Ever looked at a fancy dessert and thought, “Yeah, no way I’m making that?” Me too. But what if I told you there’s a dessert that looks like a million bucks but only demands about five minutes of actual effort (plus some chill time, obvs)? Intrigued? Good, because we’re diving into the wonderful world of Pavlova with Ice Cream, and trust me, your taste buds are about to send you a thank-you note.
Why This Recipe is Awesome
Okay, let’s be real. This isn’t just a recipe; it’s a magic trick. You take a few humble ingredients, wave your whisk, and poof! You get a crispy, chewy, cloud-like creation that screams “culinary genius.” Your friends will think you slaved away for hours, but your secret (and your minimal effort) is safe with me.
It’s practically idiot-proof. Seriously, if I can do it without setting off the smoke alarm, you absolutely can. Plus, it’s customizable, elegant, and let’s not forget the best part: it comes with ice cream. Need I say more?
Ingredients You’ll Need
Gather ’round, fellow food adventurers! Here’s your treasure map to deliciousness:
- 4 Large Egg Whites: The unsung heroes of this dessert. Make sure they’re at room temperature for the best whipping action. (Whoops, I almost said cold earlier, rookie mistake on my part, but we’ll get to that in the FAQ!). Absolutely no yolk allowed – even a tiny speck will ruin everything. Seriously, be ruthless.
- 225g Caster Sugar: This is sugar’s posh cousin. It’s finer than regular granulated sugar, so it dissolves beautifully, giving you that gorgeous glossy meringue. Don’t skimp.
- 1 tsp Cornflour (Cornstarch): Our little secret weapon for that perfect chewy centre. Shhh, it’s like a hug for your meringue.
- 1 tsp White Wine Vinegar OR Lemon Juice: Sounds weird, tastes amazing. This acid helps stabilise the meringue, making it extra fluffy and fabulous. Trust the process.
- 1 tsp Vanilla Extract: Because everything’s better with a splash of vanilla. Duh.
- Your Favourite Ice Cream: This is non-negotiable. Vanilla is classic, but chocolate, strawberry, pistachio… whatever makes your heart sing. Go wild!
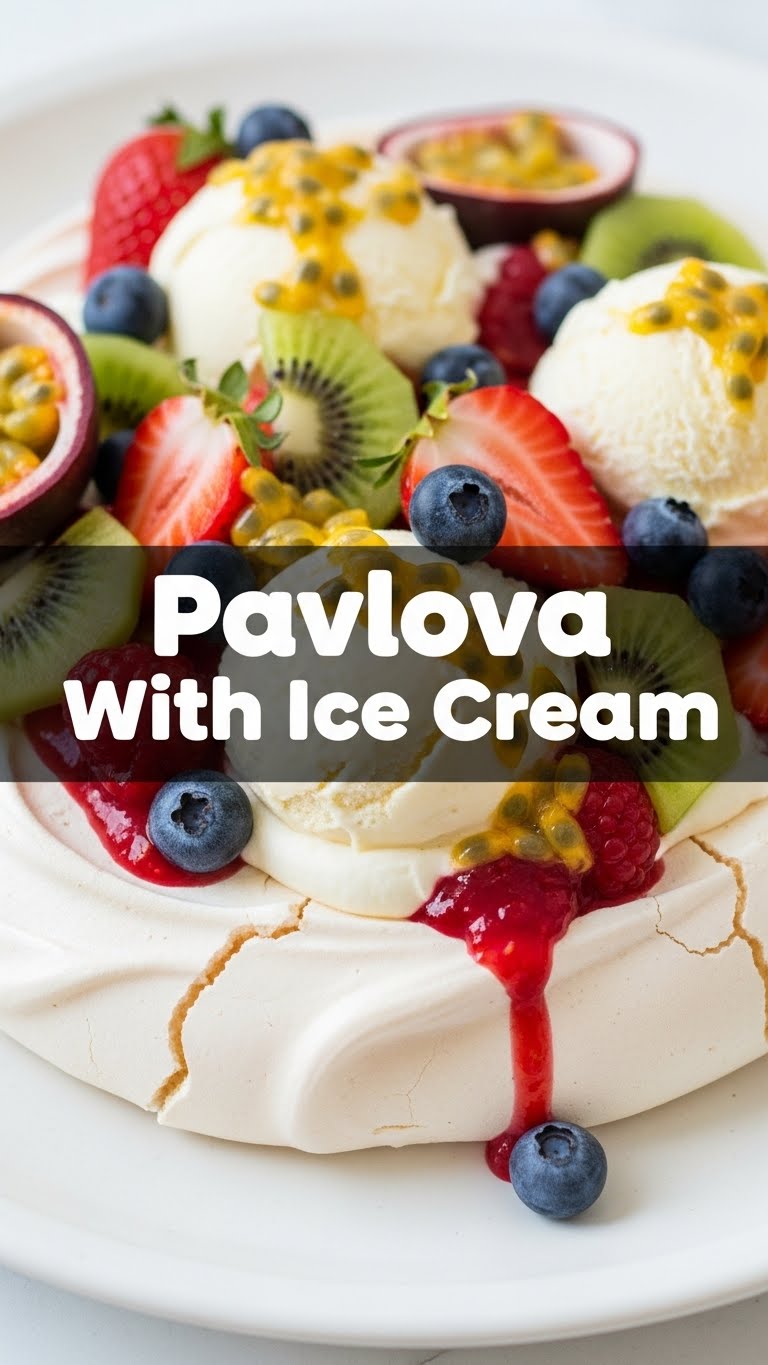
- Fresh Fruit for Topping: Berries (strawberries, raspberries, blueberries) are a classic choice and add a beautiful pop of colour and freshness.
- Optional: Whipped Cream: If you want to go full-on decadent. We’re not judging.
Step-by-Step Instructions
- Preheat & Prep: Preheat your oven to a cool 120°C (250°F). Line a baking tray with parchment paper. If you’re feeling fancy, draw a 20-23cm (8-9 inch) circle on the paper with a pencil (pencil side down, obvs!).
- Whip Those Whites: Get your room-temperature egg whites into a *super clean*, dry bowl. If you have a stand mixer, now’s its time to shine. Whisk them on medium-high speed until they form soft, foamy peaks. Think fluffy clouds forming.
- Sugar Time (Gradually!): Now, here’s the crucial bit. Gradually, add the caster sugar, one tablespoon at a time, while continuously whisking. Keep whisking until the mixture is thick, glossy, and forms stiff peaks. You should be able to hold the bowl upside down over your head without fear (but maybe test this over a sink first, just in case!). This could take 7-10 minutes, so be patient.
- The Secret Sauce: Gently fold in the cornflour, white wine vinegar (or lemon juice), and vanilla extract. And when I say gently, I mean gently! You’ve worked hard to get all that air in; don’t deflate your glorious meringue.
- Shape & Bake: Spoon the meringue mixture onto your prepared baking tray, using the circle you drew as a guide (or just freehand it, YOLO!). Create a crater or a slight dip in the middle – this is where all that delicious ice cream is going to sit. Pop it into the preheated oven.
- Low and Slow: Bake for about 1 hour to 1 hour 15 minutes. The outside should be firm to the touch. Once it’s done, here’s a super important tip: turn off the oven, but leave the pavlova inside to cool completely with the oven door ajar. This prevents cracking and gives you that perfect chewy centre. This cooling process can take a few hours, or even overnight. Patience, my friend, patience.
- Assemble & Serve: Once your pavlova base is completely cool, carefully transfer it to a serving plate. Fill the centre with generous scoops of your chosen ice cream. Pile on the fresh fruit, and if you’re feeling extra, a dollop of whipped cream. Serve immediately and bask in the glory!
Common Mistakes to Avoid
We all make mistakes, but some are more catastrophic than others when it comes to pavlova. Learn from my (and others’) mishaps!
- Yolk Contamination: Seriously, even a tiny speck of yolk is the enemy of egg whites. Your meringue won’t whip properly. Be vigilant when separating eggs!
- Greasy Bowl/Utensils: Fat, like yolk, will prevent your egg whites from whipping up. Make sure your bowl and whisk are squeaky clean and dry.
- Not Whisking Enough (or Too Much): You need stiff, glossy peaks. If it’s too soft, your pavlova will spread. If you overwhisk, it can become grainy and separate. Find that sweet spot!
- Adding Sugar Too Fast: This is not a race! Adding sugar gradually allows it to dissolve properly, giving you a stable, glossy meringue.
- Opening the Oven Door Early: **Resist the urge to peek!** The sudden change in temperature can cause your beautiful meringue to crack. Let it cool slowly in the oven.
- Assembling Too Soon: Only put the ice cream and toppings on right before serving. Meringue + moisture = sadness.
Alternatives & Substitutions
Cooking is all about having fun and making it your own, right?
- Vinegar Swap: Don’t have white wine vinegar? Lemon juice works just as well to provide that crucial acidity.
- Sugar Type: Can you use regular granulated sugar? Technically yes, but your meringue might not be as smooth, and you could get a slightly grainy texture. Caster sugar is truly worth the tiny extra effort to find.
- Ice Cream Flavours: Go wild! While vanilla is a classic pairing, a scoop of coffee, salted caramel, or even a tangy sorbet could be epic.
- Topping Extravaganza: Beyond berries, consider sliced kiwi, passionfruit pulp, mango chunks, a drizzle of chocolate sauce, toasted nuts, or even some candied citrus peel. Make it a feast for the eyes!
FAQ (Frequently Asked Questions)
- My meringue cracked! What did I do wrong?
Honestly, a few cracks are just character, not a catastrophe! Usually, it’s from cooling too fast. Next time, try leaving it in the oven (turned off, door ajar) for even longer, maybe even overnight. **Patience, my friend, is key.**
- Can I make the pavlova base ahead of time?
Absolutely! The baked and cooled meringue base can be stored in an airtight container at room temperature for up to 2-3 days. Just make sure it’s completely cool before storing, and only assemble with ice cream and toppings right before serving.
- What if I don’t have cornflour?
It helps with the chewy centre, but you can technically omit it. Your pavlova might be a bit more uniformly crisp, rather than having that lovely marshmallowy inside. Still delicious, just a slightly different texture.
- Why do I need room-temperature egg whites? I thought cold was better for separating?
Aha! Good question! Cold egg whites are indeed easier to separate, but **room-temperature egg whites whip up with more volume and stability.** So, separate them cold, then let them sit out for 20-30 minutes before whipping. Consider that my little pro-tip correction!
- Can I use a hand mixer instead of a stand mixer?
Oh, definitely! Your arm might get a bit of a workout, but a hand mixer will absolutely do the job. Just give it time to work its magic.
- Is this healthy?
Pfft, next question! It has fruit, so… yes? Let’s just say it’s soul-healthy. Sometimes you just need a dessert that makes you happy, and this one delivers.
Final Thoughts
So there you have it, folks! A dessert that screams “I’m fancy!” but whispers “I barely broke a sweat.” This Pavlova with Ice Cream is your ticket to looking like a seasoned chef with minimal actual effort. It’s perfect for impressing guests, celebrating a special occasion, or just treating yourself because, frankly, you deserve it.
Go on, whip up this cloud of deliciousness. You’ve totally got this. And remember, cooking is about having fun, not perfection. Mostly. Now go forth and conquer the dessert world!


