Okay, let’s be real. Sometimes you want dessert. Not just *any* dessert, but something that screams “I’m fancy and have my life together,” while secretly, you spent about 15 minutes of actual effort. You want a showstopper without the show-off fuss. My friend, I hear you. And I raise you: Panna Cotta with Fruit!
Why This Recipe is Awesome
This isn’t just a dessert; it’s a magic trick. Seriously, it’s so easy, your cat could probably make it (if your cat had opposable thumbs and an interest in culinary arts). It screams ‘I’m a sophisticated adult’ but whispers ‘I literally just stirred some stuff and put it in the fridge’. Plus, it’s cool, creamy, and ridiculously versatile. It’s the perfect canvas for whatever gorgeous fruit is in season. And **bonus points**: it’s naturally gluten-free! Take that, complicated bakes!
Ingredients You’ll Need
Get ready for a super short list, because who needs a million things, right?
- Heavy Cream: About 2 cups (480ml). This is where the magic happens. Don’t skimp.
- Granulated Sugar: A modest 1/4 cup (50g). Just enough sweetness, not a dental nightmare.
- Vanilla Extract: 1 teaspoon. Use the good stuff, not the imitation kind, unless you like your panna cotta tasting like a science experiment gone wrong.
- Unflavored Gelatin: 1 packet (about 2 1/4 teaspoons). This is the secret agent that makes it jiggle just right.
- Cold Water: 2 tablespoons. For blooming that gelatin.
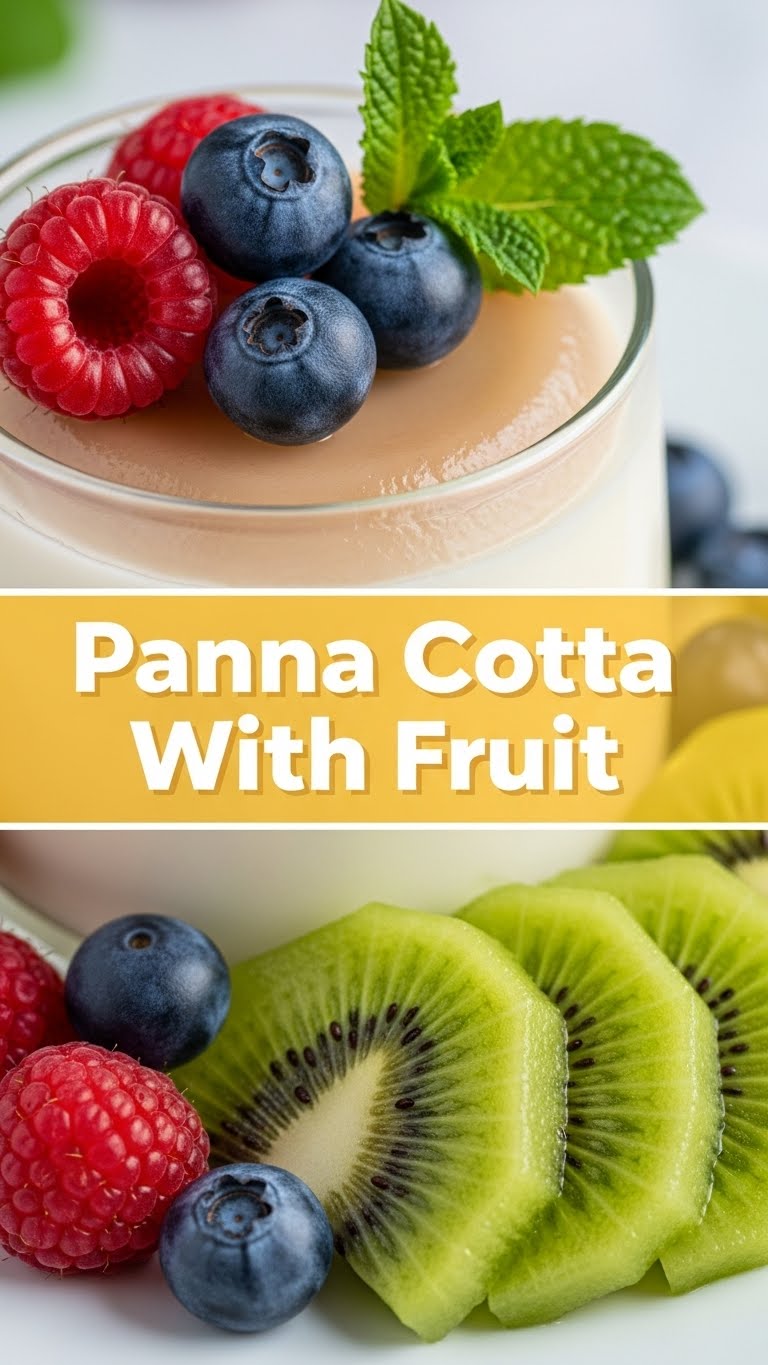
- Fresh Fruit: Your favorite! Berries (strawberries, raspberries, blueberries) are classic, but sliced peaches, kiwi, or mango work beautifully too. Whatever makes your heart sing, about 1-2 cups.
- Optional: A tiny squeeze of lemon juice or a pinch of sugar for your fruit, if it needs a little pep.
Step-by-Step Instructions
Get ready to feel like a culinary genius!
- Gelatin Glow-Up: In a small bowl, sprinkle the gelatin over the cold water. Let it sit for about 5 minutes. It’ll “bloom” and get all wrinkly and spongy. This is good! It means it’s ready to work its magic.
- Cream Dream: Pour the heavy cream and sugar into a medium saucepan. Heat over medium heat, stirring occasionally, just until the sugar dissolves and the cream is warm to the touch. You’re not boiling it, just making it cozy.
- Vanilla Vibes: Remove the saucepan from the heat. Stir in the vanilla extract.
- Melt the Magic: Add the bloomed gelatin to the warm cream mixture. Whisk vigorously for about 1-2 minutes until the gelatin is completely dissolved. **No lumps allowed!** You want it smooth.
- Pour & Chill: Divide the mixture evenly among four small ramekins, small glasses, or even cute little teacups (if you’re feeling extra whimsical). Cover them lightly with plastic wrap.
- Beauty Sleep: Pop those beauties into the fridge for at least 4 hours, or ideally, overnight. This is the hardest part: waiting!
- Fruit Fantasia: While your panna cotta is chilling, prepare your fruit. Wash it, slice it, dice it – whatever looks pretty. If your fruit isn’t super sweet, you can toss it with a tiny bit of sugar or a splash of lemon juice to brighten it up.
- Serve & Slay: When ready to serve, top your perfectly wobbly panna cotta with a generous helping of fresh fruit. If you want to unmold them, briefly dip the bottoms of the ramekins in warm water for about 10-15 seconds, then invert onto a plate. It should slide right out!
Common Mistakes to Avoid
Because even easy recipes have their pitfalls, and we want to avoid them for maximum deliciousness:
- The Gelatin Ghost: Not dissolving your gelatin properly means you’ll have weird little jiggly bits that aren’t quite right. **Bloom it thoroughly, and whisk well into the warm cream until *completely* melted.**
- The Boil-Over Blunder: Don’t boil your cream! Just heat it until the sugar dissolves. Boiling can make the texture grainy. We want silky smooth, remember?
- The Impatient Chef: Don’t peek too soon! Panna cotta needs its beauty sleep in the fridge. **Give it at least 4 hours, ideally overnight, for a perfect set.** Trust the process!
- The Fruit First Fiasco: Don’t add the fruit *before* chilling the panna cotta. It’ll just sink to the bottom and look sad. Add it right before serving for that vibrant, fresh pop.
Alternatives & Substitutions
Feel free to play around, you culinary rebel!
- Cream Choices: You can use a mix of heavy cream and whole milk for a lighter panna cotta, though I personally find the all-cream version superior (IMO, go big or go home!).
- Sweetener Swaps: Want to use maple syrup or honey instead of granulated sugar? Go for it! Start with a smaller amount (maybe 3 tablespoons) and taste the cream before adding gelatin, as these are sweeter.
- Flavor Fun: Infuse your cream with other flavors! A vanilla bean pod (remove before adding gelatin), a few strips of orange or lemon zest, a cinnamon stick, or even a teaspoon of espresso powder for a coffee panna cotta. So many possibilities!
- Fruit Freedom: No fresh fruit? A simple berry compote (just berries simmered with a tiny bit of sugar) works wonders, or even a drizzle of good quality jam or fruit curd.
FAQ (Frequently Asked Questions)
- Can I make this dairy-free? You absolutely can! Use full-fat coconut milk (the canned kind, not the beverage) or a rich oat milk. The texture will be slightly different, but still delicious.
- What if I don’t have gelatin? Are there substitutes? Well, technically yes, but it won’t be panna cotta. Agar-agar can be used as a vegan alternative, but the ratios and method are a bit different, and the texture is firmer. For classic panna cotta, gelatin is key!
- How long does panna cotta last in the fridge? Covered, it’ll last for 3-4 days. It’s perfect for making ahead for a dinner party, **FYI**. Just add the fresh fruit right before serving.
- Can I use frozen fruit? You can! Thaw it first, then drain any excess liquid. You might want to sweeten it a bit more, as freezing can dull some of the natural sweetness.
- My panna cotta isn’t setting! What did I do wrong? Likely culprits: not enough gelatin, or your cream mixture wasn’t warm enough to fully dissolve the gelatin. Make sure you see no granules before chilling!
Final Thoughts
And there you have it! A dessert that tastes like a dream, looks like a million bucks, and took you next to no effort. You’re basically a culinary wizard. Now go impress someone—or yourself—with your new skills. You’ve earned that delicious, wobbly, fruity goodness!


