So, you’re craving something seriously indulgent but the thought of turning on the oven makes you want to take a nap? Been there, done that, got the crumb-stained t-shirt. Lucky for you, I’ve got a recipe that’s about to become your new best friend: The Oreo Ice Cream Cake with Chocolate Ganache. It’s gloriously no-bake, outrageously delicious, and ridiculously easy. Prepare for greatness, my friend.
Why This Recipe is Awesome
Let’s be real, you’re not trying to win a Michelin star here; you just want something yummy that makes you feel like a culinary genius without, you know, actually being one. This cake is your ticket! It’s **no-bake**, meaning your oven can stay blissfully dormant. It requires **minimal effort** but delivers maximum “OMG, you made this?!” reactions. Plus, it combines Oreos (the cookie of champions), ice cream (the dessert of dreams), and chocolate ganache (the silky smooth crown jewel). Honestly, it’s so idiot-proof, even I didn’t mess it up, and my kitchen skills sometimes peak at instant noodles. You literally cannot go wrong here. Seriously, you can’t.
Ingredients You’ll Need
Gather ’round, fellow snack enthusiast, here’s your shopping list. Don’t worry, it’s short and sweet, just like your patience when hunger strikes!
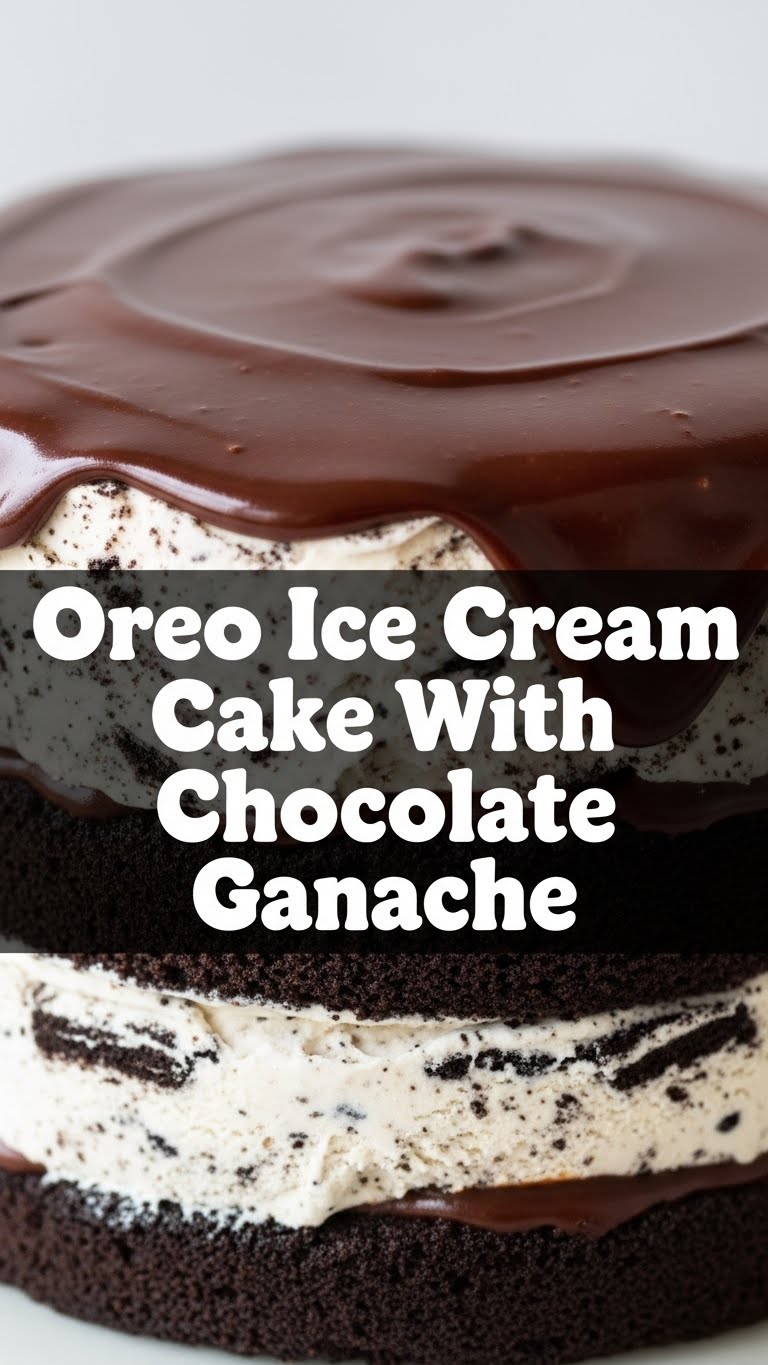
- 35-40 Oreo Cookies: The OG, the legend, the star of our show. Grab a family pack, you’ll thank me later.
- 6 tablespoons Unsalted Butter: Melted. This is the glue that holds our Oreo dreams together.
- 1.5 quarts Vanilla Ice Cream: Or Cookies & Cream if you want to double down on the Oreo goodness. Softened, so it’s spreadable. Don’t grab the low-fat stuff unless you want to disappoint yourself.
- 1 cup Heavy Cream: For that luscious, glossy ganache.
- 6 ounces Semi-Sweet Chocolate Chips or finely chopped chocolate: Use good quality chocolate here, it makes a difference! No sad, waxy stuff.
- 1 tablespoon Light Corn Syrup (optional): This is your ganache’s secret weapon for extra shine and smoothness. You can skip it, but why would you?
- Pinch of Salt: Just a tiny bit, to make the chocolate ganache sing.
- Extra Oreos (for garnish): Because more Oreos are always the answer. Duh.
Step-by-Step Instructions
Alright, let’s get down to business. Put on some tunes, grab your apron (or don’t, I won’t judge), and let’s make some magic!
Crush those Oreos! Grab 35-40 Oreos and put them in a food processor. Pulse until they’re fine crumbs. No food processor? No problem! Stick ’em in a zip-top bag and smash ’em with a rolling pin or a heavy pan. It’s a great stress reliever!
Make the Crust: Melt your 6 tablespoons of butter. Pour the melted butter over your Oreo crumbs and mix it all up until it looks like wet sand. Press this mixture firmly into the bottom of a 9-inch springform pan. You want a nice, even layer. Pop it in the freezer for at least 15-20 minutes to set while you move on.
Ice Cream Layer: While the crust chills, let your ice cream soften on the counter for about 10-15 minutes. It should be scoopable but not completely melted. Spread the softened ice cream evenly over the chilled Oreo crust. Use the back of a spoon or an offset spatula for a smooth finish. Freeze the cake for at least 2-3 hours, or until the ice cream is rock solid.
Ganache Time! In a microwave-safe bowl, combine your chocolate chips (or chopped chocolate), heavy cream, corn syrup (if using), and a pinch of salt. Microwave in 30-second intervals, stirring well after each, until the chocolate is completely melted and the mixture is smooth and glossy. This usually takes 1-2 minutes. Alternatively, heat the cream in a saucepan until just simmering, then pour it over the chocolate in a heatproof bowl. Let it sit for 5 minutes, then stir until smooth. Let the ganache cool down a bit – you want it warm and pourable, but not hot enough to melt your ice cream.
Pour and Chill: Carefully pour the cooled chocolate ganache over the frozen ice cream layer. Gently tilt the pan to ensure an even coating. Work quickly here! Pop the cake back into the freezer for at least another hour, or until the ganache is set.
Garnish and Serve: Once the ganache is firm, take the cake out of the freezer. Run a thin knife around the edge of the springform pan before releasing the sides. Garnish with some crushed Oreos or even whole ones, because why not? Let it sit at room temperature for 5-10 minutes before slicing, so it’s easier to cut. Slice it up and prepare for compliments!
Common Mistakes to Avoid
Listen, we all make mistakes. But with a few pointers, you can avoid the common pitfalls and look like a total pro. You’re welcome.
- Not Chilling Enough: Impatience is not a virtue when making ice cream cake. **Each layer needs to be properly frozen** before adding the next. If your ice cream is too soft or your ganache is too hot, things will get messy. Trust the process.
- Over-Crushing Oreos: While you want fine crumbs, don’t turn them into a powder. A little texture is nice! It adds to the charm, IMO.
- Overheating Ganache: Microwaving chocolate too long can make it seize and turn into a sad, lumpy mess. Go slow, stir often. If you burn it, just start over. It happens!
- Cutting Cold: Trying to slice this cake straight out of the deep freeze is a recipe for cracked ganache and a bent knife. Let it sit out for 5-10 minutes. Patience, young padawan.
- Eating it all in one sitting: Okay, maybe not a mistake, but definitely a test of willpower. Share the love (or don’t, I’m not your boss).
Alternatives & Substitutions
Feeling creative? Want to put your own spin on this masterpiece? Go for it! This recipe is super flexible.
- Ice Cream Flavors: Don’t limit yourself to vanilla! Rocky Road, mint chocolate chip, coffee, strawberry… literally any flavor works. Try a peanut butter ice cream for an ultimate flavor bomb!
- Cookie Crusts: Not an Oreo superfan (gasp!)? Use graham crackers, Biscoff cookies, or even chocolate chip cookies for the crust. Just use the same butter-to-crumb ratio.
- Ganache Variations: Instead of semi-sweet, try milk chocolate for a sweeter ganache, or dark chocolate for a richer, more intense flavor. You could even swap it for a white chocolate ganache!
- Add-ins: Fold in some chopped candies, mini chocolate chips, or sprinkles into your softened ice cream before spreading. Swirl in some caramel or hot fudge sauce. The possibilities are endless!
- Whipped Cream Topping: Before serving, whip up some heavy cream with a little powdered sugar and vanilla for a fluffy, cloud-like topping.
FAQ (Frequently Asked Questions)
Got questions? I’ve got answers. And maybe some sass.
Can I use margarine instead of butter for the crust?
Well, technically yes, but why hurt your soul like that? Butter just tastes better, and this is a cake of indulgence, so let’s lean into it, shall we?
How long does this ice cream cake last in the freezer?
If properly wrapped (plastic wrap + foil!), it’ll last for about 2-3 weeks. But let’s be real, it’s rarely around that long. FYI, ice cream can pick up freezer odors, so wrap it well!
Do I absolutely need a springform pan?
A springform pan makes life *so* much easier for release. If you don’t have one, you can line a regular 9-inch round cake pan with plastic wrap, leaving an overhang to lift the cake out later. It’s a bit trickier, but totally doable.
My ganache seized! What did I do wrong?
Ah, the dreaded seized ganache. Usually, it means it got too hot, or a tiny bit of water got in. Try adding a tablespoon of very hot cream or milk and whisking vigorously. Sometimes it saves it, sometimes it’s a lost cause. Don’t beat yourself up!
Can I make this cake ahead of time for a party?
Absolutely! This is a fantastic make-ahead dessert. You can assemble it a day or two in advance. Just make sure it’s wrapped tightly to prevent freezer burn.
Can I skip the corn syrup in the ganache?
Yep, you can. The corn syrup just gives the ganache a beautiful shine and a slightly smoother texture. It’ll still taste amazing without it, so no stress if you don’t have it on hand.
Final Thoughts
See? That wasn’t so scary, was it? You’ve just created a show-stopping dessert with minimal fuss and maximum deliciousness. You’re basically a dessert ninja! Now go impress someone – or yourself – with your new culinary skills. You’ve earned it! Grab a slice, put your feet up, and enjoy the sweet, sweet victory. You deserve it, champ.


