So, you’re craving something ridiculously good, a dessert mashup that’s both nostalgic and next-level, but also, like, requires minimal brain power? Same, friend, same. Get ready to have your cookie world rocked because we’re diving headfirst into the glorious, crumbled chaos that is **Oreo Chocolate Chip Cookies!** Forget choosing between two of your favorite things; today, we’re having both. You’re welcome.
Why This Recipe is Awesome
Okay, let’s be real. In a world full of complicated recipes and Pinterest fails, this one is your culinary guardian angel. Why? Because it’s utterly foolproof. Seriously, even if your oven is mostly used for storing extra pans, you’ve got this. We’re talking classic chocolate chip cookies, but with the added genius of crushed Oreos mingling in the dough. It’s like a party in your mouth, and everyone’s invited.
Plus, it’s a total crowd-pleaser. Bring these bad boys to any gathering, and you’ll instantly become everyone’s favorite person. It’s also surprisingly quick, which means less time baking and more time… well, eating the dough. (Don’t worry, I won’t tell.)
Ingredients You’ll Need
Gather ’round, my sweet-toothed companions! Here’s your shopping list for edible happiness. Don’t cheap out on the good stuff, you deserve it!
- 1 cup (2 sticks) unsalted butter, softened. And by softened, I mean left on the counter for a bit, not melted into a puddle. We’re not making soup.
- ¾ cup granulated sugar. The white stuff. For that perfect crisp edge.
- ¾ cup packed light brown sugar. This is your chewy cookie secret weapon. Don’t skip it!
- 2 large eggs. Room temperature if you’re feeling fancy, but straight from the fridge works too, we’re not baking for the Queen here.
- 1 teaspoon vanilla extract. Don’t skimp. It’s the soul of the cookie.
- 2 ¼ cups all-purpose flour. No need for fancy pastry flour, regular ol’ AP is fine.
- 1 teaspoon baking soda. For that perfect lift.
- ½ teaspoon salt. Yes, even in sweet things. It makes everything taste *more*.
- 1 ½ cups semi-sweet chocolate chips. Or milk chocolate, dark chocolate, whatever makes your heart sing. Go wild!
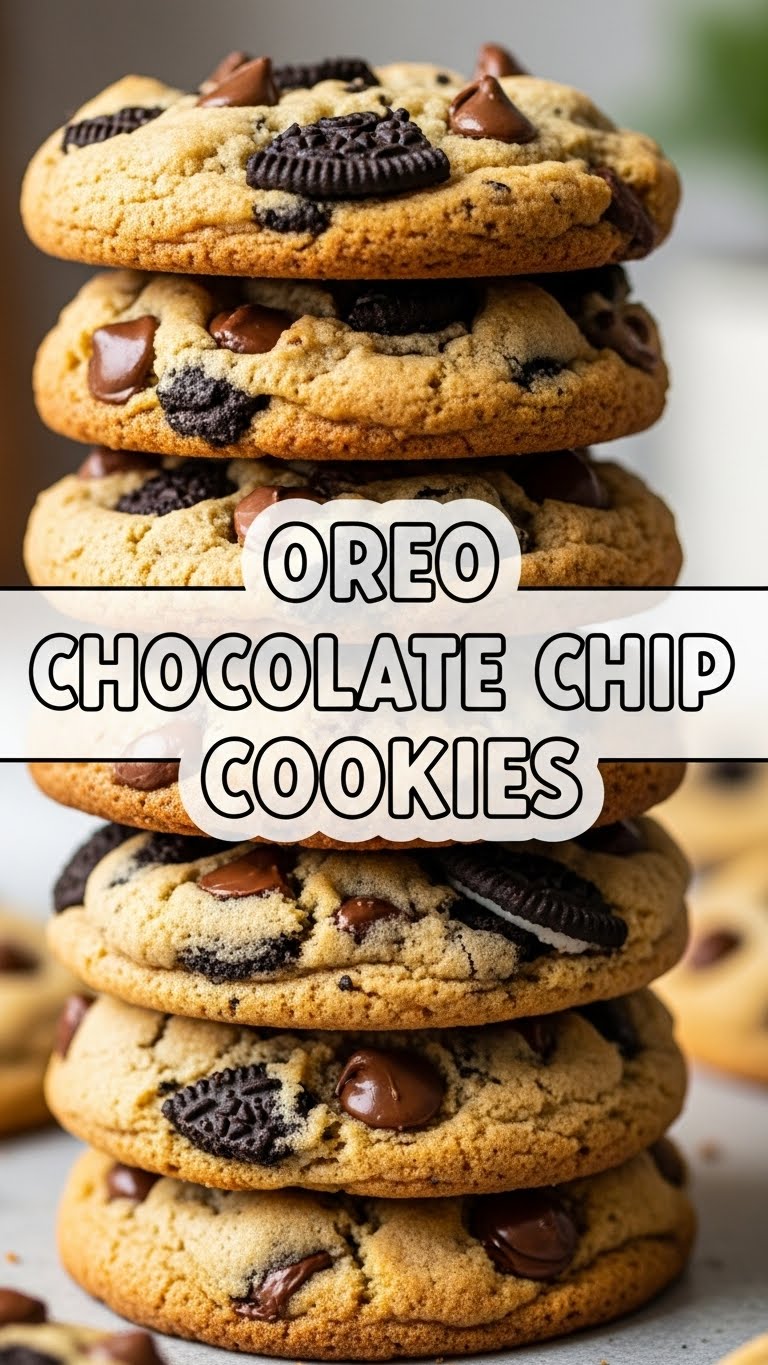
- 10-12 Oreo cookies, roughly chopped into chunky bits. The star of our show! Leave some bigger chunks for visual appeal and epic crunch.
Step-by-Step Instructions
Alright, apron on (or not, who cares?), let’s get baking! These steps are so easy, you could probably do them blindfolded. (Please don’t, for safety reasons.)
- Preheat & Prep: First things first, preheat your oven to 375°F (190°C). While it’s getting toasty, line a couple of baking sheets with parchment paper. This makes cleanup a breeze and prevents sticking. You’ll thank me later.
- Cream the Goods: In a large mixing bowl, beat your softened butter, granulated sugar, and brown sugar together. Cream ’em until they’re light and fluffy, about 2-3 minutes. This adds air and makes your cookies tender.
- Egg-cellent Addition: Crack in those two eggs, one at a time, mixing well after each. Then, stir in the vanilla extract. Scrape down the sides of the bowl to make sure everything is incorporated beautifully.
- Dry Mix Magic: In a separate, smaller bowl, whisk together the flour, baking soda, and salt. Give it a good whisk to make sure everything is evenly distributed. This prevents pockets of unmixed ingredients.
- Combine Forces: Gradually add the dry ingredients to the wet ingredients, mixing on low speed until *just* combined. Important tip: don’t overmix! Overmixing develops the gluten, leading to tough cookies. We want tender, chewy goodness, not hockey pucks.
- The Best Part: Fold in your chocolate chips and those glorious chopped Oreos. Use a spatula for this part; gentle folding keeps the dough tender and those delicious bits evenly distributed.
- Scoop & Space: Drop rounded tablespoons (or use a cookie scoop for consistency) of dough onto your prepared baking sheets. Make sure to leave a couple of inches between each cookie, as they will spread a bit.
- Bake ‘Em Up: Pop those sheets into the preheated oven for 9-12 minutes, or until the edges are golden brown and the centers are still looking just a *little* soft. That slight underbaking is the secret to gooey centers.
- Cool Down: Let the cookies cool on the baking sheet for about 5 minutes before transferring them to a wire rack to cool completely. Or, you know, eat one hot off the sheet and burn your tongue. It’s part of the experience, IMO.
Common Mistakes to Avoid
We’ve all been there, staring at a tray of disappointing cookies. But not today, my friend! Here are a few traps to sidestep:
- Overmixing the Dough: I said it once, I’ll say it again: **STOP MIXING as soon as the flour is incorporated!** Overmixing = tough cookies. We’re aiming for tender, not tire rubber.
- Using Cold Butter: If your butter is straight from the fridge, it won’t cream properly with the sugar, leading to a denser, less airy cookie. Room temperature is key for that fluffy texture.
- Not Preheating the Oven: Impatience is a virtue, but not in baking. A properly preheated oven ensures even baking from the start. Rookie mistake otherwise!
- Baking Too Long: The line between perfectly gooey and tragically dry is thin. Remember: pull them out when the edges are set and golden, but the centers still look slightly soft. They’ll continue to cook a bit on the hot sheet.
- Eating All the Oreo Chunks While Chopping: A true test of willpower. Try to leave some for the actual cookies, okay?
Alternatives & Substitutions
Feeling adventurous? Or just realized you’re missing an ingredient? No stress, here are some fun twists:
- Chocolate Chip Swap: Not a fan of semi-sweet? Use milk chocolate, dark chocolate, white chocolate, or even a mix! Peanut butter chips could also be a fun (if chaotic) addition.
- Oreo Variations: Mint Oreos? Golden Oreos? Peanut Butter Oreos? They all work! Each will give your cookies a slightly different, but equally delicious, personality.
- Butter Replacements: For a dairy-free option, you can try plant-based butter sticks. Just be aware that the texture might be slightly different. But hey, experimentation is half the fun!
- Flour Power: If you’re gluten-free, an all-purpose gluten-free flour blend can often be substituted 1:1. Just make sure it contains xanthan gum, or add a tiny bit if it doesn’t.
FAQ (Frequently Asked Questions)
Got questions? I’ve got answers! (Mostly.)
Can I use margarine instead of butter? Well, technically yes, but why hurt your soul like that? Butter provides superior flavor and texture. If you must, use stick margarine, but be warned: results may vary significantly.
Do I have to chill the dough? You don’t *have* to, but a 30-minute chill (or even overnight!) can deepen the flavors and make for a chewier cookie that spreads less. It’s a pro move if you have the patience.
My cookies spread too much! What happened? Likely culprits: your butter was too warm/melted, your oven wasn’t hot enough (or too hot and then dropped), or you added too little flour. **Make sure your butter is softened, not melted.**
What if I don’t have baking soda? Can I use baking powder? Baking soda and baking powder are BFFs but not interchangeable 1:1. Baking soda needs an acid (like brown sugar has a bit) to react, while baking powder has its own acid. If you *only* have baking powder, you might need to use more, and your cookie’s texture might be a little different. It’s best to stick to baking soda for this recipe for that perfect chew.
How long do these cookies last? If they last more than 24 hours in your house, you’re either a saint or not making enough! Seriously though, stored in an airtight container at room temp, they’re best for 3-4 days. You can also freeze the dough balls for later cookie emergencies, FYI.
Should I crush the Oreos finely or leave them chunky? I prefer chunky bits for texture and visual appeal, but it’s totally up to you! Finer crumbs will blend more into the dough, while chunks give you those delightful surprise crunch moments.
Final Thoughts
There you have it, folks! A ridiculously easy, outrageously delicious recipe for Oreo Chocolate Chip Cookies that will make you a legend in your own kitchen (and beyond). No need for culinary degrees or fancy gadgets, just a craving for something sweet and a willingness to get a little flour on your nose. So go forth, bake these beauties, and impress someone—or yourself—with your new culinary skills. You’ve earned it!


