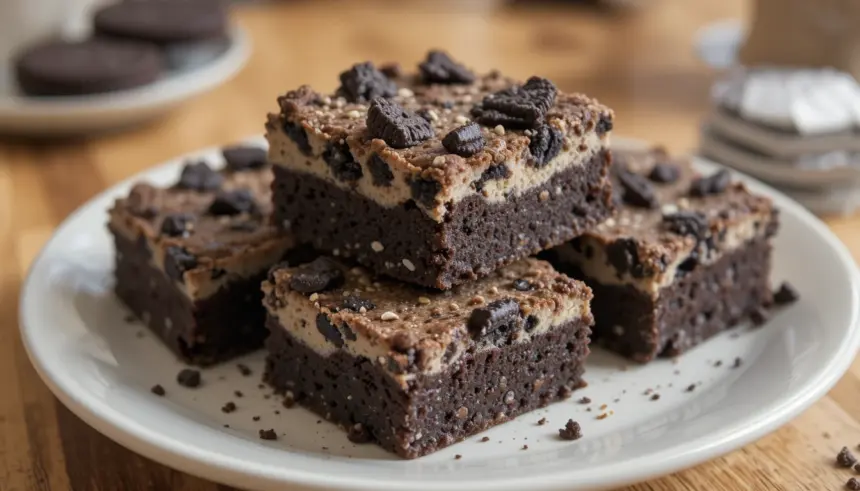
Oreo Blondies With an Oreo Cookie Crust: Because Life’s Too Short for Boring Desserts
So, you’re staring into the abyss of your snack cabinet, contemplating a life of sad, plain cookies, huh? Or maybe you’re just feeling that irresistible pull of something sweet, something decadent, something… *extra*. Well, my friend, you’ve come to the right place! Forget those fancy, labor-intensive desserts that require a PhD in pastry. We’re diving headfirst into the glorious world of Oreo Blondies with an Oreo Cookie Crust. Get ready for a flavor explosion that’s ridiculously easy to whip up.
Why This Recipe is Awesome (Seriously, It’s a Game Changer)
Let’s be real: this isn’t your grandma’s delicate shortbread. This is pure, unadulterated joy in bar form. The crust? It’s basically a giant Oreo cookie hug for your blondie. And the blondie itself? Chewy, gooey, studded with even MORE Oreos. It’s the perfect balance of sweet and crunchy, soft and fudgy. Plus, it’s pretty much **idiot-proof**. If I can make these without turning my kitchen into a disaster zone (most of the time), you definitely can. It’s the ultimate dessert for when you want to impress without breaking a sweat.
Ingredients You’ll Need (Don’t Panic, It’s Not That Scary)
Alright, gather your troops. Here’s what you’ll need to make this magic happen:
- For the Oreo Crust:
- About 20-24 Oreos (the classic ones are best, but feel free to experiment later!)
- 4 tablespoons unsalted butter, melted (the good stuff, please)
- For the Blondie Batter:
- 1/2 cup (1 stick) unsalted butter, softened (crucial for that fudgy texture!)
- 1 cup packed light brown sugar (for that irresistible chewiness)
- 2 large eggs (room temperature is a nice bonus, but not a deal-breaker)
- 1 teaspoon vanilla extract (don’t skip this, it’s the secret weapon!)
- 1 cup all-purpose flour (standard issue, no need to get fancy)
- 1/2 teaspoon baking powder (just a little lift, nothing dramatic)
- 1/4 teaspoon salt (balances all that sweetness, essential!)
- 1 cup chopped Oreos (give ‘em a good chop, like you mean it)
- Optional: A handful of mini chocolate chips because, why not?
Step-by-Step Instructions (Let’s Get Baking!)
Ready? Set? Bake!
- Preheat & Prep: Preheat your oven to 350°F (175°C). Line an 8×8 inch baking pan with parchment paper, leaving some overhang. This makes life SO much easier when you’re trying to get these beauties out.
- Crust Time: Toss those 20-24 Oreos into a food processor (or a Ziploc bag and a rolling pin if you’re feeling primal). Pulse until you have fine crumbs. Pour in the melted butter and pulse a few more times until it looks like wet sand. Press this mixture evenly into the bottom of your prepared pan. Bake for about 8-10 minutes until slightly golden. Let it cool while you make the batter.
- Creamy Dreamy Base: In a large bowl, cream together the softened butter and brown sugar until it’s light and fluffy. This might take a minute or two, so put on some tunes and enjoy the process.
- Egg-cellent Addition: Beat in the eggs one at a time, then stir in the vanilla extract. Make sure it’s all well combined.
- Dry Ingredients Unite: In a separate small bowl, whisk together the flour, baking powder, and salt.
- Combine the Magic: Gradually add the dry ingredients to the wet ingredients, mixing until just combined. **Do not overmix!** We want tender blondies, not tough hockey pucks.
- Oreo Party: Gently fold in your chopped Oreos (and chocolate chips, if using). Seriously, be gentle. We want pockets of Oreo goodness, not crumbs.
- Bake to Perfection: Spread the blondie batter evenly over the pre-baked Oreo crust. Bake for 25-30 minutes, or until a toothpick inserted into the center comes out with moist crumbs attached (not wet batter!). **Oven times can vary, so keep an eye on it!**
- Cool Down is Crucial: Let the blondies cool completely in the pan on a wire rack. This is the hardest part, I know. But trust me, cutting into warm blondies is a recipe for a messy disaster. Patience, grasshopper!
- Slice and Devour: Once completely cool, use the parchment paper overhang to lift the entire slab out of the pan. Slice into bars and prepare for pure bliss.
Common Mistakes to Avoid (Don’t Be That Guy… or Gal)
We’ve all been there, right? Let’s try to dodge these pitfalls:
- Skipping the Crust Pre-Bake: That little bake for the crust? It’s not just for show! It helps set it so it doesn’t turn into a soggy mess under your blondie.
- Overmixing the Batter: I know, I know, you want it all mixed. But seriously, **overmixing develops gluten**, which leads to tough blondies. Mix until *just* combined.
- Cutting Them Too Soon: Seriously, I know the temptation is real. But if you cut them warm, they’ll likely fall apart. Let them cool. Your future self will thank you.
- Underbaking (or Overbaking): Underbaked means gooey goo. Overbaked means dry sadness. Aim for that toothpick test with moist crumbs.
Alternatives & Substitutions (Because We’re All About Options)
Don’t have exactly what the recipe calls for? No sweat!
- Different Oreos? Feeling adventurous? Try mint Oreos, golden Oreos, or even those seasonal ones! Just a heads-up, they might slightly alter the flavor and color.
- No Food Processor? Like I mentioned, a sturdy Ziploc bag and a rolling pin (or the bottom of a heavy pan) work like a charm for crushing Oreos. It’s a good stress reliever, too!
- Nutty Addition? Feel free to toss in some chopped walnuts or pecans with the Oreos for an extra crunch. Just a suggestion, but a good one.
- Gluten-Free? You *could* try a good quality gluten-free all-purpose flour blend. I haven’t personally tested this, so results may vary, but it’s worth a shot if you’re living the GF life!
FAQ (The Burning Questions You Might Have)
- Can I make these ahead of time?
- Absolutely! These are actually better the next day when the flavors have melded. Store them in an airtight container at room temperature.
- My crust seems crumbly, what did I do wrong?
- Make sure you used enough butter! The mixture should resemble wet sand and hold together when you squeeze it. Also, pressing it down firmly helps.
- Can I freeze these?
- Yep! Wrap them tightly in plastic wrap and then in foil. They should last for a couple of months. Thaw them at room temperature before indulging.
- What’s the deal with softened butter vs. melted butter?
- Softened butter is for creaming with sugar to create air pockets for a fluffy texture (like in the blondie batter). Melted butter is for binding and moisture (like in the crust). Different jobs, different textures!
- Why do my blondies look a little pale?
- Don’t worry too much! Blondies are supposed to be lighter in color than brownies. As long as a toothpick comes out with moist crumbs, they’re good to go. Overbaking to get a deeper color will just make them dry.
- Can I add more Oreos? Like, a LOT more?
- You are speaking my language! While the recipe is balanced, if you want more Oreo action, go for it! Just be aware it might slightly affect the texture.
Final Thoughts
There you have it – a ridiculously delicious, surprisingly easy dessert that’s guaranteed to be a crowd-pleaser (even if the crowd is just you and your Netflix queue). These Oreo Blondies with an Oreo Cookie Crust are proof that you don’t need to be a gourmet chef to whip up something spectacular.
So go on, get baking! Your kitchen (and your taste buds) will thank you. Now go impress someone—or yourself—with your new culinary skills. You’ve earned it!
