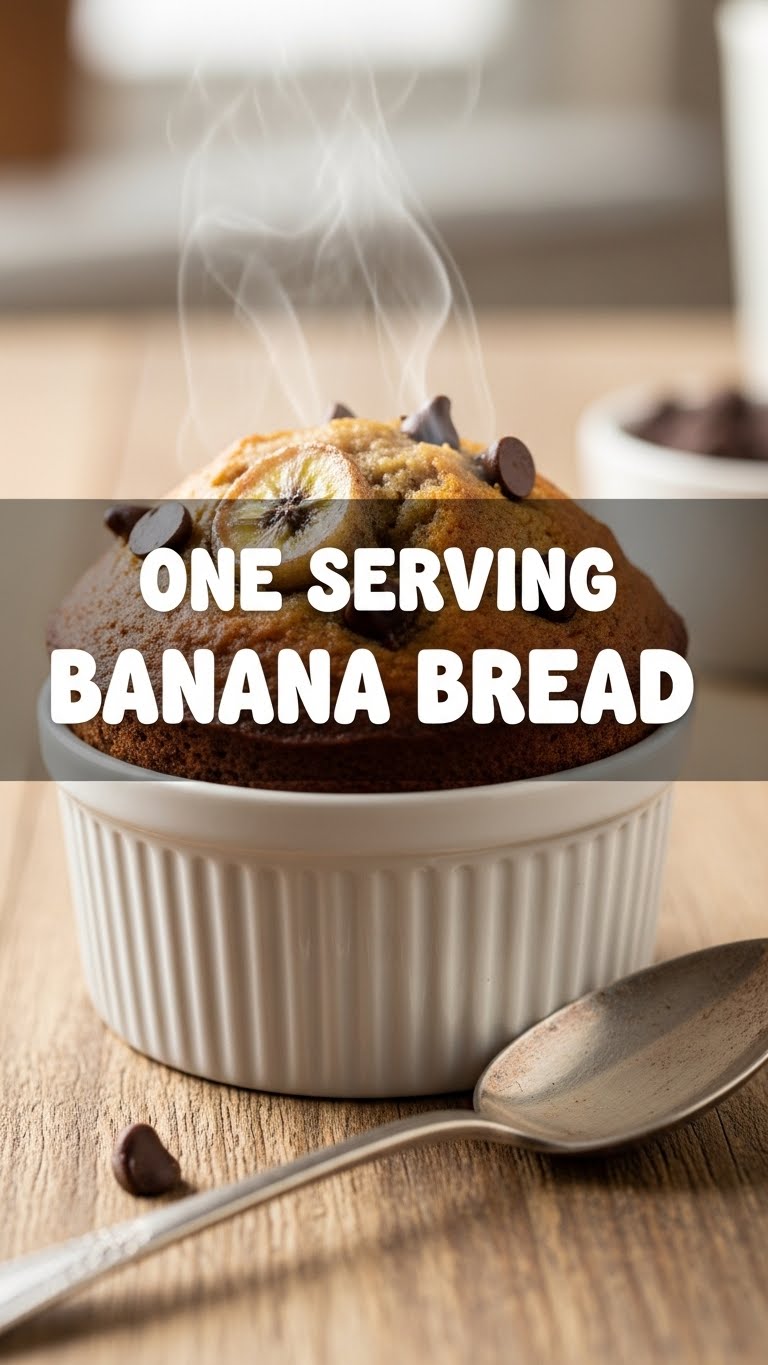
So you’re craving something warm, sweet, and comforting, but the idea of baking an entire loaf of banana bread just for yourself (and then having to *share* it, gasp!) feels like a monumental task? Or maybe you just have one sad, spotty banana judging you from the fruit bowl? Honey, I hear you. We’ve all been there, staring into the culinary abyss of too much effort for too little reward. But fear not, my friend! I’ve got a solution that’s so easy, it’ll make you wonder why you ever bothered with those giant recipes.
Why This Recipe is Awesome
Okay, buckle up, because this isn’t just *any* recipe. This is **the** recipe for those moments when you need a hug in bread form, stat. Why is it awesome, you ask? Let me count the ways:
- **Single Serving Nirvana:** No leftovers to tempt you for days. No pressure to share. It’s all yours, baby!
- **Minimal Dishes:** We’re talking one bowl (maybe two if you’re fancy), one ramekin. That’s it! Your dishwasher (or your hands) will thank you.
- **Idiot-Proof:** Seriously. If I can make this without setting off the smoke detector, you can too. It’s incredibly forgiving.
- **Quick as a Bunny:** From mixing to munching, you’re looking at about 30-35 minutes. Perfect for those sudden, intense cravings.
- **Uses Up That One Banana:** You know the one. The forgotten soldier, turning browner by the hour. Give it a glorious purpose!
Ingredients You’ll Need
Gather your troops! Here’s what you’ll need for your solo banana bread adventure:
- **1 Ripe Banana:** The spottier, the better! We’re talking brown spots, not green. That’s where all the magic sweetness hides.
- **2 Tablespoons Melted Unsalted Butter:** Or coconut oil, if you’re feeling tropical. Just no margarine, unless you want to hurt my feelings.
- **2 Tablespoons Granulated Sugar:** Brown sugar works too if you want a deeper, more caramel-y vibe. Your call, boss!
- **1/4 Teaspoon Vanilla Extract:** A little splash for that “oomph.” Don’t skip it!
- **1/4 Teaspoon Baking Soda:** Our leavening friend. Make sure it’s not expired, unless you like dense bricks.
- **Pinch of Salt:** Just a tiny bit to make all the other flavors sing.
- **1/4 Cup All-Purpose Flour:** The foundation of our delicious dream.
- **Optional Add-ins (1-2 tablespoons):** Chocolate chips (duh!), chopped nuts (walnuts or pecans, classic!), or a sprinkle of cinnamon. Go wild!
Step-by-Step Instructions
Alright, chef, let’s get cooking! This is going to be so easy, you’ll giggle.
- **Preheat Your Oven & Prep Your Ramekin:** Set that oven to **350°F (175°C)**. While it’s heating, grab an oven-safe ramekin (about 6-8 oz capacity) or a jumbo muffin tin cavity. Lightly grease it with butter or cooking spray. Don’t skip this, unless you enjoy playing “pry the banana bread.”
- **Mash That Banana:** In a small bowl, mash your ripe banana with a fork until it’s mostly smooth but still has a few small lumps. We’re going for rustic, not baby food.
- **Wet Ingredients Unite!** Add the melted butter, sugar, and vanilla extract to the mashed banana. Stir it all together until it’s well combined. It should look like a glorious, sweet goo.
- **Dry Team Assembles:** In a separate, even smaller bowl (or just sprinkle directly over the wet ingredients if you’re feeling rebellious and brave), whisk together the baking soda, salt, and flour.
- **Combine Gently:** Pour the dry ingredients into the wet banana mixture. Mix until *just* combined. **Pro Tip: Do NOT overmix!** A few streaks of flour are totally fine; overmixing leads to tough bread, and nobody wants that. If using, fold in your optional add-ins now.
- **Bake It Up!** Scrape the batter into your prepared ramekin. Pop it into your preheated oven and bake for **20-25 minutes**. You’re looking for a golden-brown top and when a toothpick inserted into the center comes out clean (or with a few moist crumbs).
- **Cool Down (If You Can Wait):** Let it cool in the ramekin for about 5-10 minutes before diving in. This helps it set and makes it easier to eat. Or, you know, just eat it with a spoon directly from the ramekin. I won’t judge.
Common Mistakes to Avoid
We’ve all made them! Learn from my hilarious blunders, so you don’t have to:
- **Underripe Banana Syndrome:** Trying to bake with a green banana is like trying to make lemonade with unripe lemons. You just won’t get that sweet, banana-y goodness. Wait for the spots!
- **The Overmix Menace:** This is the arch-nemesis of all baked goods. **Mix until *just* combined.** Seriously. Your biceps don’t need the extra workout here.
- **Impatience is a Virtue (Not Here):** Pulling it out of the oven too early leads to a sad, gooey center. Let that toothpick tell you when it’s ready.
- **Forgetting to Grease the Ramekin:** Don’t do it. Just… don’t. Unless you want a crumbly, stuck-to-the-dish situation.
- **Expired Baking Soda:** If your baking soda is older than your last serious relationship, it might be time for a fresh box. Old leavening means flat bread. Boo.
Alternatives & Substitutions
Feeling adventurous? Here are some ways to shake things up:
- **Sugar Swap:** Don’t have granulated? Use all brown sugar for a deeper molasses flavor. Want to cut back? Use less or try a natural sweetener like maple syrup (adjust other liquids if using liquid sweetener).
- **Fat Facts:** Melted coconut oil works beautifully instead of butter and adds a subtle tropical note. Vegetable oil is also fine in a pinch.
- **Flour Power:** All-purpose is great, but you can totally use whole wheat flour for a nuttier, healthier twist. Or a 1:1 gluten-free flour blend works too!
- **Spice it Up:** A pinch of cinnamon, nutmeg, or even a tiny dash of allspice can really elevate your banana bread game. **IMO**, cinnamon is a non-negotiable.
- **Vegan Vibes:** You can easily make this vegan! Use mashed flax egg (1 tbsp ground flaxseed + 3 tbsp water, let sit for 5 mins) or unsweetened applesauce instead of the butter (though butter tastes better, FYI), and ensure your sugar is vegan.
FAQ (Frequently Asked Questions)
Got questions? I’ve got (casual) answers!
- **Can I make this in the microwave?** Well, you *can*, but it’ll be more like a mug cake in texture – softer, spongier, not quite “bread.” For proper banana bread, the oven is your best friend.
- **What if my banana isn’t super ripe?** You can try baking it in its peel at 300°F (150°C) for 15-20 minutes until it turns black. Or, just accept it’ll be less sweet and maybe add an extra half-teaspoon of sugar.
- **Can I double the recipe?** Absolutely! Just use a slightly larger ramekin or two smaller ones, and keep an eye on the baking time as it might need a few extra minutes.
- **Can I add nuts AND chocolate chips?** Honey, this is your banana bread. You can add anything your heart desires. Just don’t overfill the ramekin!
- **My banana bread turned out dry. What happened?** Usually, it’s either overbaking (keep an eye on that toothpick!) or overmixing the batter, which develops the gluten too much. Remember: gentle hand, moist crumbs.
- **Can I store leftovers?** LOL. Leftovers? Of a single-serving banana bread? You’re adorable. But theoretically, yes, cover it and leave it on the counter for a day, or refrigerate for a couple.
Final Thoughts
So there you have it, your very own personal banana bread experience. No fuss, no muss, just pure, unadulterated banana-y joy. Go on, pat yourself on the back. You just whipped up something delicious without breaking a sweat (or a full ingredient budget). Now go impress someone—or yourself, which is arguably more important—with your new culinary skills. You’ve earned it!

