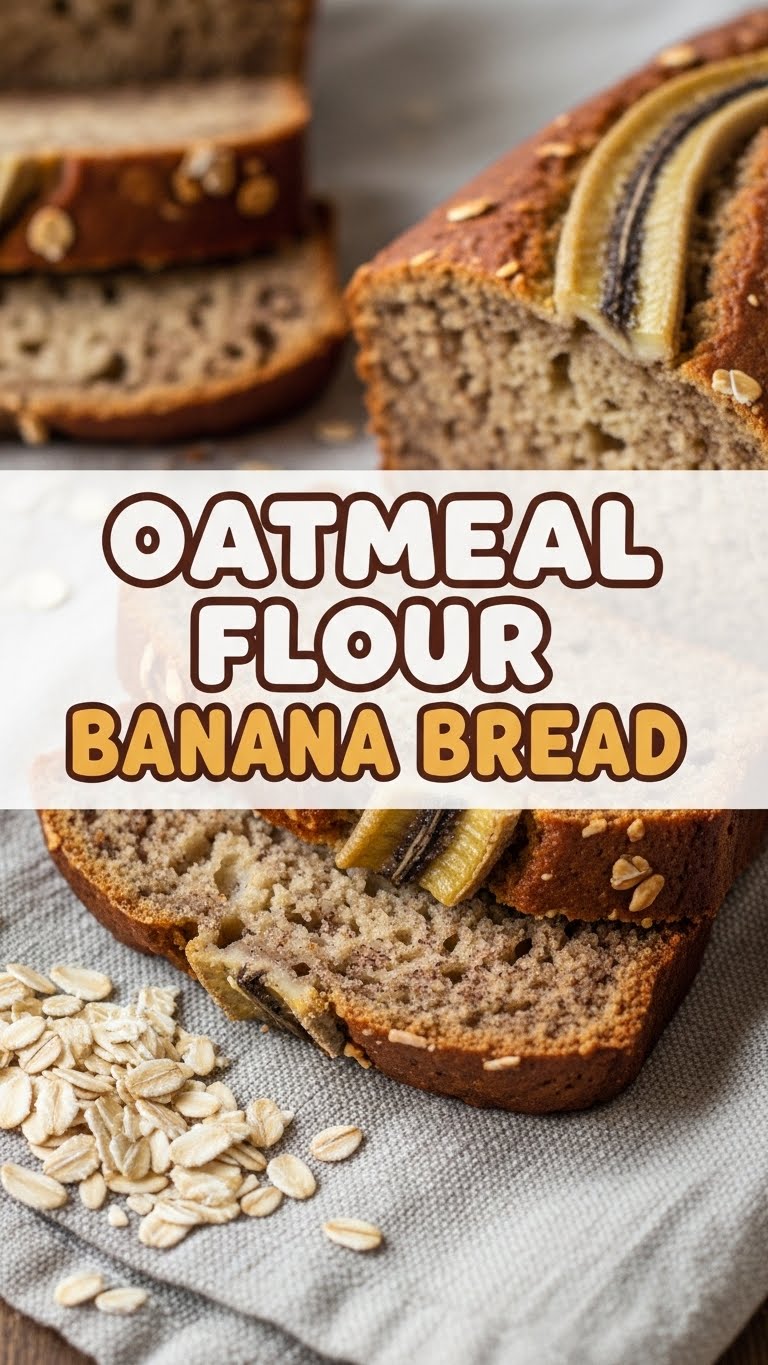
So you’re craving something tasty but too lazy to spend forever in the kitchen, huh? Same. We’ve all been there: staring at those suspiciously brown bananas on the counter, knowing their destiny is either the compost bin or, *gasp*, actually being used for something delicious. Well, friend, today we choose delicious. And easy. Because life’s too short for complicated recipes when a Netflix binge is calling. Get ready for Oatmeal Flour Banana Bread that’s so good, you might actually fool yourself into thinking it’s healthy. (Spoiler: it’s healthier-ish!)
Why This Recipe is Awesome
Let’s be real, you’re not here for a culinary challenge. You’re here because you want something warm, comforting, and utterly delicious that practically bakes itself. This Oatmeal Flour Banana Bread delivers. It’s so incredibly easy, it’s practically idiot-proof – and trust me, if *I* can make it without a catastrophic kitchen fire, you can too. It smells divine while baking (your neighbors will be jealous, FYI), uses up those neglected bananas, and gives you a legitimate reason to eat “bread” for breakfast. Plus, oatmeal flour! It’s got that wholesome, rustic vibe without being overly dense or dry. Win-win-win!
Ingredients You’ll Need
Gather your troops! Here’s what you’ll need to make this magic happen:
- 1 ½ cups Oatmeal Flour: Yep, just regular rolled oats blitzed in a blender until it’s flour. Or buy it if you’re feeling fancy/lazy.
- 1 teaspoon Baking Soda: Our trusty leavening agent. Don’t skip it unless you want a banana brick.
- ½ teaspoon Salt: Crucial for balancing all that sweetness and bringing out the flavors.
- 3 Ripe Bananas: The browner, the better! We’re talking seriously spotted, almost black. This is where all the natural sweetness comes from.
- ½ cup Brown Sugar (packed): Adds a beautiful caramel note. You can adjust this down if your bananas are super ripe.
- ¼ cup Melted Unsalted Butter or Oil: Butter for flavor, oil for moisture. Choose your fighter!
- 1 Large Egg: Our binder. Room temperature if you’re a perfectionist, but straight from the fridge is usually fine, IMO.
- 1 teaspoon Vanilla Extract: Because everything is better with vanilla. It’s a fact.
- Optional: ½ cup Chocolate Chips or Chopped Nuts: Go wild! This is where you personalize your masterpiece.
Step-by-Step Instructions
- Preheat & Prep: First things first, crank up your oven to 350°F (175°C). Then, grab a 9×5 inch loaf pan, give it a quick spray with non-stick spray, and maybe dust it with a little flour or line it with parchment paper. No one likes a stuck loaf!
- Mash ‘Em Up: In a medium bowl, take those gloriously ripe bananas and mash them with a fork until they’re mostly smooth but still have a few little lumps. Get out any aggression you’ve been holding onto.
- Wet Ingredients Party: To your mashed bananas, add the brown sugar, melted butter (or oil), egg, and vanilla extract. Whisk it all together until it’s well combined and looks like a delicious, banana-y soup.
- Dry Ingredients Unite: In a separate, larger bowl, whisk together the oatmeal flour, baking soda, and salt. Make sure there are no lumpy bits of baking soda chilling out on their own.
- Combine & Conquer: Pour the wet banana mixture into the dry flour mixture. Now, with a spatula or spoon, mix gently until *just* combined. Seriously, do not overmix! A few streaks of flour are totally fine. Overmixing leads to tough bread, and nobody wants that.
- Add the Goodies: If you’re using chocolate chips, nuts, or anything else your heart desires, fold them in now. Be gentle!
- Into the Pan It Goes: Pour the batter into your prepared loaf pan. Give it a gentle tap on the counter to settle it and smooth out the top.
- Bake Away! Pop it into your preheated oven and bake for 50-60 minutes. You’ll know it’s ready when a toothpick inserted into the center comes out clean or with just a few moist crumbs.
- Cool Down: Once baked, take it out of the oven and let it cool in the pan for about 10-15 minutes. This helps it firm up before you attempt to wrestle it out. Then, transfer it to a wire rack to cool completely (or at least mostly) before slicing. The hardest part of this recipe is waiting.
Common Mistakes to Avoid
Even though this recipe is pretty foolproof, there are a few banana bread blunders to steer clear of:
- Using Underripe Bananas: This is the cardinal sin of banana bread. Greenish or yellow bananas won’t give you the sweetness or the moisture you need. Wait for those beautiful brown spots!
- Overmixing the Batter: We already mentioned it, but it’s worth repeating. Too much mixing develops the gluten in the flour, making your bread tough and chewy instead of light and tender. Mix until *just* combined, then stop!
- Not Preheating Your Oven: Rookie mistake! A cold oven won’t allow your leavening agents to activate properly, leading to dense, sad bread. Give your oven time to get to temp.
- Cutting Into It Too Soon: I know, the smell is intoxicating. But cutting into hot banana bread can make it crumble or seem underbaked. Let it chill out for a bit, okay?
Alternatives & Substitutions
Feeling creative? Or just missing an ingredient? Here are some simple swaps:
- No Oatmeal Flour? No Problem! Grab 1 ½ cups of rolled oats and blitz them in your blender or food processor until they form a fine flour. Voila! DIY oatmeal flour.
- Sweetener Swaps: Not a brown sugar fan? You can use maple syrup, honey, or coconut sugar instead. Just know that liquid sweeteners might slightly alter the texture, so keep an eye on your batter consistency.
- Butter Alternatives: Melted coconut oil works beautifully for a slightly tropical flavor. You can also use unsweetened applesauce for a lower-fat option, but be aware it might make the bread a tad more dense.
- Spice it Up: Add a teaspoon of cinnamon, a pinch of nutmeg, or even some pumpkin pie spice for extra warmth and flavor.
- Mix-in Madness: Beyond chocolate chips and nuts, consider dried cranberries, shredded coconut, or a swirl of cream cheese frosting on top once it’s cooled!
FAQ (Frequently Asked Questions)
Got questions? I’ve got answers (mostly humorous ones):
Can I make my own oatmeal flour?
Absolutely! As mentioned, just take rolled oats, toss ’em in a blender or food processor, and blend until they’re a fine flour. Easy peasy lemon squeezy. Why pay extra?
My bananas aren’t ripe enough! Help!
Uh oh! If you’re in a pinch, you can bake them unpeeled on a baking sheet at 300°F (150°C) for 15-30 minutes until their skins are black and shiny. Let them cool before mashing. It’s a little hack, but brown bananas are always best!
Can I use margarine instead of butter?
Well, technically yes, but why hurt your soul like that? Butter’s just better for flavor, IMO. If you’re really committed to margarine, it’ll work, but don’t blame me if it tastes… less buttery.
How long does this banana bread last?
If you manage not to devour the entire loaf in one sitting (impressive!), it’ll last about 3-4 days at room temperature in an airtight container, or up to a week in the fridge. It also freezes beautifully for longer storage.
Is this actually “healthy”?
Let’s go with “healthier-ish.” It’s got whole grains (oats!) and fruit, so it’s a step up from, say, a donut. It’s all about balance, baby! Enjoy it without guilt.
Can I make muffins instead of a loaf?
You betcha! Just divide the batter among a 12-cup muffin tin (paper liners recommended). Bake for about 18-25 minutes, or until a toothpick comes out clean. Muffin life is good life.
Can I reduce the sugar?
Definitely! If your bananas are super ripe, you can often reduce the sugar by ¼ cup without much issue. Taste the batter (before adding egg if you’re worried) and adjust if you dare!
Final Thoughts
And there you have it! You’ve just pulled off a culinary miracle with minimal effort and maximum deliciousness. This Oatmeal Flour Banana Bread is truly a game-changer for those mornings when you want something comforting but don’t want to feel like you’re eating dessert (even if you kinda are). Now go impress someone—or yourself—with your new culinary skills. You’ve earned it!
