Okay, friend, let’s be real. You’re scrolling, you’re hungry, and “baking” sounds like a lot of effort for something that might just turn into a sad, burnt hockey puck. Been there. But what if I told you there’s a cookie recipe so ridiculously easy, so utterly delicious, that it feels like cheating? And it involves a secret ingredient that makes them softer than a cloud and chewier than your favorite stand-up comic’s gum? Yeah, I thought that’d get your attention.
Why This Recipe is Awesome
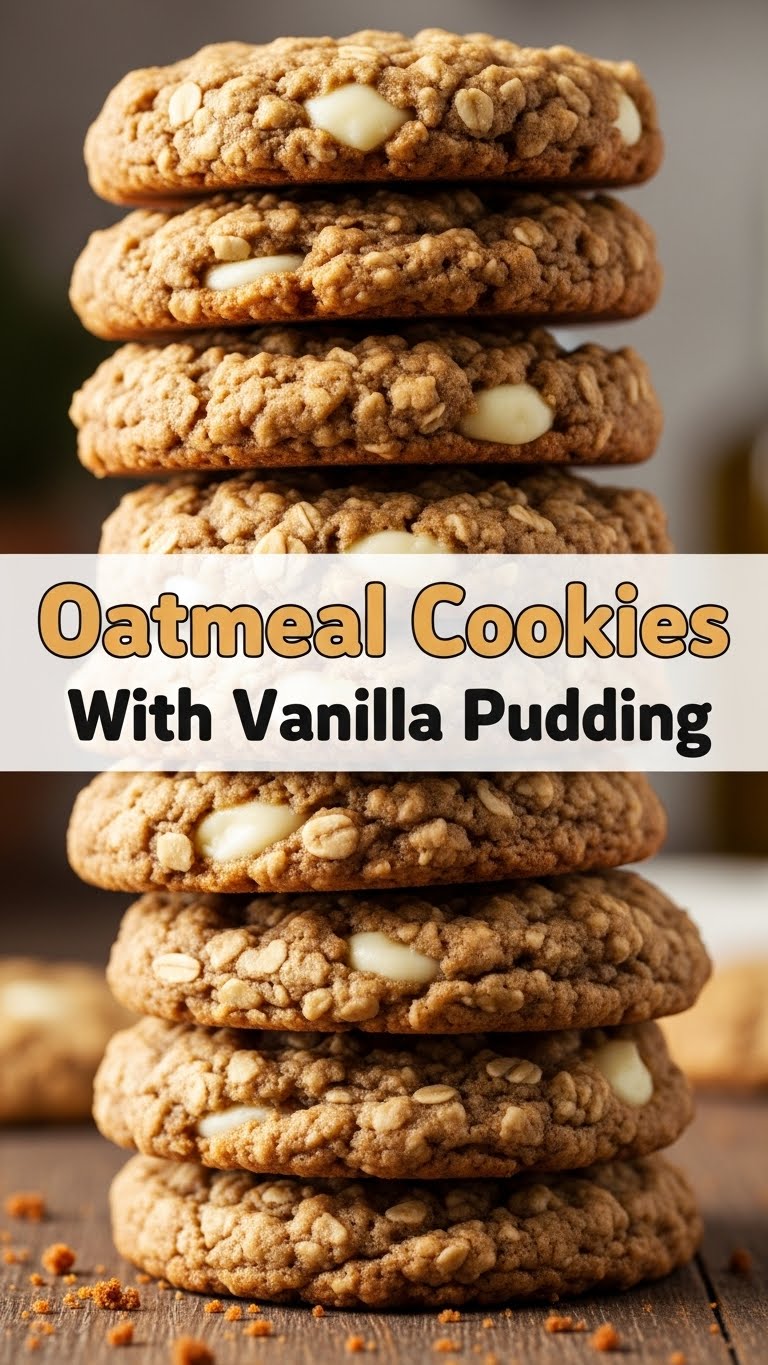
Because, darling, it’s practically fool-proof. Seriously. If I can make these without accidentally setting off the smoke alarm (again), you definitely can. The real magic? It’s all thanks to a box of instant vanilla pudding mix. No, we’re not making pudding to put *in* the cookies; we’re using the dry mix to create oatmeal cookies with an unbelievably soft, chewy texture and a subtle vanilla whisper that just sings. Plus, they stay soft for days. Days! Assuming they last that long, which, spoiler alert: they won’t. This recipe is your new best friend for when you want to impress but also want to nap.
Ingredients You’ll Need
Gather ’round your pantry, here’s the lineup for your next cookie masterpiece. Nothing too fancy, I promise.
- 1 cup (2 sticks) Unsalted Butter: Softened, please. Not melted, not rock-hard. We’re aiming for “I can easily make a thumbprint in it” soft.
- ¾ cup Granulated Sugar: For that classic sweet kick.
- ¾ cup Packed Light Brown Sugar: Our secret weapon for chewiness and a lovely caramel note. Don’t skimp, don’t loosely pack. Pack it like you’re playing Jenga with sugar.
- 2 Large Eggs: Room temperature is best, as it helps everything emulsify beautifully. Science, or something.
- 1 teaspoon Vanilla Extract: The good stuff. Don’t go cheap here; it makes a difference.
- 1 ½ cups All-Purpose Flour: The foundation of our cookie dreams.
- 1 teaspoon Baking Soda: For that perfect lift.
- ½ teaspoon Salt: Because flavor balance is key, even in cookies.
- 1 (3.4 ounce) package Instant Vanilla Pudding Mix: **THIS IS KEY!** Make sure it’s *instant*, not cook-and-serve. This is where the magic happens, people.
- 3 cups Old-Fashioned Rolled Oats: The hearty bits. **Do NOT use instant oats unless you want sad, mushy cookies.** You’ve been warned.
- Optional Mix-ins (1 cup): Chocolate chips (dark, milk, white!), raisins (if you’re into that), chopped nuts, sprinkles… go wild!
Step-by-Step Instructions
Alright, apron on (or not, I’m not judging), let’s get baking!
- Preheat & Prep: First things first, get your oven to **350°F (175°C)**. While it’s warming up, line two baking sheets with parchment paper or silicone mats. This is not optional; it saves so much headache.
- Cream the Goods: In a large mixing bowl, using an electric mixer, cream together your softened butter, granulated sugar, and brown sugar until it’s light and fluffy. This should take about 2-3 minutes. **Don’t rush this step!**
- Egg-cellent Addition: Beat in the eggs one at a time, mixing well after each addition. Then, stir in the vanilla extract. Scrape down the sides of the bowl to make sure everything is incorporated.
- Dry Spell: In a separate, medium bowl, whisk together the flour, baking soda, salt, and that glorious instant vanilla pudding mix. Give it a good whisk to break up any lumps.
- Combine Forces: Gradually add the dry ingredients to the wet ingredients, mixing on low speed until *just* combined. **Whatever you do, don’t overmix!** Overmixing leads to tough cookies, and nobody wants a tough cookie.
- Oat & Greet: Now, fold in the old-fashioned oats until they’re evenly distributed. If you’re adding any optional mix-ins (chocolate chips, nuts, etc.), now’s the time to gently stir those in too.
- Scoop & Space: Drop rounded spoonfuls (about 1.5-2 tablespoons) of dough onto your prepared baking sheets, leaving about 2 inches between each cookie. They’re going to spread a bit and need their personal space.
- Bake ‘Em Up: Pop those trays into your preheated oven and bake for **10-12 minutes**. You’re looking for edges that are lightly golden brown, but the centers should still look slightly soft. That’s the secret to chewy.
- Cool Down: Let the cookies cool on the baking sheets for about 5 minutes before transferring them to a wire rack to cool completely. Or, you know, eat one hot. I won’t tell.
Common Mistakes to Avoid
Listen, we all make mistakes. But with these pointers, you can avoid the common cookie pitfalls and look like a baking genius.
- Not Preheating Your Oven: Rookie mistake! A cold oven means uneven baking and sad, flat cookies. **Always preheat!**
- Overmixing the Dough: I know, it’s tempting to keep mixing, but stop as soon as everything is combined. Overmixing develops the gluten too much, leading to tough, not chewy, cookies.
- Using Instant Oats: I said it before, I’ll say it again: NO INSTANT OATS! They soak up too much liquid and turn your cookies into a gummy mess. Old-fashioned for the win.
- Substituting Cook-and-Serve Pudding: This is a different beast entirely. It has different starches and thickeners. **Only use instant pudding mix** for this recipe’s magic.
- Overbaking: If you wait for these to look “done” and golden all over, you’ve gone too far. Pull them when the edges are set and lightly golden, but the center still looks a bit soft. They’ll continue to cook on the hot tray.
Alternatives & Substitutions
Feeling adventurous? Or maybe you just ran out of vanilla pudding (gasp!). Here are some ideas:
- Pudding Power-Up: While vanilla is amazing, feel free to experiment with other instant pudding flavors! Butterscotch, cheesecake, chocolate, or even banana cream for a truly wild ride. Just make sure it’s *instant*.
- Mix-in Madness: This recipe is a blank canvas! Instead of or in addition to chocolate chips, try chopped pecans, walnuts, dried cranberries, white chocolate chunks, or even a sprinkle of cinnamon for extra warmth. Your cookie, your rules!
- Butter Swap: Can you use margarine instead of butter? Well, technically yes, but why hurt your soul like that? Butter just tastes better, IMO. If you absolutely must, grab a good quality stick margarine, but expect a slight difference in flavor and texture.
FAQ (Frequently Asked Questions)
Got questions? I’ve got (mostly) sarcastic answers!
- Do I *really* need old-fashioned oats? Can’t I just use instant?
Oh, you *can*, if you enjoy a distinctly different, mushier, less satisfying texture. But if you want the chewiness and heartiness that makes an oatmeal cookie truly great, stick with the old-fashioned. Your taste buds will thank you.
- What if I only have cook-and-serve pudding mix? Will that work?
Bless your heart. No, sweet friend, it won’t. Cook-and-serve has different starches and thickeners and requires heat to set. Instant pudding works its magic with just liquid, or in our case, the moisture in the dough. So, a quick trip to the store for instant is in your future.
- My cookies spread too much! What happened?
A few culprits! Your butter might have been too soft (verging on melted), your oven wasn’t preheated properly, or your baking soda might be old. Also, make sure you’re using a proper scoop size; too much dough can lead to too much spread. If all else fails, pop the scooped dough on the tray into the fridge for 15-20 minutes before baking.
- Can I add chocolate chips? I’m a chocoholic.
Um, YES! What are you even waiting for? This recipe practically begs for a cup of chocolate chips. Or two. Go wild. You do you.
- How long do these glorious cookies last?
In a tightly sealed container at room temperature, they’ll stay delicious for 3-4 days. But let’s be honest, they rarely make it past day one in my house. Consider yourself warned.
- Can I freeze the dough for later?
Absolutely! Scoop the dough onto a parchment-lined tray and freeze until solid, then transfer the frozen dough balls to a freezer-safe bag. When you’re ready for fresh cookies, bake from frozen, adding a couple of extra minutes to the baking time. It’s like having a cookie emergency stash!
Final Thoughts
So there you have it, champ! A ridiculously easy, unbelievably delicious recipe to add to your repertoire. Go forth, bake some magic, and bask in the glory of homemade cookies that are so good, people will think you spent hours slaving away. Don’t worry, our secret is safe. Now go impress someone—or yourself—with your new culinary skills. You’ve earned that cookie (or five). Happy baking!


