Alright, listen up, cookie monster! So you’re craving something warm, gooey, chocolatey, and probably bigger than your face, but you’re also maybe *slightly* too lazy to spend all day on a baking marathon, huh? Same, friend, same. We’re talking about those legendary NYC Chocolate Chip Cookies – the kind that make you wonder if you can just move into the bakery and live happily ever after. Good news: I’ve got your back. Get ready to bake some magic (without the actual magic wand, sadly).
Why This Recipe is Awesome
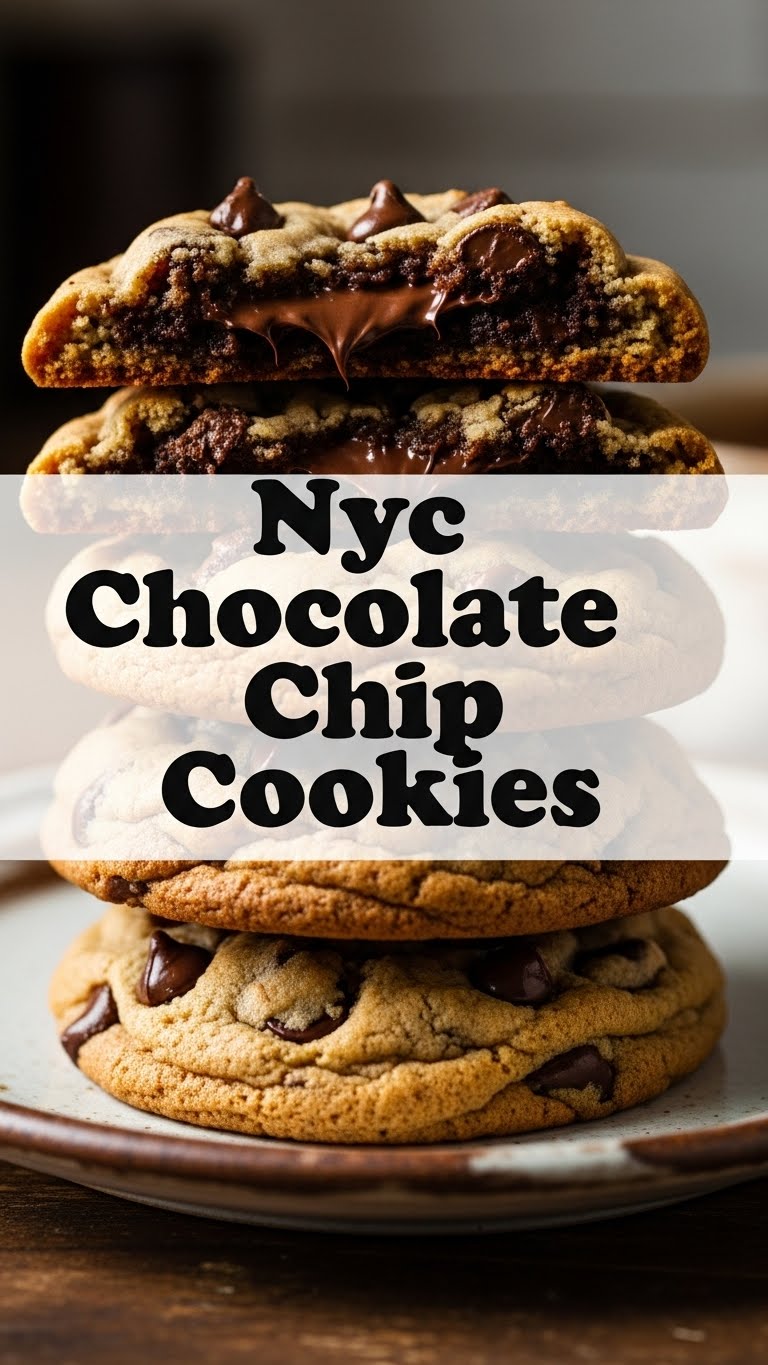
Okay, let’s be real. There are a million chocolate chip cookie recipes out there. But *this one*? This is the one that’ll make your friends think you secretly flew to the Big Apple for culinary school. It’s for those times you want a cookie that isn’t just a cookie; it’s an experience. We’re talking crispy edges, a perfectly soft, gooey center, and so much chocolate you might think it’s a crime (but a delicious one!). It’s also surprisingly idiot-proof. Seriously, if I can do it without setting off the smoke alarm, you’re golden. Plus, it involves chilling dough, which means you *have* to wait, which means built-in delayed gratification. You’re welcome.
Ingredients You’ll Need
Before we get our hands sticky, let’s gather the goods. Quality matters here, folks. Don’t skimp, your taste buds will thank you.
- 1 cup (2 sticks) unsalted butter: Softened, because cold butter is the enemy of smooth creaming.
- ¾ cup granulated sugar: The regular stuff. For sweetness, obviously.
- 1 cup packed light brown sugar: This is key for that chewiness and deep flavor. Don’t even *think* about swapping it out for more white sugar.
- 2 large eggs: Room temperature, please! They mix better and make for a better cookie.
- 1 teaspoon vanilla extract: The good stuff. Not that imitation vanilla that smells like regret.
- 2 ¼ cups all-purpose flour: Fluff it up before you measure.
- 1 teaspoon baking soda: Our little helper for lift.
- ½ teaspoon salt: Balances all that sweetness. Don’t skip it, even if you think it’s weird in a cookie.
- 1 ½ cups chocolate chips/chunks: Here’s where it gets fun. A mix of milk, semi-sweet, and dark chocolate chunks is highly encouraged for maximum flavor bomb status. Get good quality ones, you deserve it.
Step-by-Step Instructions
- Cream the Butter and Sugars: In a large bowl, or your stand mixer if you’re fancy, beat the softened butter, granulated sugar, and brown sugar together until it’s light and fluffy. This usually takes about 2-3 minutes. Scrape down the sides of the bowl to make sure everything’s getting acquainted.
- Add Eggs and Vanilla: Beat in the eggs, one at a time, making sure each is fully incorporated before adding the next. Stir in the vanilla extract. It’ll look a bit wild, but trust the process.
- Mix Dry Ingredients: In a separate, medium bowl, whisk together the flour, baking soda, and salt. Make sure it’s all combined so you don’t get a random pocket of salt in one cookie.
- Combine Wet and Dry: Gradually add the dry ingredients to the wet ingredients, mixing on low speed until just combined. Do not overmix! Overmixing develops gluten, which makes tough cookies, and nobody wants a tough cookie.
- Fold in Chocolate: Gently fold in all those glorious chocolate chips and chunks. Try not to eat too many while you’re doing it, but I won’t judge if you do.
- Chill the Dough: This is where the magic happens for those thick NYC-style cookies. Cover the bowl with plastic wrap and chill the dough for at least 30 minutes, but ideally 1-2 hours. Overnight? Even better! Chilling prevents spreading and intensifies flavor.
- Preheat Oven & Prep Sheets: When you’re ready to bake, preheat your oven to 375°F (190°C). Line a baking sheet with parchment paper.
- Scoop Big Balls: Scoop out large balls of dough, about 2-3 tablespoons each. Don’t flatten them; keep them tall and round. Place them about 2 inches apart on your prepared baking sheet.
- Bake ‘Em Up: Bake for 10-14 minutes, or until the edges are golden brown and the centers are still a little soft and gooey. If they look underdone, don’t panic – they’ll continue to cook a bit on the hot pan.
- Cool Down: Let the cookies cool on the baking sheet for about 5 minutes before transferring them to a wire rack to cool completely (if you can wait that long, you’re a stronger person than me).
Common Mistakes to Avoid
Baking is science, but also a little bit of art. Don’t trip up on these common blunders!
- Overmixing the Dough: Remember what I said about tough cookies? That’s what happens when you beat the flour too much. Mix until just combined, then stop. Walk away.
- Not Chilling the Dough: This isn’t an optional step for this recipe, it’s mandatory! Skipping this will give you flat, sad cookies instead of thick, chewy beauties. Think of it as a beauty rest for your dough.
- Using Cold Eggs/Butter: It’s a small detail, but it makes a big difference in the texture. Room temperature ingredients emulsify better, leading to a smoother dough and better rise.
- Crowding the Pan: Give those cookies some space to spread out a bit. If they’re too close, they’ll merge into one giant “cookie blob,” which, while not entirely unappealing, isn’t what we’re going for.
- Overbaking: When in doubt, underbake slightly. The cookies will firm up as they cool. An overbaked cookie is a dry, sad cookie. We want gooey centers!
Alternatives & Substitutions
Feeling adventurous? Or just out of something crucial? Here are some ideas!
- Chocolate Variety: Instead of just chips, try chopped chocolate bars for different textures and melting qualities. White chocolate, dark chocolate, milk chocolate – mix ’em up! Or throw in some toffee bits, caramel chips, or even chopped nuts for extra crunch.
- Flour Power: Want to get a little fancy? Swap out ¼ cup of the all-purpose flour for bread flour. It adds a bit more chewiness, which is always a win in my book.
- Brown Butter Magic: For an extra layer of nutty flavor, try browning your butter before adding it. Just melt it over medium heat until it turns golden brown and smells nutty, then let it cool slightly before using. It’s a game-changer, FYI.
- Gluten-Free: You can often substitute a 1:1 gluten-free flour blend for the all-purpose flour. Just make sure it has xanthan gum in it, or add ¼ teaspoon yourself.
- Butter Substitute: Can you use margarine? Technically yes, but why hurt your soul like that? If you absolutely *must* use a dairy-free alternative, go for a high-quality vegan butter stick, not spread. The flavor and texture will be different, though.
FAQ (Frequently Asked Questions)
- Why are my cookies flat? Ah, the age-old cookie question! Most likely, your butter was too soft (or even melted), your oven wasn’t hot enough, or – the biggest culprit for NYC cookies – you skipped chilling the dough! Make sure to follow that chilling step, it’s crucial.
- Can I freeze the dough? Absolutely! Roll the dough into balls, place them on a baking sheet, and freeze until solid. Then transfer them to a freezer-safe bag or container. When you’re ready for a fresh cookie, just bake from frozen, adding a few extra minutes to the baking time. Best invention ever, IMO.
- How long do these cookies last? If you can make them last, they’re generally best eaten within 3-4 days at room temperature in an airtight container. But let’s be real, they usually disappear way before then.
- My cookies are too crispy, not chewy. What gives? You likely overbaked them, my friend. Next time, pull them out when the edges are set but the middle still looks a little soft and glossy. They’ll finish baking on the hot pan.
- Can I reduce the sugar? You can slightly, but going too low will affect the texture and spread of the cookies. Sugar isn’t just for sweetness; it plays a structural role. Maybe try reducing by ¼ cup MAX if you must, but for ultimate deliciousness, stick to the recipe!
- Should I use cold butter if my kitchen is warm? Nope, still use softened butter. If your kitchen is super warm, your butter might soften faster than usual, but you still need to start with softened, not cold. If it gets too soft/melty during mixing, pop the dough in the fridge for 10-15 minutes before chilling fully.
Final Thoughts
So there you have it! Your very own guide to creating those ridiculously good NYC-style chocolate chip cookies right in your kitchen. It’s a little bit of patience (hello, chilling time!), a little bit of love, and a whole lot of deliciousness. Now go impress someone—or, let’s be honest, just yourself—with your new culinary skills. You’ve earned that warm, gooey, chocolatey reward. Happy baking!


