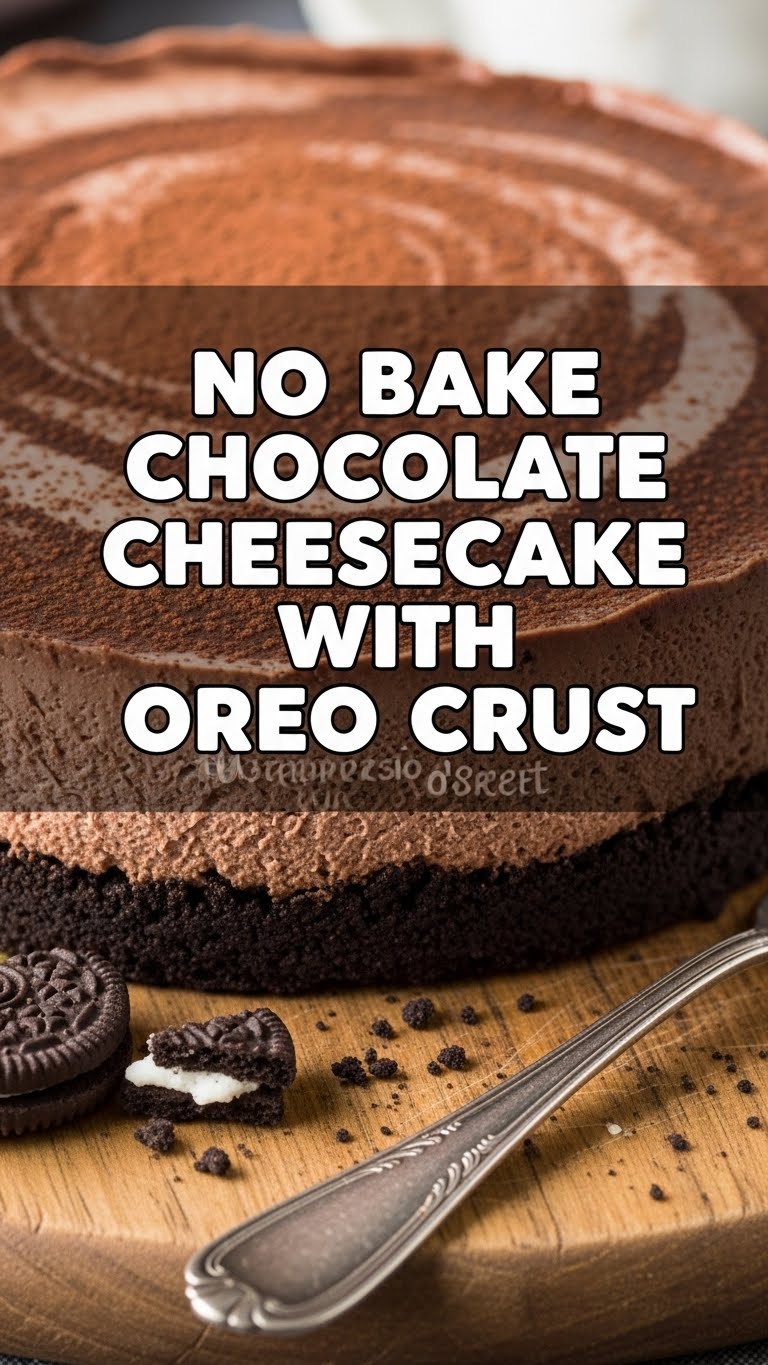
So you’re craving something tasty, chocolatey, and utterly decadent but the thought of turning on the oven makes you want to curl up and nap? Same, friend, same. Welcome to your happy place: the land of no-bake desserts. Specifically, the magical realm of **No-Bake Chocolate Cheesecake with an Oreo Crust**. Prepare yourself, because your dessert game is about to get ridiculously good without breaking a sweat (or a single oven mitt).
Why This Recipe is Awesome
Let’s be real, life is complicated enough. Your dessert shouldn’t be. This recipe is awesome for a gazillion reasons, but here are the highlights:
- **It’s No-Bake, duh!** No oven required. Zero. Zip. Nada. Perfect for hot days, lazy days, or “I forgot to preheat” days.
- **It’s practically idiot-proof.** Seriously, if I can do it without setting off the smoke alarm, you’re golden. The steps are straightforward, and the main “skill” required is patience (for chilling, not for making it).
- **Oreo Crust.** Need I say more? It’s crunchy, chocolatey, and the perfect base for anything, let alone rich cheesecake. It’s basically a hug for your taste buds.
- **Minimal Dishes.** Okay, maybe not *minimal*, but fewer than a baked cheesecake, for sure. Which means less scrubbing and more eating.
- **Maximum Deliciousness.** This isn’t just easy; it’s genuinely, mouth-wateringly, “OMG-I-need-another-slice” delicious. It’s rich, creamy, and hits all the right chocolate notes.
Ingredients You’ll Need
Time to gather your delicious arsenal! These are simple pantry staples, mostly. No weird, obscure ingredients that you’ll only use once and then stare at mournfully in the back of your cupboard.
- **For the Oreo Crust:**
- **25-30 Oreo Cookies** (about 1 standard family-sized pack). Don’t you dare remove the cream. That’s part of the magic.
- **6 tablespoons (85g) Unsalted Butter**, melted. The good stuff.
- **For the Chocolate Cheesecake Filling:**
- **2 (8-ounce) blocks Full-Fat Cream Cheese**, softened. And by softened, I mean leave it out for an hour or two. **Don’t even *think* about low-fat cream cheese.** This is not the time for health food.
- **1 cup Powdered Sugar** (aka confectioners’ sugar). Sift it if you’re fancy, but I usually don’t bother.
- **½ cup Unsweetened Cocoa Powder**. The darker, the better, IMO.
- **1 teaspoon Vanilla Extract**. Real vanilla, please. Not the imitation stuff.
- **1 ¾ cups Cold Heavy Cream** (aka whipping cream). Make sure it’s super cold for best whipping results.
- **Optional: Chocolate shavings or extra crushed Oreos** for garnish. Because why not?
Step-by-Step Instructions
Alright, apron on (or not, we’re not judging), let’s get this party started!
- **Crush those Oreos!** Grab your Oreos and either pop them in a food processor until fine crumbs form, or put them in a zip-top bag and smash them with a rolling pin (or a heavy can, or your frustrations from the day). Aim for fine crumbs, with a few larger bits for texture if you like.
- **Butter ’em up!** Pour the melted butter over the crushed Oreos. Mix thoroughly until all the crumbs are moistened. It should look like wet sand.
- **Press it real good.** Press the mixture firmly into the bottom of a 9-inch springform pan. Use the bottom of a glass or your hands to get it nice and even. **Pro Tip: Make sure it’s packed tightly, especially around the edges!** Pop the crust into the fridge or freezer to chill while you make the filling.
- **Cream cheese party.** In a large bowl, beat the softened cream cheese with a hand mixer on medium speed until smooth and creamy. Scrape down the sides.
- **Sweeten the deal.** Add the powdered sugar, cocoa powder, and vanilla extract to the cream cheese. Beat until well combined and smooth, scraping down the bowl as needed.
- **Whip it good.** In a separate, very cold bowl (metal bowls chilled in the freezer for 10 mins work wonders!), pour in the cold heavy cream. Beat on high speed until stiff peaks form. This means when you lift the beaters, the cream stands up straight.
- **Fold with love.** Gently fold the whipped cream into the chocolate cream cheese mixture until just combined. Be gentle – you want to keep that glorious fluffiness!
- **Assemble your masterpiece.** Pour the chocolate cheesecake filling over your chilled Oreo crust. Smooth the top with a spatula.
- **Chill out.** Cover the springform pan loosely with plastic wrap and refrigerate for at least 4 hours, but **ideally overnight** for the best results. Seriously, don’t rush this part.
- **Garnish and devour.** Once firm, carefully remove the sides of the springform pan. Garnish with chocolate shavings or more crushed Oreos if desired. Slice, serve, and accept all the compliments!
Common Mistakes to Avoid
Look, we all make mistakes. But let’s try to avoid these specific blunders to ensure your cheesecake dreams come true:
- **Not Chilling the Crust Enough:** A crumbly, collapsing crust is a sad sight. Give it at least 20-30 minutes in the fridge while you make the filling, or even longer. **A firm crust is a happy crust.**
- **Using Cold Cream Cheese:** Trying to beat cold cream cheese is like trying to convince a toddler to eat broccoli—it’s lumpy, frustrating, and just won’t work out. Softened cream cheese is key for a smooth filling.
- **Overmixing the Filling After Adding Whipped Cream:** Once you fold in the whipped cream, stop mixing as soon as it’s combined. Overmixing will deflate the air you worked so hard to incorporate, leading to a denser, less fluffy cheesecake.
- **Impatience (aka Cutting Too Soon):** This is the hardest one, I know. But if you try to slice it before it’s properly set, you’ll have a delicious, but messy, puddle. **Patience, young grasshopper.** Four hours is the minimum, but overnight is where the magic truly happens.
- **Forgetting the Springform Pan (or Not Greasing It):** Okay, you probably won’t forget the pan, but make sure it’s a springform pan for easy removal. And a little spray of non-stick oil on the sides doesn’t hurt!
Alternatives & Substitutions
Feeling adventurous? Or maybe you’re missing an ingredient? Here are some fun ways to mix things up:
- **Crust Creativity:** Not an Oreo purist? You could use graham cracker crumbs, digestive biscuits, or even chocolate chip cookies for the crust. Just remember the 1.5 cups of crumbs to 6 tbsp butter ratio.
- **Flavor Boosts:** Want to add a little something extra to the chocolate filling?
- **Espresso Powder:** Add 1-2 teaspoons of instant espresso powder to the cream cheese mixture to deepen the chocolate flavor. It won’t taste like coffee, just more intensely chocolatey.
- **Mint Extract:** A few drops of mint extract for a delicious mint-chocolate cheesecake.
- **Liqueur:** A splash of Kahlúa, Bailey’s, or even a raspberry liqueur can elevate the adult factor.
- **Topping it Off:**
- Simple whipped cream and chocolate shavings are always a winner.
- Fresh berries (raspberries or strawberries) add a lovely tart contrast.
- A drizzle of homemade (or store-bought, no judgment!) chocolate ganache.
- Caramel sauce? Yes, please!
FAQ (Frequently Asked Questions)
Got questions? I’ve got answers (and probably some sassy commentary).
- **Can I use reduced-fat cream cheese?**
Well, technically yes, but why hurt your soul like that? For real, though, full-fat cream cheese is essential for the rich, creamy texture and stability of a good no-bake cheesecake. Reduced-fat versions often have more water and less fat, making your cheesecake sad and watery. Just say no! - **How long does this cheesecake last in the fridge?**
It typically lasts for 3-5 days in an airtight container in the fridge. But honestly, it rarely lasts that long in my house. - **Can I freeze this cheesecake?**
Absolutely! You can freeze it whole or in slices for up to 1-2 months. Wrap it tightly in plastic wrap, then foil. Thaw in the fridge for a few hours before serving. It’s great for making ahead! - **What if my filling isn’t firm enough after chilling?**
First, double-check that you used full-fat cream cheese and that your heavy cream was whipped to stiff peaks. If it’s still a bit soft, it likely just needs more chilling time. Pop it back in the fridge, or even the freezer for an hour or two to speed things up. - **Do I need to grease the springform pan?**
While not strictly necessary for the crust to release, I usually give the sides a light spray with non-stick cooking spray or line them with parchment paper. It just makes for a cleaner release and less chance of sticking. - **My crust is too crumbly/too wet, help!**
If it’s too crumbly, you might need a tiny bit more melted butter (start with a tablespoon). If it’s too wet, you might have used too much butter, or your Oreos weren’t crushed fine enough. Add a few more crushed Oreos to soak up some of the moisture. It’s a bit of an art, but you’ll get it!
Final Thoughts
And there you have it! A ridiculously easy, unbelievably delicious, and completely no-fuss chocolate cheesecake that will make you feel like a culinary genius (without actually having to be one). This is your go-to recipe for potlucks, parties, or simply a Tuesday night when you deserve something amazing.
Now go forth, my friend, and create some magic. You’ve got this. And remember, calories don’t count when it’s a no-bake dessert. That’s just science (probably). Enjoy every single glorious bite!

