So, you’re craving something ridiculously delicious, creamy, and zesty, but the thought of turning on your oven right now makes you want to curl up in a ball and cry? Same, my friend, *same*. And let’s be real, who needs the drama of a water bath when you can achieve pure dessert nirvana with zero baking involved? Today, we’re diving headfirst into the glorious world of No-Bake Lemon Cheesecake. Get ready to have your taste buds do a happy dance.
Why This Recipe is Awesome
Okay, let’s break it down. Why is this specific recipe about to become your new best friend? First off, it’s no-bake. This means no oven-related anxiety, no preheating, no checking if it’s “done.” It’s practically magic! Secondly, it’s lemon, which means it’s bright, fresh, and cuts through all that glorious richness like a boss. Think sunshine in a dessert. Thirdly, it’s pretty much idiot-proof. Seriously, if I can nail this without setting off a smoke alarm, you’re golden. Plus, it looks fancy enough to fool anyone into thinking you actually put in a ton of effort. Win-win-win!
Ingredients You’ll Need
Gather ’round, my fellow lazy gourmands! Here’s what you’ll need for this masterpiece. Nothing too wild, just good old pantry staples (mostly). Grab your cutest mixing bowls!
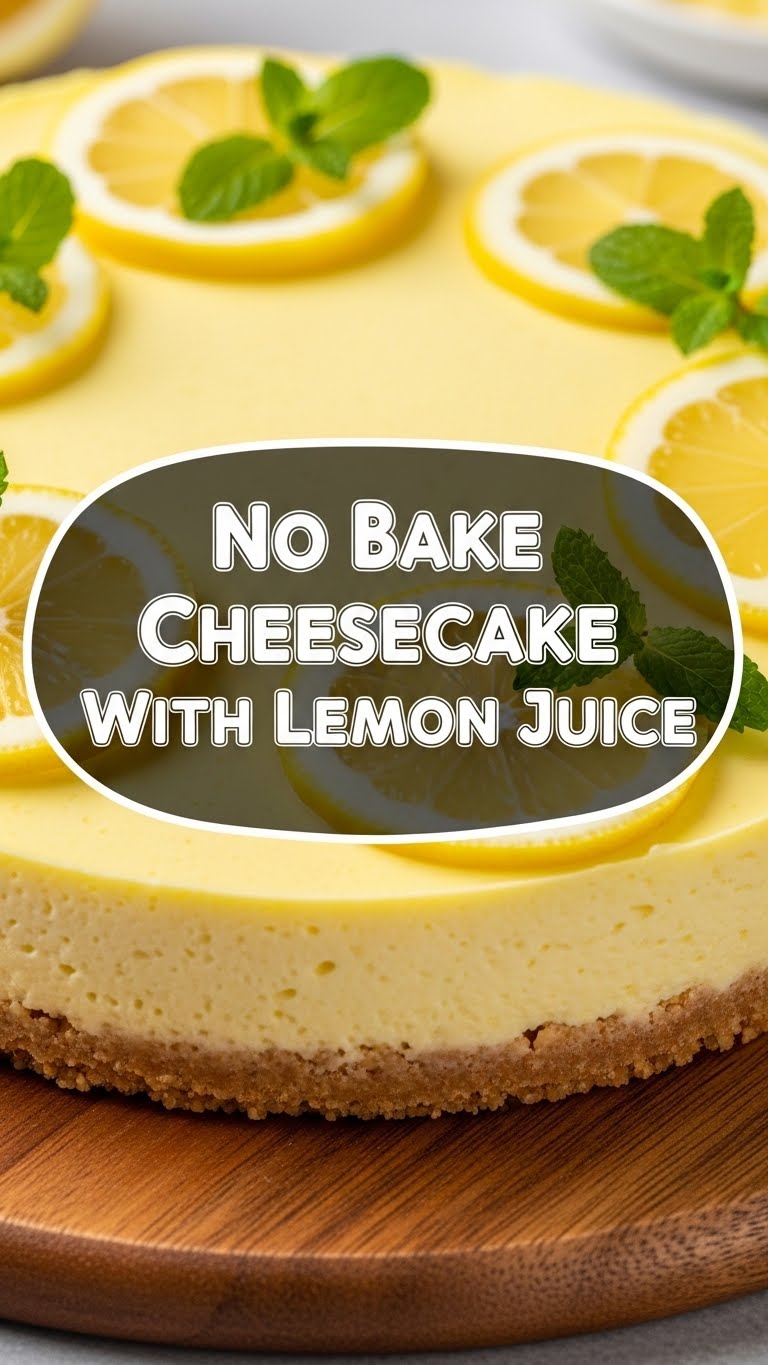
- For the Crust (the best part, IMO):
- 1 ½ cups graham cracker crumbs (or digestive biscuits, if you’re feeling fancy/British). Crush ’em good!
- ½ cup unsalted butter, melted (Don’t skimp, butter is love.)
- 2 tablespoons granulated sugar (Just a little sweetness to bind it all.)
- For the Zesty Filling (where the magic happens):
- 2 (8-ounce) packages full-fat cream cheese, softened (Philadelphia or similar, no low-fat nonsense here, please and thank you.)
- 1 ½ cups powdered sugar (also known as confectioners’ sugar. Sift it if you’re feeling ambitious, but honestly, I rarely do.)
- ½ cup fresh lemon juice (Squeeze those lemons yourself! It makes a HUGE difference.)
- 2 teaspoons lemon zest (Don’t skip this! It’s where a lot of that “zing” comes from.)
- 1 teaspoon vanilla extract (Pure vanilla, please. No imitation stuff, we’re better than that.)
- 1 ½ cups heavy cream, very cold (This is crucial for whip-ability.)
Step-by-Step Instructions
Alright, let’s get down to business. Follow these steps, and you’ll have a show-stopping dessert chilling in no time. Promise!
- Crush the Crackers & Make the Crust: First up, get those graham cracker crumbs ready. You can smash them in a Ziploc bag with a rolling pin (therapeutic!) or use a food processor. In a medium bowl, combine the crumbs, melted butter, and granulated sugar. Mix until it looks like wet sand.
- Press It In: Press this delicious mixture firmly into the bottom of a 9-inch springform pan. Really get in there and compact it with the back of a spoon or your knuckles. You want a sturdy base! Pop it in the fridge while you make the filling.
- Whip the Cream Cheese Mixture: In a large bowl, using an electric mixer, beat the softened cream cheese until it’s smooth and creamy. No lumps allowed! Gradually add the powdered sugar, beating until fully combined.
- Add the Zest & Juice: Stir in the fresh lemon juice, lemon zest, and vanilla extract. Mix until just combined. Don’t overmix! Set this bowl aside for a hot sec.
- Whip the Heavy Cream: In a separate, *very clean* bowl (super important, any grease can prevent it from whipping!), pour in the cold heavy cream. Beat with an electric mixer on high speed until stiff peaks form. This means when you lift the beaters, the cream stands up straight and holds its shape.
- Fold It In: Gently, oh-so-gently, fold the whipped cream into the cream cheese mixture until no streaks remain. This is where you keep all that lovely air you just beat into the cream, so be tender!
- Assemble & Chill: Pour the creamy, dreamy filling over your chilled graham cracker crust. Smooth the top with a spatula. Now comes the hard part: resisting the urge to face-plant into it immediately. Cover the pan loosely with plastic wrap and refrigerate for at least 6 hours, but preferably overnight. This is where it firms up and becomes cheesecake magic!
- Serve & Enjoy: Once fully chilled, run a thin knife around the edge of the pan before releasing the springform. Garnish with extra lemon zest or fresh berries if you’re feeling fancy. Slice, serve, and bask in the glory!
Common Mistakes to Avoid
Look, we all make mistakes. It’s part of the human experience. But let’s try to avoid these rookie errors when making this cheesecake, shall we?
- Not Softening Cream Cheese: Trying to beat cold cream cheese is like trying to reason with a toddler – it’s just going to be lumpy and frustrating. Let it sit on the counter for at least an hour!
- Skimping on Chill Time: “But it looks firm enough!” No, friend, it’s not. Unless you want a wobbly, sad cheesecake puddle, give it the full chill time. Patience is a virtue, especially in dessert making.
- Overmixing the Cream Cheese: While you want the cream cheese smooth, once you add the sugar and liquids, overmixing can incorporate too much air, which can actually make your cheesecake less dense and more prone to cracking (though less of an issue with no-bake).
- Warm Heavy Cream: Your heavy cream needs to be COLD to whip properly. Stick it in the fridge until the last possible second.
- Using Low-Fat Anything: Do yourself a favor and use full-fat cream cheese and heavy cream. This is dessert, not a diet plan. The texture and taste will thank you.
Alternatives & Substitutions
Feeling adventurous? Or just realized you’re missing an ingredient? No stress! Here are some ways to shake things up:
- Crust Variations: Not a graham cracker fan? Try crushed shortbread cookies, ginger snaps, or even Oreo crumbs (though that might clash with the lemon, IMO).
- Citrus Swap: Instead of lemon, go for lime! A no-bake key lime cheesecake is also a showstopper. You could even try orange zest and juice for a milder citrus flavor.
- Add Fruit: Swirl in some raspberry puree (or just fresh raspberries) into the filling for a pretty pink hue and extra fruity kick. Blueberries, strawberries, or even a simple berry compote on top would be divine.
- Dairy-Free? You *can* find dairy-free cream cheese and coconut cream (chilled, use the thick cream on top) to make this vegan. The texture might be slightly different, but the flavor can still be amazing!
FAQ (Frequently Asked Questions)
Got questions? I’ve got answers. Mostly.
- Can I use margarine instead of butter for the crust? Well, technically yes, but why hurt your soul like that? Butter just tastes better and holds the crust together more effectively. Treat yo’ self!
- How long does this cheesecake last in the fridge? It’ll stay fresh for about 3-4 days, covered. But trust me, it probably won’t last that long!
- Can I freeze this no-bake cheesecake? Absolutely! It freezes beautifully. Wrap it tightly (once firm) in plastic wrap and then foil. It’ll last for up to 2-3 months. Thaw in the fridge overnight.
- My cheesecake isn’t setting! What did I do wrong? Likely culprits: not enough chill time, using low-fat cream cheese, or not whipping the heavy cream to stiff peaks. Go back to basics next time!
- What if I don’t have a springform pan? You can use a regular 9-inch pie plate, but it’ll be harder to get nice clean slices out. Or, even better, make individual cheesecakes in small jars or ramekins!
Final Thoughts
And there you have it! A ridiculously easy, incredibly delicious, and seriously impressive No-Bake Lemon Cheesecake. You’ve just created something amazing without breaking a sweat (or an oven mitt). Now go impress someone—or yourself—with your new culinary skills. You’ve earned it! Seriously, pour yourself a cuppa, grab a slice, and pat yourself on the back. You’re a dessert superstar!


