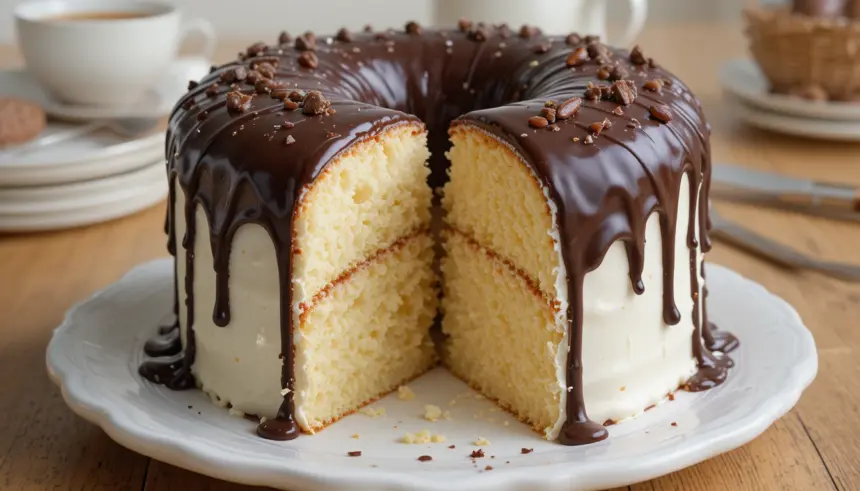
So, you’ve got that undeniable craving for something sweet, something that whispers “hug in a mouthful,” but the thought of a three-day baking project makes your soul weep? Yeah, I’ve been there. We’re talking about a moist vanilla cake so ridiculously easy, it’s practically a crime not to make it. And the chocolate glaze? Oh, that’s just the universe saying “you’re doing great, sweetie.” Let’s get this party started!
Why This Recipe is Pure Gold
Honestly, this recipe is your new best friend. It’s forgiving, it’s delicious, and it requires minimal brainpower. Seriously, if you can stir things in a bowl and not set your kitchen on fire, you’ve got this. It’s the kind of cake that looks like you slaved over it for hours, but in reality, you probably watched a questionable amount of reality TV while it baked. Plus, moist vanilla cake is the ultimate blank canvas. It’s like the little black dress of the dessert world – always appropriate, always delicious.
Ingredients You’ll Need
- Flour: All-purpose is your gal. Don’t get fancy unless you’re feeling adventurous (and prepared for potential chaos).
- Sugar: Granulated, the sweet stuff that makes life worth living.
- Baking Powder & Soda: These are the magic workers that make your cake rise like a well-rested superhero.
- Salt: Just a pinch, to balance all that sweetness. It’s like the thoughtful friend in the group.
- Eggs: Large ones, preferably at room temperature. They’re the glue holding this deliciousness together.
- Milk: Whole milk for maximum richness, but semi-skimmed will do in a pinch.
- Vegetable Oil: This is the secret to that legendary moistness. Butter cakes can be dry, but oil? Oil is the MVP.
- Vanilla Extract: The star of the show! Use the good stuff if you can; it makes a difference, trust me.
- Hot Water: Don’t ask questions, just have it ready. It’s another trick up this cake’s sleeve.
- For the Chocolate Glaze: Powdered sugar, cocoa powder, a splash of milk, and a tiny bit of vanilla. Simple, elegant, and decadent.
Step-by-Step Instructions
- Preheat your oven to 350°F (175°C). **Grease and flour your cake pan.** A well-loved bundt pan or a couple of 8-inch rounds will work.
- In a big bowl, whisk together the dry ingredients: flour, sugar, baking powder, baking soda, and salt. Give it a good stir so everything’s happy and mixed.
- In another bowl, whisk together the wet ingredients: eggs, milk, oil, and vanilla.
- Pour the wet ingredients into the dry ingredients. Mix until just combined. **Don’t overmix!** We’re not making rubber.
- Now for the magic: slowly pour in the hot water and stir until the batter is smooth and *pourable*. It’ll be thin, and that’s exactly what we want.
- Pour the batter into your prepared pan. Bake for 30-40 minutes, or until a toothpick inserted into the center comes out clean.
- Let the cake cool in the pan for about 10 minutes before inverting it onto a wire rack to cool completely.
- While the cake cools, whip up the glaze. Whisk together powdered sugar and cocoa powder. Gradually add milk and vanilla until you reach a smooth, drizzly consistency. Add more milk if it’s too thick, more powdered sugar if it’s too thin.
- Once the cake is fully cooled (seriously, **let it cool completely** unless you like soggy glaze), drizzle that gorgeous chocolate all over it.
Common Mistakes to Avoid
- Skipping the Preheat: Seriously, don’t do it. Your cake will be sad and flat.
- Overmixing: I can’t stress this enough. Overmixing equals a tough cake. Be gentle, be brief.
- Using Cold Ingredients: Room temperature eggs and milk mix better and create a smoother batter.
- Opening the Oven Door Too Soon: Let the cake bake in peace! Every time you peek, you risk deflating your masterpiece.
- Cutting into a Hot Cake: Patience, grasshopper! A hot cake will crumble like a bad excuse.
Alternatives & Substitutions
Feeling a bit experimental? Go for it!
- Gluten-Free? Swap the all-purpose flour for a good quality gluten-free blend. You might need to adjust the liquid slightly, so keep an eye on the batter consistency.
- Dairy-Free? Use your favorite plant-based milk (almond or oat are great) and a dairy-free oil like canola or sunflower.
- Want Chocolate Chips? Fold a cup of chocolate chips into the batter before baking. Because, why not?
- Different Glaze? A cream cheese frosting is divine. Or a simple lemon glaze for a zesty twist. The world is your oyster (or your cake!).
FAQ (Frequently Asked Questions)
Can I use butter instead of oil? Well, technically yes, but oil is what gives this cake its signature moistness. Butter will give you a slightly different, perhaps a bit denser, crumb. If you *must*, use melted butter, but IMO, stick with the oil for this one.
What if I don’t have hot water? Regular tap water will work in a pinch, but the hot water really helps bloom the cocoa and makes the batter super smooth. So, heat it up if you can!
How long does this cake last? In an airtight container at room temperature, it should be good for about 2-3 days. If it’s super humid, the fridge might be a better option.
Can I make this into cupcakes? Absolutely! Reduce the baking time to about 18-22 minutes. Keep an eye on them, though – cupcakes can go from perfect to burnt in seconds.
My glaze is too thick/thin! What do I do? Don’t panic! For too thick, add milk about a teaspoon at a time until it’s drizzly. For too thin, add more powdered sugar, a tablespoon at a time. It’s all about balance.
Can I use different extracts? Sure! Almond extract would be yummy, or a bit of lemon zest for a brighter flavor. Just don’t go overboard.
Final Thoughts
There you have it! A ridiculously easy, wonderfully moist vanilla cake with a dreamy chocolate glaze. It’s the perfect treat for a Tuesday, a birthday, or just because you deserve a little sweetness. Don’t be shy, share it with loved ones, or hog it all for yourself (no judgment here). Now go impress someone—or yourself—with your new culinary skills. You’ve earned it!
