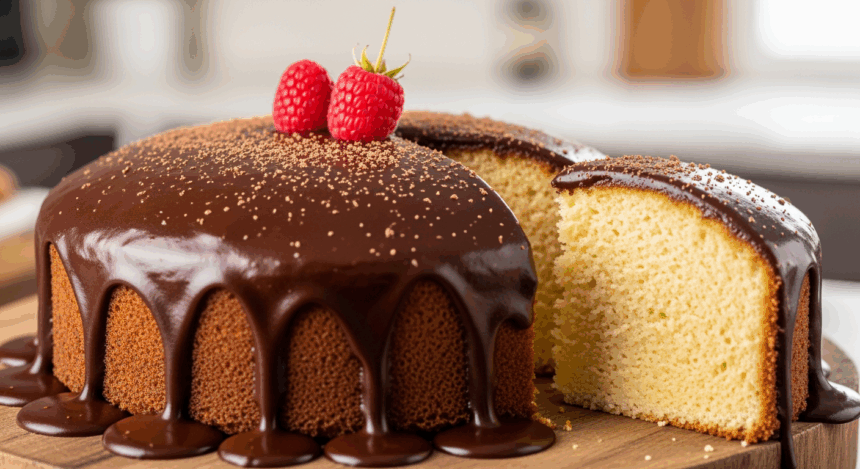
Look, let’s be real. Nothing says “I’ve got my life together” quite like pulling a homemade cake out of the oven – especially when it’s not someone’s birthday and you just made it because… well, cake. This moist vanilla cake with chocolate glaze is what happens when basic meets bougie – simple ingredients but a result that’ll have people thinking you’ve been taking secret pastry classes.
Why This Recipe is Awesome
First off, this cake is practically fool-proof. If you can operate a mixing bowl and turn on an oven, you’re already 80% there. No fancy equipment needed – your grandma’s hand mixer from 1992 will work just fine.
What makes this recipe stand out is the perfect balance of moisture and structure. It’s not one of those sad, dry cakes that has you reaching for your drink after every bite. And that chocolate glaze? It’s basically a chocolate mirror that makes everything look professional, even if you decorated it with your eyes closed.
Plus, it stores well, which means you can absolutely eat cake for breakfast tomorrow. I won’t tell anyone.
Ingredients You’ll Need
For the Vanilla Cake:
- 2½ cups all-purpose flour (the regular stuff, nothing fancy)
- 2 cups granulated sugar (yes, that much – we’re making cake, not salad)
- 1 cup unsalted butter, softened (leave it out while you binge an episode of something)
- 4 large eggs (room temperature, because cold eggs are party poopers)
- 1 cup whole milk (2% works too if you’re being “healthy”)
- 2 tsp real vanilla extract (the good stuff, not that imitation nonsense)
- 2½ tsp baking powder (the magical rising dust)
- ½ tsp salt (to make the sweet things sweeter, science!)
For the Chocolate Glaze:
- 1 cup semi-sweet chocolate chips (or just chop up that chocolate bar you were saving)
- ½ cup heavy cream (also called heavy whipping cream for the confused shoppers)
- 2 tbsp unsalted butter (for shine and because more butter = more better)
- 1 tsp vanilla extract (yes, more vanilla – trust me)
- Pinch of salt (tiny but mighty flavor enhancer)
Step-by-Step Instructions
- Prep your battlefield. Preheat oven to 350°F (175°C). Grease and flour two 9-inch round cake pans. Or use one 9×13 pan if you’re not trying to create a layer cake masterpiece.
- Mix the dry team. In a medium bowl, whisk together the flour, baking powder, and salt. Set aside and try not to spill it all over your counter.
- Beat the butter and sugar. In a large bowl, beat butter and sugar until fluffy – about 3-4 minutes. It should look pale and somewhat like beach sand after a wave hits it.
- Add eggs and vanilla. Mix in eggs one at a time (patience, grasshopper), then vanilla. Don’t worry if it looks curdled – we’re fixing that next.
- Alternate wet and dry. Add the flour mixture in three parts, alternating with the milk, beginning and ending with flour. Mix just until combined after each addition – overmixing is the enemy.
- Bake it! Pour batter into prepared pan(s) and bake for 25-30 minutes, or until a toothpick inserted comes out clean or with a few moist crumbs.
- Cool your jets. Let the cake cool in the pan for 10 minutes, then remove to a wire rack to cool completely. If you glaze it while hot, you’ll have a delicious mess instead of a cake.
- Make the glaze. Heat heavy cream until it’s just about to simmer. Pour over chocolate chips, let sit for 1 minute, then stir until smooth. Add butter and vanilla, stir until glossy.
- Glaze that beauty. Once cake is completely cool (I mean it!), pour glaze over the top, letting it drip down the sides if you’re doing a layer cake. For extra style points, use an offset spatula to guide it.
- Set and serve. Let glaze set for about 30 minutes, then slice and accept your new status as the cake whisperer of your friend group.
Common Mistakes to Avoid
Opening the oven door too early. I know you’re excited, but your cake needs privacy during its first 20 minutes in the oven. Opening the door causes temperature drops that lead to sad, sunken centers.
Using cold ingredients. Cold eggs and milk are basically sabotage. Room temperature ingredients mix better and create a more uniform batter.
Measuring flour by dipping the cup. This packs too much flour in and makes for a dry cake. Spoon it into your measuring cup and level it off instead.
Glazing a warm cake. Unless you want your glaze to slide right off onto your counter, be patient! A warm cake plus chocolate glaze equals a delicious puddle.
Alternatives & Substitutions
Milk alternatives: Almond milk, oat milk, or even buttermilk work great. Just note that buttermilk will give it a slight tanginess (in a good way).
Flour options: You can swap up to ½ cup of the all-purpose flour with cake flour for an even softer texture. FYI, using all cake flour might make it too delicate to hold up the glaze.
Vanilla variations: Try scraping a real vanilla bean instead of extract for fancy-pants vanilla flavor, or use almond extract for a twist (reduce to 1 tsp though – that stuff is potent).
Glaze alternatives: Not feeling chocolate? Make a vanilla glaze with powdered sugar, milk, and vanilla. Or go wild with cream cheese frosting if you’re in that kind of mood.
Add-ins: Throw in some sprinkles for funfetti vibes, or fold in lemon zest for brightness. You’re the boss of your cake universe.
FAQ (Frequently Asked Questions)
How do I know when the cake is actually done?
The toothpick test is reliable, but you can also gently press the center – it should spring back. If your finger leaves a dent, give it a few more minutes. Also, the cake will start to pull away from the sides of the pan when it’s ready.
Can I make this ahead of time?
Absolutely! The cake layers can be made a day ahead (wrap them well). You can even freeze them for up to a month. Just glaze it when you’re ready to serve, or within a few hours at least.
My glaze is too thick/thin. What now?
Too thick? Add a teaspoon of warm cream at a time until it reaches pourable consistency. Too thin? Let it cool a bit more, or add a few extra chocolate chips and stir until melted.
Do I really need to use unsalted butter?
I mean, salted butter won’t summon demons or anything, but it does make controlling the salt level tricky. If it’s all you have, skip the added salt in the recipe.
Can I turn this into cupcakes?
You bet! Fill cupcake liners about 2/3 full and bake for approximately 18-22 minutes. This recipe should make about 24 cupcakes. Dip the tops in the glaze for a bakery-style finish.
Final Thoughts
Congratulations! You’ve now got a cake that looks like you actually know what you’re doing in the kitchen. Whether you’re serving it at a dinner party or eating it alone on your couch while binge-watching shows (no judgment here), this vanilla cake with chocolate glaze hits that perfect spot between “I made an effort” and “this wasn’t so hard I needed therapy after.”
Remember, the best part about baking is that even the “failures” are usually still delicious. So don’t stress if your glaze isn’t perfectly smooth or your cake has a slight lean – just call it “rustic” and own it. Now go slice yourself a piece – you’ve earned it just by reading this far!
