So, you’ve got that specific craving, that whisper in your soul telling you, “I need cake, and I need it *now*!” But you’re also kinda-sorta-definitely not in the mood for a culinary marathon, right? You want delicious, impressive, but also, like, *effortless*? My friend, I feel you. That’s exactly where this ridiculously easy (and unbelievably moist) Vanilla Bean Cake recipe struts in, ready to save your dessert game without breaking a sweat. Or your spirit. Or your kitchen. (Mostly.)
Why This Recipe is Awesome
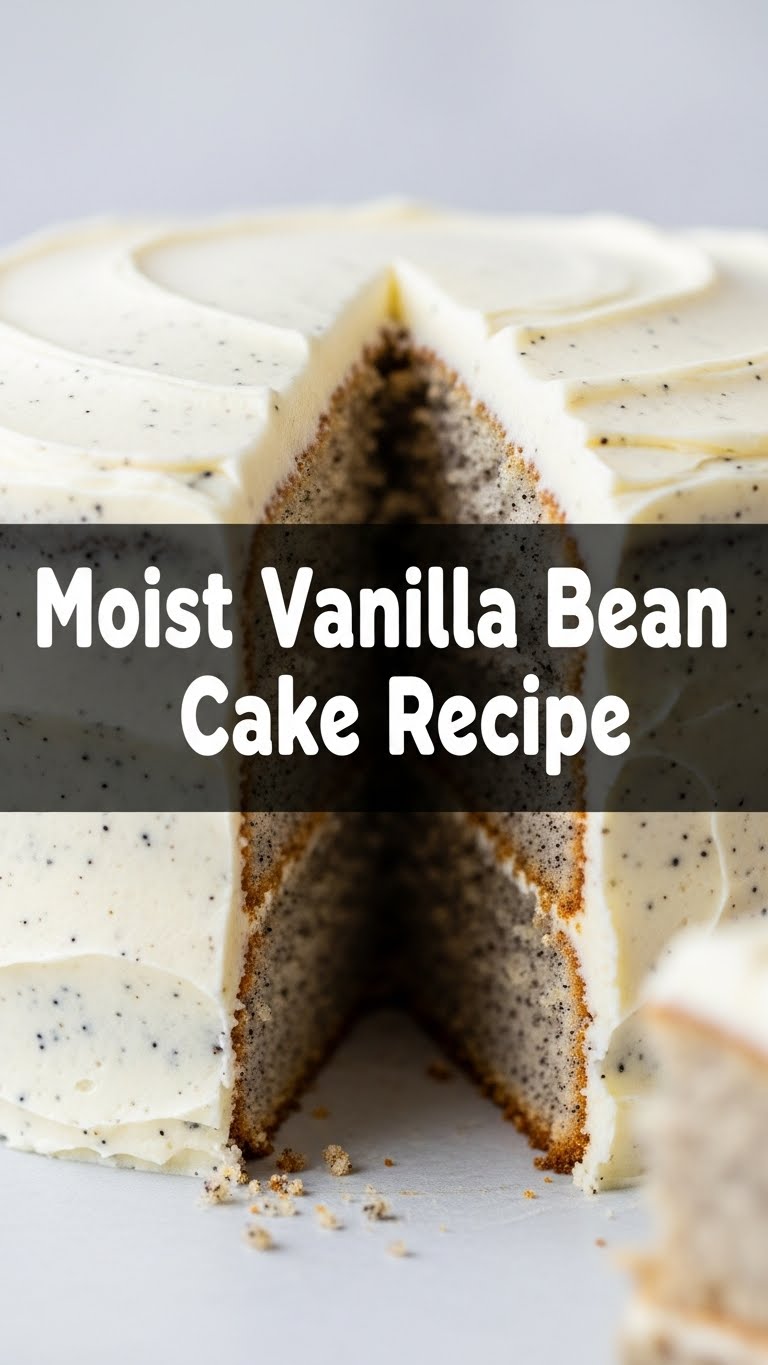
Look, I’ve had my share of cake disasters. Cakes that tasted like cardboard, cakes that looked like a deflated soufflé, cakes that spontaneously combusted (okay, maybe not that last one, but it *felt* like it). This isn’t one of those. This is the unicorn of vanilla cakes: super moist, packed with actual vanilla bean flavor (none of that “vanilla-ish” nonsense), and honestly, it’s pretty much idiot-proof. Even I, a self-proclaimed expert in kitchen chaos, managed to nail it on the first try. It’s got that delicate crumb and rich flavor that screams “I spent hours on this!” when really, you just… didn’t. Plus, your kitchen will smell like a dream. You’re welcome.
Ingredients You’ll Need
Alright, gather your troops! Most of these are probably already chilling in your pantry, waiting for their moment to shine. No obscure dragon’s breath required, promise.
- 2 ½ cups All-Purpose Flour: The foundation of our dreams. Sift it if you’re feeling fancy (or just want a lighter cake).
- 1 ½ cups Granulated Sugar: Sweetness! Don’t skimp, this is cake, not a health food smoothie.
- 1 tbsp Baking Powder: Our lift-off mechanism. Helps us defy gravity.
- ½ tsp Salt: Crucial for balancing all that sweetness and bringing out the flavors. Don’t skip it, seriously.
- 1 cup (2 sticks) Unsalted Butter: Softened to room temperature. And yes, unsalted. We control the salt around here.
- 2 Large Eggs: Room temperature, please! They mix better.
- 2 Large Egg Yolks: Extra richness and moisture, because we’re not messing around. Also room temperature.
- 1 cup Whole Milk: Also room temp. If you’re feeling extra, buttermilk works too!
- 1 Vanilla Bean: The star of the show! Scrape out those beautiful little flecks. No vanilla extract in sight for this one, unless you absolutely *have* to (more on that later).
- ½ cup Sour Cream or Full-Fat Greek Yogurt: Room temperature, for that extra scientific moistness. Trust me on this one.
Step-by-Step Instructions
Deep breaths, you got this. This isn’t rocket science, it’s just cake. Fun cake!
- Preheat & Prep: First things first, get that oven sizzling at 350°F (175°C). Grease and flour two 8-inch round cake pans. Or line with parchment paper circles if you’re like me and fear sticking.
- Whisk the Dry Stuff: In a medium bowl, whisk together your flour, sugar, baking powder, and salt. Give it a good swish to make sure everything’s evenly distributed.
- Cream the Butter & Vanilla: In a large bowl (or your stand mixer), beat the softened butter until it’s light and fluffy. Now, here’s the fun part: slice open that vanilla bean lengthwise, scrape out all those tiny, aromatic seeds, and add them to the butter. Beat for another minute to really infuse that glorious vanilla.
- Add Eggs & Yolks: Add your eggs and egg yolks one at a time to the butter mixture, beating well after each addition. Make sure it’s all combined before adding the next one. Scrape down the sides of the bowl as needed.
- Alternate Wet & Dry: Now for the magic trick! Add about a third of your dry ingredients to the butter mixture and mix on low until just combined. Next, pour in half of your milk and sour cream mixture (mixed together in a separate small bowl) and mix. Repeat, ending with the dry ingredients. Do NOT overmix! Mix until *just* combined – a few streaks of flour are okay. Overmixing makes for tough cake, and we want tender, moist cake!
- Divide & Bake: Divide the batter evenly between your two prepared cake pans. Spread it out gently with a spatula. Pop them into your preheated oven.
- Bake & Cool: Bake for 28-32 minutes, or until a wooden skewer inserted into the center comes out clean. Once done, let them cool in the pans for about 10-15 minutes before inverting them onto a wire rack to cool completely. Patience is a virtue here, don’t rush it!
- Frost & Devour: Once completely cool (seriously, *completely* cool, or your frosting will melt into a sad puddle), frost with your favorite vanilla buttercream or cream cheese frosting. Then, the best part: eat it!
Common Mistakes to Avoid
Because nobody’s perfect, especially in the kitchen. Learn from my blunders, folks!
- Not Preheating the Oven: Rookie mistake, friend. A cold oven is a sad oven. Your cake won’t rise properly, and you’ll end up with dense disappointment. Always preheat!
- Cold Ingredients: Seriously, I wasn’t kidding about the room temperature butter, eggs, milk, and sour cream. Cold ingredients don’t emulsify well, leading to a lumpy, less-than-perfect batter and a denser cake. Plan ahead, okay?
- Overmixing the Batter: This is probably the biggest culprit for dry, tough cakes. Once the flour hits the wet ingredients, mix *just* until combined. We’re not making bread dough here; gluten development is our enemy.
- Opening the Oven Door Too Early: Resist the urge to peek! Especially in the first 20 minutes. The sudden temperature drop can make your cakes fall flatter than your last attempt at dating.
- Not Letting Cakes Cool Completely: You’ve come this far, don’t ruin it with premature frosting! Hot cake + frosting = sugary soup. Wait it out.
Alternatives & Substitutions
Life happens, and sometimes you don’t have *all* the things. Here are some friendly swaps:
- No Vanilla Bean? *Gasp!* Okay, if you absolutely must, you can use 2 teaspoons of good quality vanilla extract instead. It won’t have those gorgeous speckles or quite the same depth, but it’ll still be delicious. Or, a combo of 1 tsp extract and ½ tsp vanilla bean paste (if you have it) is a decent compromise.
- No Whole Milk? You can use 2% milk, but whole milk truly gives the best richness. If you only have regular milk but want a buttermilk vibe, add 1 tablespoon of lemon juice or white vinegar to 1 cup of milk and let it sit for 5-10 minutes until it slightly curdles. Voila, DIY buttermilk!
- No Sour Cream/Greek Yogurt? While these are great for moisture, if you’re really in a pinch, you can increase your milk slightly (maybe by ¼ cup) or use a similar amount of ricotta cheese (it adds amazing moisture!).
- Butter: Unsalted is preferred so you control the salt. If you *only* have salted butter, omit the ½ tsp of salt from the recipe.
- Cake Flour vs. All-Purpose: If you want an even lighter, more delicate crumb, you can absolutely use cake flour. Just make sure to measure it by weight if you can, as it’s lighter than AP flour. If using volume, you might need a tiny bit more.
FAQ (Frequently Asked Questions)
Got questions? I probably did too. Let’s tackle ’em!
- “Can I use margarine instead of butter?” Well, technically yes, but why hurt your soul like that? Butter provides superior flavor and texture. Margarine just… isn’t the same. Treat yourself!
- “My cake sunk in the middle! What happened?” Ah, the dreaded sinkhole! Could be a few things: oven door opened too soon, underbaked, too much leavening (baking powder), or overmixing. Next time, try to be patient and avoid opening the oven!
- “How long does this cake last?” If stored properly (airtight container, room temp), it’s best for 2-3 days. In the fridge, maybe 4-5 days, but it tends to dry out a bit. FYI: It rarely lasts that long anyway.
- “Can I make cupcakes with this recipe?” Absolutely! Fill cupcake liners about two-thirds full and bake for a shorter time, usually around 18-22 minutes. Keep an eye on them!
- “What kind of frosting should I use?” A classic vanilla buttercream is always a winner. Cream cheese frosting is also divine! For something less sweet, a whipped cream frosting can be lovely, but use it closer to serving time.
- “Can I double the recipe?” You can, but it’s often better to make two separate batches if you’re using a stand mixer, as fitting double the ingredients can be tricky and lead to overmixing. If doing two layers, just make two separate 8-inch cakes from this single recipe.
Final Thoughts
So there you have it, folks! Your new go-to recipe for a vanilla bean cake that’s so moist and flavorful, it practically winks at you. You’ve navigated the tricky waters of baking, armed with a vanilla bean, some butter, and a whole lot of good vibes. Now go forth, impress your family, charm your friends, or just, you know, eat the whole thing yourself while binge-watching your favorite show. No judgment here. You’ve earned every single delicious bite. Happy baking!


