Feeling fancy but also kinda lazy? Want to bake something that looks impressive but won’t make you wanna throw your mixer out the window? Good, because we’re diving headfirst into the magical, ridiculously moist world of Red Velvet cake layers! Forget dry, crumbly imposters. We’re making cake layers so good, you’ll want to hug them. Literally.
Why This Recipe is Awesome
Okay, let’s be real. There are a bazillion Red Velvet recipes out there. So why *this* one? Because it’s so straightforward, even your pet goldfish could probably follow along (if it had opposable thumbs, obvs). Seriously, no weird, fancy ingredients you have to hunt down in an ancient apothecary. We’re talking basic pantry staples that come together to create pure magic.
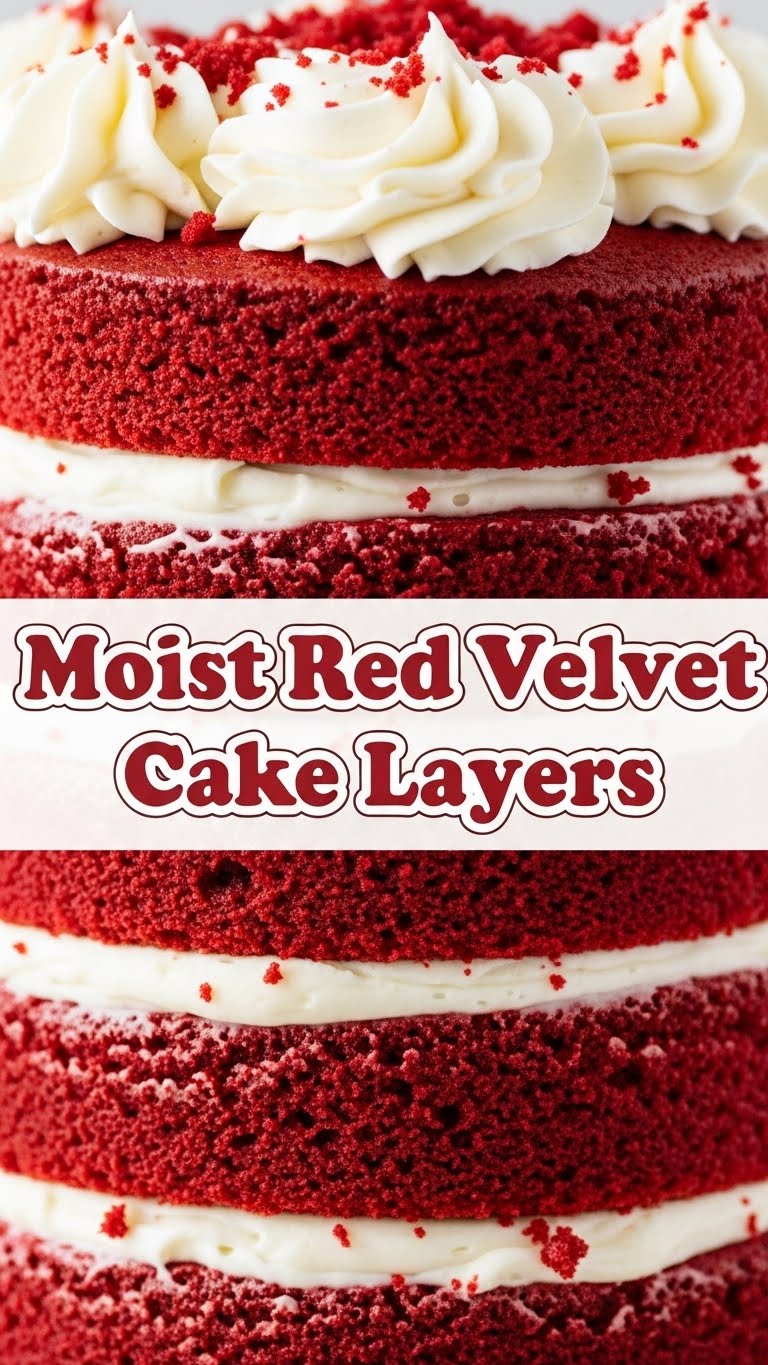
The result? Cake layers so incredibly moist, they’ll make you question all other cakes you’ve ever eaten. They have that perfect tender crumb, that subtle cocoa tang, and that vibrant pop of red that screams “eat me now!” Plus, it looks like you put in way more effort than you actually did. You’re welcome. I’m still getting compliments from the last time I made this, and I almost believe I’m a baking genius now.
Ingredients You’ll Need
Gather your troops, folks! Make sure everything is at room temperature unless specified. This is key for a smooth batter.
- 2 ½ cups All-Purpose Flour: The unsung hero of all baking. Don’t even think about substituting with self-rising.
- 1 ½ cups Granulated Sugar: Sweet, sweet granulated joy.
- 1 tbsp Unsweetened Cocoa Powder: The secret to that *velvety* part and subtle chocolate flavor. Don’t skimp!
- 1 tsp Baking Soda: Our little leavening friend.
- 1 tsp Salt: Just a pinch, to make everything taste *more*.
- 1 cup (2 sticks) Unsalted Butter: Room temp, please! No ice-cold bricks here.
- 2 Large Eggs: Also room temp. Patience, grasshopper.
- 1 cup Buttermilk: The magic liquid that makes it extra moist. If you don’t have it, don’t panic (see FAQs!), but try to get the real deal.
- 2 tsp Vanilla Extract: The hug-in-a-bottle for all desserts.
- 2 tbsp Red Gel Food Coloring: The vibrant star! Use good quality gel for max impact. Liquid food coloring just won’t cut it for that deep red.
- 1 tsp White Vinegar: Sounds weird, but trust the process. Reacts with the baking soda for that perfect rise and tang.
Step-by-Step Instructions
- Preheat & Prep: First things first, preheat your oven to 350°F (175°C). Now, grease and flour two 8-inch round cake pans. Or, even better, line the bottoms with parchment paper and grease the sides. You want these cakes to slide right out, not stick around for eternity.
- Whisk the Dry Squad: In a large bowl, whisk together your flour, sugar, cocoa powder, baking soda, and salt. Make sure everything is nicely combined, no lumps allowed!
- Cream the Butter: In a separate, even larger bowl (or your stand mixer), beat the room temperature butter until it’s light and fluffy. This usually takes about 2-3 minutes.
- Sweeten the Deal: Gradually add the granulated sugar to the butter, beating until the mixture is pale and super fluffy. Scrape down the sides of the bowl often to ensure everything gets incorporated.
- Egg-cellent Addition: Add the eggs, one at a time, beating well after each addition. Don’t rush this part; it’s important for emulsification. Then, stir in the vanilla extract and that vibrant red gel food coloring. Mix until you have a gloriously red, even color.
- Alternate & Conquer: Now for the fun part! Add your dry ingredients mixture to the wet mixture in three parts, alternating with the buttermilk in two parts. Start and end with the dry ingredients. For example: dry, buttermilk, dry, buttermilk, dry. Mix on low speed just until combined after each addition.
- The Vinegar Finale: In a small bowl, quickly stir the white vinegar into the remaining buttermilk (if you added all buttermilk in step 6, just add the vinegar to the batter directly). Pour this into your cake batter and mix on low for just a few seconds, until barely combined. Don’t overmix!
- Bake It Up: Divide the batter evenly between your two prepared cake pans. Pop them into the preheated oven and bake for 25-30 minutes, or until a wooden skewer inserted into the center comes out clean.
- Cool Down: Let those beautiful layers cool in their pans for about 10-15 minutes before inverting them onto a wire rack to cool completely. Patience is a virtue, especially when it comes to cake.
Common Mistakes to Avoid
Listen up, buttercup! We’re all human, but some mistakes are just easily avoided if you know what’s up.
- Overmixing the Batter: Your arm might get a workout, but your cake will be tough and dense. Mix on low speed and stop as soon as the ingredients are just combined. Seriously, overmixing is the enemy of moist cake.
- Using Cold Ingredients: This is a biggie! Cold butter and eggs don’t emulsify well, leading to a lumpy batter and a less-than-stellar cake texture. Plan ahead, leave ’em out.
- Skimping on Cocoa: Red velvet isn’t just red; it has a subtle chocolate undertone. Using proper cocoa is key for that classic flavor. Don’t think it’s just for color.
- Opening the Oven Door Too Much: Let them bake in peace! Every time you open the door, you drop the oven temperature, which can make your cakes sink. Resist the urge to peek until at least 20 minutes in.
- Not Greasing Your Pans Properly: Rookie mistake! You want the cake, not a permanent fixture in the pan. Grease AND flour, or use parchment paper. No regrets!
Alternatives & Substitutions
Life happens, ingredients run out, or you just wanna experiment. Here are a few swaps that won’t totally derail your red velvet dreams:
- Buttermilk Substitute: No buttermilk? No problem (mostly)! You can make your own by adding 1 tablespoon of white vinegar or lemon juice to a measuring cup, then filling it up to the 1-cup line with whole milk. Let it sit for 5-10 minutes until it curdles. It works, but honestly, real buttermilk is king here.
- Food Coloring: We specifically said gel, right? Liquid food coloring tends to be watery and won’t give you that deep, rich red without affecting the batter consistency. But if you’re in a pinch and don’t care about a paler red, use double the amount of liquid.
- Oil Instead of Butter: For an even *moister* crumb, some folks swap butter for vegetable oil. You’d use ¾ cup of oil instead of 1 cup of butter. You’ll get a super tender cake, but you’ll lose a bit of that rich, buttery flavor. It’s a trade-off, really.
- Gluten-Free Flour: Yes, you absolutely can! Use a good quality 1:1 gluten-free baking blend. The texture might be ever so slightly different, but it should still turn out delicious.
FAQ (Frequently Asked Questions)
Got questions? I’ve got (casual) answers!
- Why is my red velvet not very red? Hmm, probably your food coloring! You need a good quality gel paste, not the watery stuff you get at the regular grocery store. Brands like Wilton or Americolor are your friends here.
- Can I make cupcakes instead? Absolutely! Divide the batter into cupcake liners. Reduce the baking time significantly—usually around 18-22 minutes. Keep a close eye on them, as ovens vary.
- How long do these cake layers last? Wrapped well in plastic wrap, the cooled layers can last 2-3 days at room temperature, or up to a week in the fridge. But let’s be real, they’re usually gone within a day.
- Do I *have* to use vinegar? It sounds weird! Yes, you do! It’s not just for flavor; it reacts with the baking soda to give the cake its lift and contributes to that classic subtle tang of red velvet. Trust the process!
- What if I don’t have buttermilk? (Again, seriously, go get some next time!) But as mentioned in Alternatives, mix milk with a tablespoon of vinegar or lemon juice and let it sit for a few minutes until it curdles. It’s a decent stand-in.
- Can I freeze the cake layers? OMG, yes! Once completely cooled, wrap each layer tightly in plastic wrap, then again in foil. They’ll keep in the freezer for up to 2-3 months. Thaw them in the fridge overnight before frosting. It’s a lifesaver for prep!
Final Thoughts
And there you have it, my friend! Your ticket to red velvet bliss. These layers are so good, you might just eat them plain, sans frosting (don’t tell anyone I said that). They’re the perfect base for your favorite cream cheese frosting, ready to become the star of any celebration, or just a Tuesday night.
Go forth and conquer that cake craving! You’ve totally got this. Now, if you’ll excuse me, all this talk of red velvet has made me suddenly need cake. Enjoy baking, and remember: life’s too short for boring cake!


