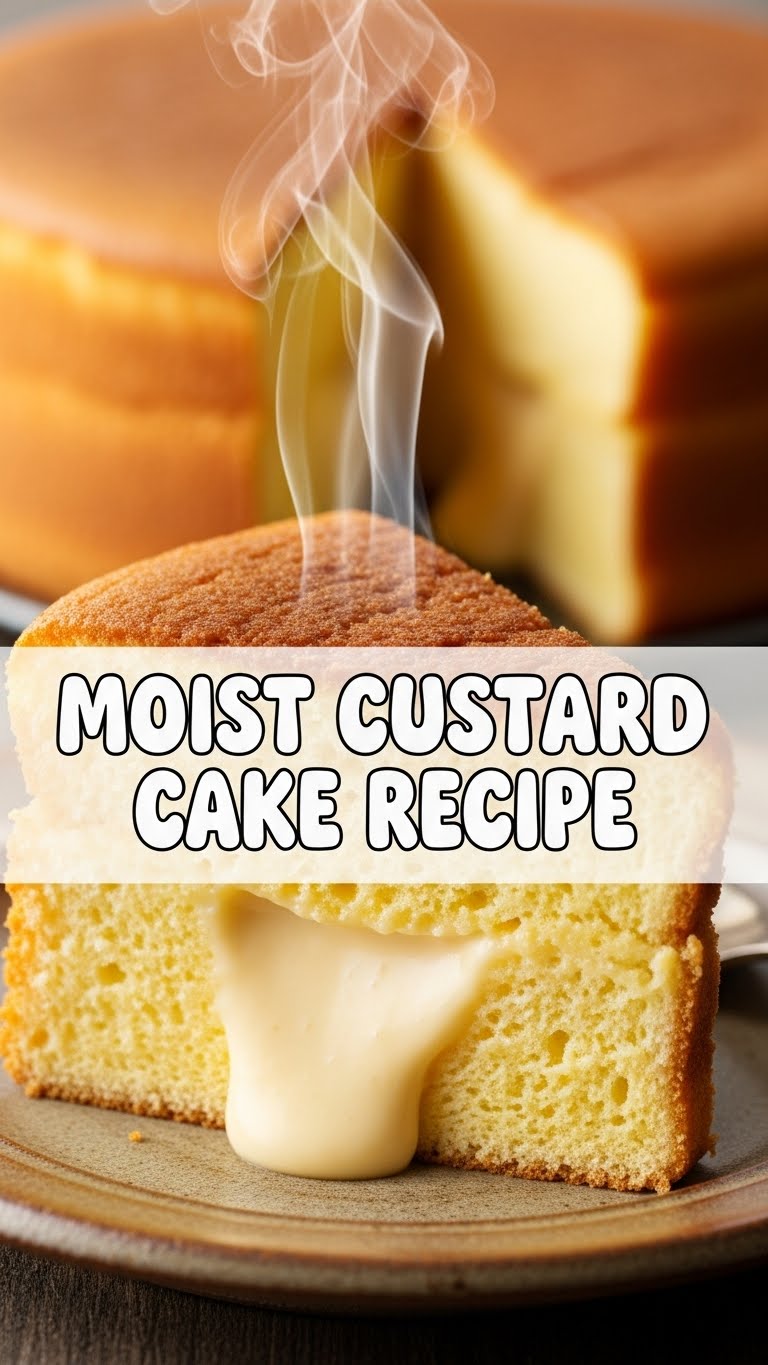
So, you’re craving something ridiculously tasty but your brain is already on weekend mode and thinking about elaborate baking just sounds… exhausting, huh? Same. Let’s make a cake that tastes like a cloud hugged a crème brûlée, but without any of the drama or a blowtorch. Get ready for a Moist Custard Cake that practically bakes itself into pure joy!
Why This Recipe is Awesome
Okay, so why this particular cake? First off, it’s a bit of a magic trick in the oven. You pour in one batter, and it magically separates into two glorious layers: a fluffy, light cake on top and a rich, creamy custard on the bottom. **No fancy layering skills required!** It’s practically idiot-proof – even I didn’t mess it up, and my kitchen sometimes resembles a war zone. Plus, it just *looks* impressive, making your friends think you’ve secretly attended culinary school. Don’t worry, I won’t tell them your secret weapon is just following ridiculously easy steps. It’s a true crowd-pleaser that screams “I tried, but not *too* hard.”
Ingredients You’ll Need
Gather your troops, fellow lazy-but-gourmet chef! Here’s what you’ll need to make this happen:
- 4 Large Eggs: The unsung heroes of this cake! Get big ones, they’re more dramatic and make things fluffier.
- 150g Granulated Sugar: For that perfect touch of sweetness. Because who needs a lumpy cake?
- 120g Unsalted Butter: Melted. Yes, unsalted, because we’re fancy and want to control the salt. Don’t even *think* about margarine unless you want a sad, flavorless cake.
- 500ml Whole Milk: Warmed slightly. Whole milk is key here for ultimate creaminess. Skim milk? That’s just sad water, friend.
- 120g All-Purpose Flour: Sifted. Because we’re not baking bread here, we want lightness.
- 1 tsp Baking Powder: Our little lift-off agent, ensuring that cake layer is nice and airy.
- 2 tsp Vanilla Extract: Go for the good stuff, your taste buds will thank you. No imitation stuff, please!
- Pinch of Salt: Just a tiny bit to enhance all those other yummy flavors. It’s a flavor whisperer.
Step-by-Step Instructions
- Get That Oven Hot: Preheat your oven to 160°C (325°F). Lightly grease and flour a 9-inch round cake pan or an 8×8 inch square pan. A springform pan works great too, but wrap the bottom in foil just in case of leaks (custard is runny!).
- Egg & Sugar Party: In a large bowl, whisk the eggs and sugar together until they’re light, pale, and fluffy. You’re aiming for ribbon stage here, so give it some elbow grease for about 3-5 minutes with a hand mixer.
- Butter Up: Slowly drizzle in the melted butter into the egg mixture, whisking constantly until it’s all combined. We’re building layers of deliciousness!
- Milk & Vanilla Swirl: Gently warm the milk (just enough so it’s not cold, but not hot enough to scramble the eggs!) and stir in the vanilla extract. Gradually add this warm milk mixture to your egg-butter concoction, whisking continuously. It will look very liquidy – don’t panic, that’s normal.
- Flour Power: In a separate bowl, sift together the flour and baking powder. This ensures no lumps and a lighter cake.
- Combine & Conquer: Now, add the dry ingredients to the wet mixture in three batches, gently whisking after each addition until just combined. **Don’t overmix!** Lumps are okay here; overmixing develops gluten and makes your cake tough.
- Pour & Bake: Pour the super liquidy batter into your prepared pan. Place the pan into a larger baking dish or roasting pan. Carefully pour hot water into the larger dish, creating a water bath (bain-marie) that comes about halfway up the sides of your cake pan. This gentle heat helps the custard set perfectly.
- Magic Time: Carefully transfer the whole setup to your preheated oven. Bake for about 50-70 minutes, or until the top cake layer is golden brown and springs back when lightly touched. The custard underneath might still be slightly wobbly, which is totally fine – it will set as it cools.
- Cool Down: Remove the pan from the water bath and let it cool completely on a wire rack. **This is crucial!** Pop it in the fridge for at least 2-3 hours (or overnight for best results) to allow the custard to fully set. Seriously, patience is a virtue here.
Common Mistakes to Avoid
Listen up, buttercup! Don’t make these rookie errors:
- Not preheating your oven: Seriously, your oven isn’t a mind-reader. Give it a head start! A properly preheated oven ensures even baking from the get-go.
- Overmixing the batter: We want a fluffy cake, not a dense brick. Mix just until combined, okay? Lumps are your friends here; overmixing is your enemy.
- Opening the oven door constantly: Patience, grasshopper! Let the magic happen. Every peek drops the temperature, which can really mess with the delicate rise and separation of the layers. **Trust the process!**
- Not letting it cool properly: I know, I know, it smells divine and you want to dive in. But seriously, let it cool down and chill in the fridge before slicing, or it’ll be a soupy, disappointing mess.
- Skipping the water bath: This isn’t just for show! The water bath provides gentle, even heat, which is essential for that silky smooth custard texture. Without it, you risk a curdled, dry custard.
Alternatives & Substitutions
Feeling a little extra? Here are some simple swaps and additions:
- Milk: If you’re feeling adventurous (or lactose-intolerant), almond milk or oat milk can work, but IMO, whole milk gives the absolute best texture and richness. Results may vary with plant-based milks.
- Vanilla: Try a hint of almond extract for a marzipan-like twist, or even some lemon zest for a brighter flavor. Just don’t go crazy, we’re making custard cake, not potpourri.
- Spices: A tiny sprinkle of nutmeg or cinnamon in the batter? Ooh la la! It adds a warm, cozy vibe.
- Toppings: After it’s completely cooled, dust with powdered sugar, serve with fresh berries, or a dollop of whipped cream. Fancy!
FAQ (Frequently Asked Questions)
- Why does it separate into two layers? Is it witchcraft?
Pretty much! It’s actually a cool bit of kitchen science. The different densities of the batter separate during baking; the lighter cake batter floats to the top, and the heavier custard mix sinks and sets on the bottom. Cool, right?
- Can I use cold milk?
Technically, you *could*, but warming it slightly (not hot!) helps all the ingredients emulsify better and results in a smoother, more uniform batter. **Warm milk is your friend!**
- My cake didn’t rise much, what happened?
Did you check your baking powder’s expiry date? Old baking powder is like a deflated balloon – no lift! Or maybe you opened the oven door too often during baking? Patience, my friend, patience.
- Can I make it gluten-free?
You *can* try a 1:1 gluten-free flour blend, but results might vary in terms of texture. It’ll still be tasty, but expect a slightly different mouthfeel.
- How long does it keep?
If you can manage not to eat it all in one sitting (impressive self-control!), it’ll last 3-4 days in the fridge. Just make sure to cover it well to keep it fresh and moist.
- Can I add chocolate chips?
Honey, you can add whatever your heart desires! But I’d recommend sprinkling them on top of the batter *before* baking. Otherwise, they might sink into the custard layer, which isn’t a bad thing, but it won’t be as visually appealing.
- Is it supposed to be super wobbly when I take it out of the oven?
Yes, absolutely! The custard layer is delicate and needs time to set as it cools, especially in the fridge. It’s a bit like a panna cotta – it firms up with chilling.
Final Thoughts
And there you have it! Your very own, ridiculously delicious, moist custard cake that makes you look like a culinary superstar without breaking a sweat. See? I told you it was easy. Now go impress someone – or just yourself – with your new culinary skills. You’ve earned it, chef! Maybe even treat yourself to a second slice, you deserve it after all that ‘hard work’. Enjoy, my friend!

