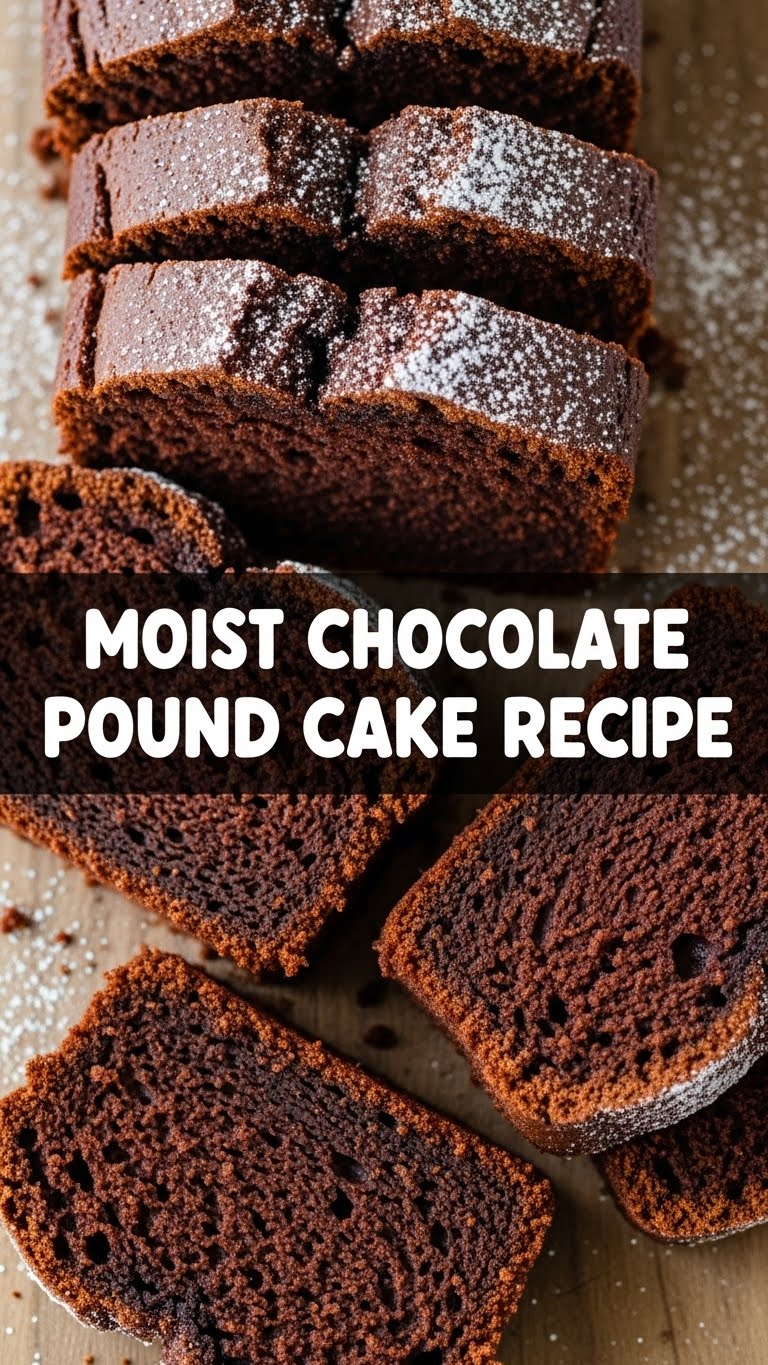
So, you’ve got that chocolate craving gnawing at you, but the thought of a super-fancy, multi-layered cake sends shivers down your spine? Friend, I feel you. Or maybe you just want to impress someone (or, let’s be real, yourself) with minimal fuss and maximum deliciousness. You’re in the right place! This isn’t just any chocolate cake; it’s the kind of moist, rich, pound cake perfection that practically bakes itself while you, like, contemplate your life choices. Let’s get baking!
Why This Recipe is Awesome
Okay, buckle up, because this isn’t just a recipe; it’s a declaration of love for easy, delicious chocolate. This chocolate pound cake is **ridiculously moist**. We’re talking “where has this been all my life?” kind of moist. It’s dense yet tender, with a chocolate flavor that’s deep and satisfying without being overwhelming.
It’s also pretty much **idiot-proof**. Seriously, if I can make it without setting off the smoke alarm (which, FYI, is a high bar in my kitchen), you’re golden. No tricky techniques, no gazillion steps. Just good old-fashioned baking magic. Plus, it looks super impressive, even if your decorating skills peak at “drizzle some chocolate on it and call it art.”
Ingredients You’ll Need
- 1 cup (2 sticks) Unsalted Butter: The good stuff. Softened to room temperature, please! Don’t even *think* about margarine for this masterpiece.
- 2 cups Granulated Sugar: Sweetness incarnate.
- 4 Large Eggs: Also at room temperature! This is important, trust me. It helps create a smoother, more cohesive batter.
- 2 cups All-Purpose Flour: The backbone of our cakey dreams.
- ¾ cup Unsweetened Cocoa Powder: The darker, the better for that deep, chocolatey hug.
- 1 teaspoon Baking Powder: Our little lift-off secret.
- ½ teaspoon Salt: Just a pinch to make everything pop and balance the sweetness.
- 1 cup Buttermilk: This is our moisture MVP, the secret sauce (literally!) for that incredibly tender crumb.
- 1 teaspoon Vanilla Extract: A splash of pure magic that enhances all the chocolatey goodness.
- 1 cup Chocolate Chips (optional, but c’mon): Because more chocolate is always the answer. Semi-sweet or dark are great.
Step-by-Step Instructions
- Prep Your Stage: First things first, preheat your oven to 325°F (160°C). Then, generously grease and flour a 9×5 inch loaf pan (or a 10-12 cup Bundt pan if you’re feeling fancy). **Don’t skip this step, seriously.**
- Cream it Good: In a large mixing bowl, beat the softened butter and granulated sugar together with an electric mixer until it’s light and fluffy – this usually takes about 3-5 minutes. It should look pale and airy, like your best dreams.
- Egg-cellent Addition: Add the eggs one at a time, beating well after each addition. Make sure each egg is fully incorporated before adding the next. Scrape down the sides of the bowl as needed to keep everything mingling nicely.
- Whisk the Dry Stuff: In a separate medium bowl, whisk together the flour, cocoa powder, baking powder, and salt. Give it a good whisk to make sure everything is evenly distributed.
- Alternate & Combine: Now for the magic! With the mixer on low speed, gradually add the dry ingredients to the butter mixture, alternating with the buttermilk. Start and end with the dry ingredients. Mix until just combined – **do not overmix!** Overmixing is a one-way ticket to dry cake.
- Vanilla & Chips: Stir in the vanilla extract. If you’re using chocolate chips, gently fold them into the batter now.
- Bake Time!: Pour the glorious batter into your prepared pan. Smooth the top with a spatula. Bake for about 60-75 minutes for a loaf pan, or 70-85 minutes for a Bundt pan.
- Test & Cool: How do you know it’s done? Insert a wooden skewer or toothpick into the center; if it comes out with moist crumbs (not wet batter), you’re golden! Let the cake cool in the pan for about 10-15 minutes before inverting it onto a wire rack to cool completely.
- Devour: Once cooled (or mostly cooled, if you lack patience like me), slice it up and enjoy your masterpiece!
Common Mistakes to Avoid
- Overmixing the Batter: This is probably the number one killer of moist cakes. Once you add the flour, mix until *just* combined. Seriously, stop before you think it’s perfectly smooth. A few lumps are fine!
- Cold Ingredients: Especially the butter and eggs. Room temperature is your BFF here. It helps everything emulsify properly, leading to a smoother batter and a better-textured cake. Plan ahead, people!
- Opening the Oven Door Constantly: Patience, grasshopper. Every time you peek, you let out heat and mess with your cake’s rise. Let it bake in peace until it’s almost done.
- Not Greasing and Flour-ing the Pan Properly: Cake stuck to the pan? The horror! Don’t be that person. Take an extra minute to ensure your pan is perfectly coated.
- Undercooking or Overcooking: Both are no-gos. Use the toothpick test, but don’t stab it a million times. Once it’s good, get it out of there!
Alternatives & Substitutions
- No Buttermilk? No Problem! If you don’t have buttermilk on hand, don’t despair! Mix 1 cup of regular milk (any kind!) with 1 tablespoon of lemon juice or white vinegar. Let it sit for 5-10 minutes until it looks slightly curdled. Voila! Instant buttermilk. You’re basically a kitchen wizard.
- Cocoa Powder Choices: We used unsweetened cocoa, but if you want an even darker, less acidic flavor, try Dutch-processed cocoa powder. It gives a beautiful, deep hue and mellow chocolate taste.
- Spice it Up: Want to add another layer of flavor? Swirl in ½ teaspoon of espresso powder for a mocha vibe, or a dash of cinnamon (¼ teaspoon) for warmth and depth.
- Gluten-Free Flour: While I haven’t personally tested it, a 1:1 gluten-free baking blend *should* work. Just make sure it contains xanthan gum, or add about ½ teaspoon if it doesn’t.
FAQ (Frequently Asked Questions)
- Can I use oil instead of butter? Well, technically yes, but why hurt your soul like that? You’ll lose that rich, buttery flavor and the tender crumb. **Butter is king here, my friend.** Stick with the good stuff for the best results.
- How do I know my cake is truly done? The classic toothpick test! Stick a wooden skewer or toothpick right into the center of the cake. If it comes out with moist crumbs attached (not wet batter), you’re golden. If it’s wet, give it a few more minutes.
- My cake came out dry. What went wrong? Oof, that’s a bummer! Usually, a dry cake means you either overmixed the batter (developing too much gluten) or overbaked it (sucking out all the moisture). Remember, **gentle mixing and keep a close eye on the oven!**
- Can I make this in a different pan? Absolutely! A Bundt pan works beautifully and gives it a lovely shape. Just be aware that baking times might vary slightly, so start checking earlier and adjust as needed. You can also make cupcakes, but again, adjust timing.
- How long does this cake last? HA! As if it’ll last that long! But seriously, if tightly wrapped, it will stay fresh at room temperature for 3-4 days, or in the fridge for up to a week. It also freezes beautifully for longer storage.
- Do I have to add chocolate chips? Nope, but why deny yourself extra happiness? This cake is fantastic on its own, but the chips add little pockets of melty joy. It’s totally your call.
- Can I add frosting? Why limit your happiness? This cake is amazing naked, but a simple chocolate ganache, a dusting of powdered sugar, or even a cream cheese frosting would be absolutely divine. Go wild!
Final Thoughts
So there you have it, your new go-to chocolate obsession. No fancy chef skills required, just a love for deliciousness and a willingness to follow a few simple steps. This moist chocolate pound cake is going to be your new best friend for potlucks, lazy Sundays, or just when you need a serious chocolate fix.
Whip this up, share it (if you’re feeling generous!), and bask in the glory of your moist, chocolatey creation. You’ve totally got this! Now go impress someone—or yourself—with your new culinary skills. You’ve earned it!

