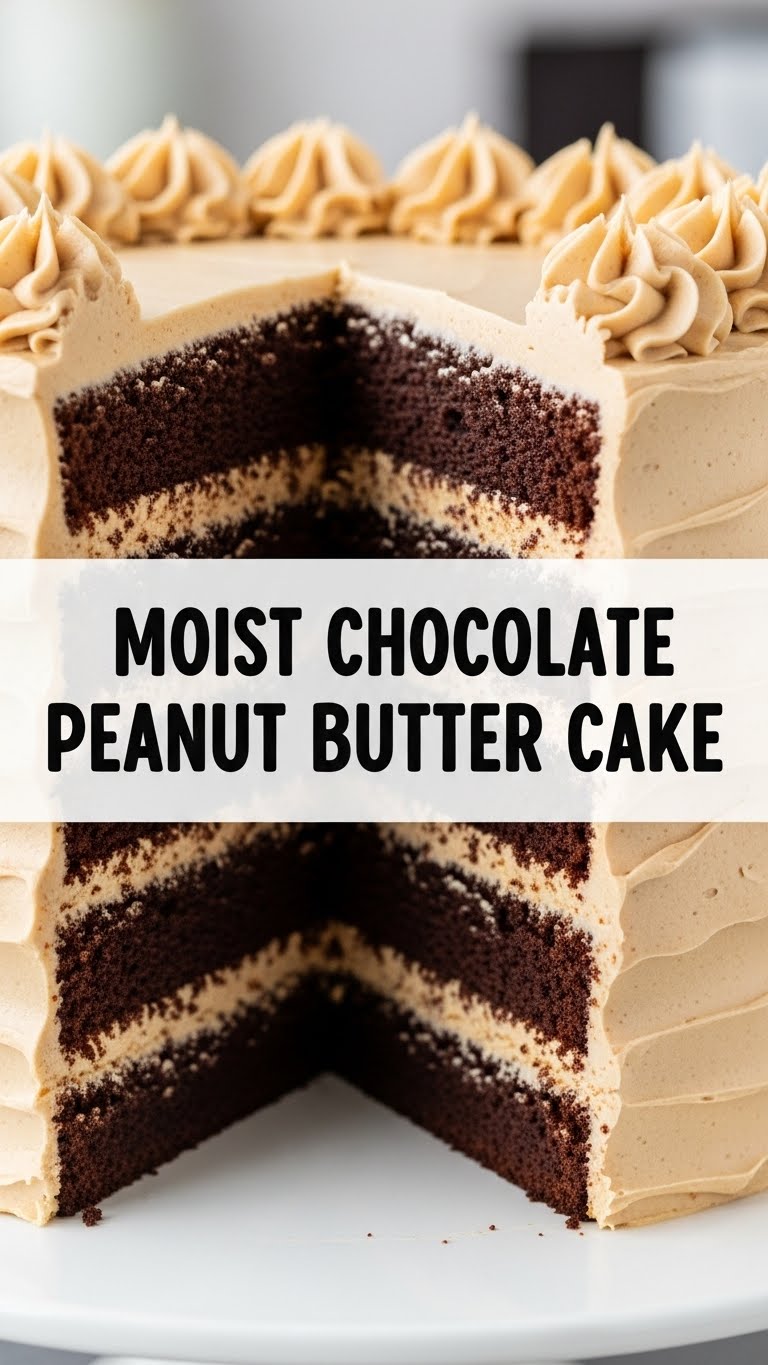
Alright, listen up buttercup! Ever have those days where you desperately need something ridiculously delicious, chocolatey, and kinda-sorta-nutty, but the thought of spending hours in the kitchen makes you want to crawl back into bed? Yep, me too. Luckily, I’ve got just the thing that’s about to become your new best friend: a Moist Chocolate Peanut Butter Cake that’s so good, it’s practically illegal.
Why This Recipe is Awesome
Okay, so why this cake, you ask? Because it’s basically magic. Seriously. It’s **stupidly easy** – like, even your goldfish could probably bake it (if fish had hands and opposable thumbs, that is). No fancy techniques, no obscure ingredients, just pure, unadulterated deliciousness that comes together faster than you can say “I need more chocolate.” Plus, it makes you look like a master baker without actually having to put in master baker effort. Win-win, right?
Ingredients You’ll Need
- **All-purpose flour:** The backbone of our cakey dreams. Don’t try to get fancy with almond flour here, unless you’re feeling adventurous and don’t mind a different texture.
- **Granulated sugar:** Because life is sweet, and so should our cake be.
- **Unsweetened cocoa powder:** The deeper and darker, the better for that intense chocolate hit. This isn’t the time for mild-mannered cocoa.
- **Baking soda & Baking powder:** Our dynamic duo for lift! Don’t mix them up, folks.
- **Salt:** Just a pinch, to make all the other flavors sing.
- **Milk:** Any kind works! Whole, 2%, even almond milk if you’re dairy-free-ish.
- **Vegetable oil:** Or canola oil. Keeps things moist, and honestly, butter would be too much effort to melt for this.
- **Large eggs:** Two, please. They’re the glue!
- **Vanilla extract:** A splash of pure joy. Don’t skip it!
- **Hot water (or coffee!):** The secret weapon for extra moistness and really blooming that cocoa flavor. **Pro tip:** Coffee enhances chocolate *without* making it taste like coffee. Shhh.
- **Creamy peanut butter:** The star of our frosting show. Jif, Skippy, whatever your jam is.
- **Powdered sugar (confectioners’ sugar):** For that super smooth, melt-in-your-mouth frosting.
- **Unsalted butter:** Softened, for the frosting. Don’t use cold butter, you’ll regret it.
Step-by-Step Instructions
- **Get Prepped:** First things first, preheat your oven to **350°F (175°C)**. Grease and flour a 9×13 inch baking pan. This is non-negotiable unless you want your cake to become one with the pan.
- **Mix the Dry Stuff:** In a large bowl, whisk together the flour, sugar, cocoa powder, baking soda, baking powder, and salt. Make sure there are no lumps—we’re going for smooth sailing here.
- **Add the Wet Stuff (Mostly):** Pour in the milk, oil, eggs, and vanilla extract. Beat with an electric mixer on medium speed for about 2 minutes, until everything is just combined and looking glorious.
- **The Hot Water Magic:** Carefully add the hot water (or coffee). The batter will be thin, don’t panic! This is what makes it super moist. Mix until just combined; don’t overmix.
- **Bake It Up:** Pour the batter into your prepared pan. Pop it into the preheated oven and bake for **30-35 minutes**, or until a wooden skewer inserted into the center comes out clean.
- **Cool Down:** Let the cake cool completely in the pan on a wire rack. Patience, grasshopper! Seriously, don’t try to frost a warm cake unless you’re aiming for a soupy mess.
- **Frosting Time!** While the cake cools, whip up the peanut butter frosting. In a medium bowl, beat the softened butter and peanut butter until light and fluffy. Gradually add the powdered sugar, one cup at a time, mixing well after each addition. If it’s too thick, add a tiny splash of milk until it’s spreadable.
- **Frost & Devour:** Once the cake is completely cool, spread that luscious peanut butter frosting all over it. Slice, serve, and bask in the glory of your creation.
Common Mistakes to Avoid
- **Not preheating the oven:** Rookie mistake, seriously. Your cake won’t bake evenly, and you’ll end up with a sad, dense hockey puck.
- **Overmixing the batter:** Once you add the wet ingredients, mix until *just* combined. Overmixing develops the gluten too much, leading to a tough, dry cake. Nobody wants a tough cake.
- **Skipping the hot water/coffee:** This is crucial for moisture and flavor. Don’t think you can just leave it out because the batter looks thin. It’s science, people!
- **Frosting a warm cake:** Unless you’re going for a *melted lava cake* aesthetic (which isn’t what we’re going for here), wait until the cake is completely cool. **Trust me on this one.**
- **Ignoring the “grease and flour the pan” step:** You might think you’re above it, but your cake will stick, and you’ll cry. Just do it.
Alternatives & Substitutions
Feeling a little rebellious, huh? I like your style! Here are a few ways to tweak this masterpiece:
- **Nut Butter Swap:** Not a huge peanut butter fan? You could totally use almond butter or cashew butter for the frosting. The flavor profile will shift, obviously, but still delicious.
- **Chocolate Boost:** For an extra decadent chocolate kick, melt about 1/2 cup of chocolate chips and fold them into the batter at the very end. OMG, it’s good.
- **Dairy-Free Dream:** Swap regular milk for your favorite plant-based milk (almond, soy, oat). Make sure your butter for the frosting is also plant-based, and boom, you’re in business.
- **Coffee or No Coffee?** If you *really* don’t want to use coffee, just use hot water. But seriously, the coffee makes the chocolate sing!
FAQ (Frequently Asked Questions)
- Can I make this as cupcakes?
- Absolutely! Just fill cupcake liners about two-thirds full and bake for about 18-22 minutes. Keep an eye on them, because ovens vary!
- What if I don’t have an electric mixer?
- You can totally do this by hand! Just be prepared for a bit of a bicep workout, especially for the frosting. Mix until smooth and well combined.
- How long does this cake last?
- Honestly? Not long in my house. But properly covered and stored at room temperature, it’s usually good for 3-4 days. You can also refrigerate it for a longer shelf life, but bring it to room temp before serving for best flavor.
- Can I use crunchy peanut butter for the frosting?
- Well, you *can*, but why would you want to ruin that silky smooth frosting texture? IMO, creamy is king here. Unless you *really* love peanut chunks in your frosting. No judgment, just… texture considerations.
- My cake came out dry, what went wrong?
- Oh no! Chances are you either overbaked it or overmixed the batter. Or maybe you forgot the hot water? **Baking is a science, follow the steps!**
- Can I add chocolate chips to the batter?
- Um, yes! Is that even a question? Fold in about a cup of your favorite chocolate chips (semi-sweet, milk, dark—your choice!) at the end. You’re welcome.
Final Thoughts
So there you have it, folks! Your new go-to recipe for when you need a hug in cake form, but also when you’re feeling a bit lazy (which, let’s be real, is often). This Moist Chocolate Peanut Butter Cake is a crowd-pleaser, a mood-lifter, and a testament to the fact that delicious doesn’t have to mean difficult. Now go forth, bake this beauty, and impress literally everyone (including yourself!). You’ve earned those bragging rights. Happy baking!
