Okay, confession time: sometimes I want something decadent, delightful, and utterly adorable, but the thought of baking a whole elaborate cake? Yeah, no thanks. My oven and I have an understanding: keep it simple, keep it delicious. And that, my friend, is where the magic of **Moist Cake Pops** waltzes in! Think tiny, perfect spheres of cakey goodness, enrobed in a sweet shell. They’re like the ultimate party trick for your mouth, and trust me, they’re easier than convincing your cat to wear a tiny hat (unless you have a very agreeable cat, in which case, share your secrets).
Why This Recipe is Awesome
Look, if you can open a box and wield a spoon, you can make these. Seriously. This recipe is practically **idiot-proof**, even I didn’t mess it up, and I once almost set off the fire alarm microwaving popcorn. These little spheres of joy are the ultimate “I made this!” boast without having to break a sweat. They’re perfect for parties, gifts, or just eating all by yourself in a dark closet (no judgment here, we’ve all been there). Plus, they are incredibly versatile, unbelievably moist (that’s the secret sauce!), and just plain fun to decorate. Who doesn’t love edible art on a stick?
Ingredients You’ll Need
Gather ’round, my fellow kitchen adventurers! Here’s your treasure map to deliciousness:
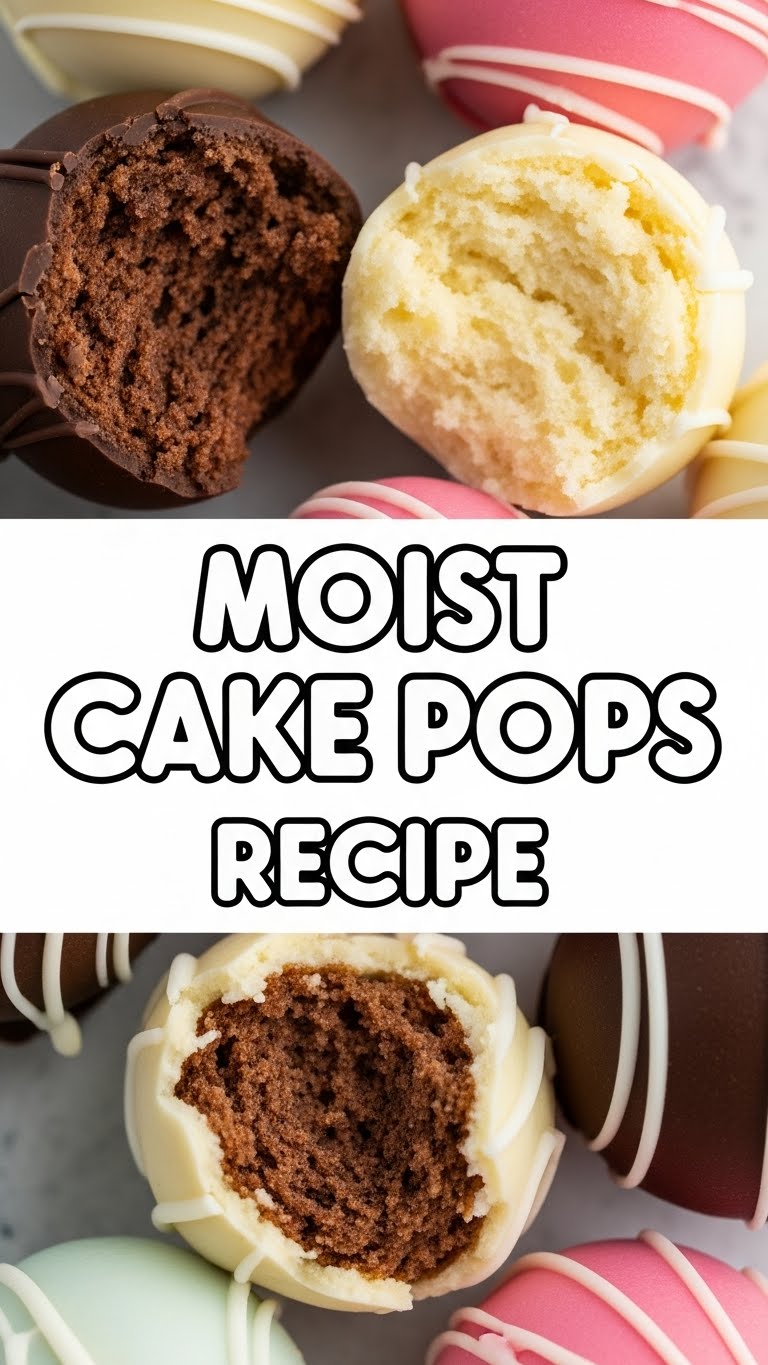
- **1 box of your favorite cake mix:** Vanilla, chocolate, red velvet – whatever makes your heart sing! (And yes, we’re using a box mix. No shame in shortcuts, my friend.)
- **Ingredients for cake mix:** Usually eggs, oil, and water. Follow the box instructions, you rebel.
- **1 can (16 oz) of prepared frosting:** Again, choose your fighter! Vanilla, cream cheese, chocolate – pick something that complements your cake.
- **Candy melts (12-16 oz bag):** White, milk chocolate, or whatever crazy color matches your party theme. These are key for that perfect shell.
- **Lollipop sticks:** About 25-30 of ’em. Because who wants cake that *isn’t* on a stick?
- **Sprinkles, edible glitter, or other fun decorations:** Get creative! This is where you unleash your inner artist (or just dump a bunch of sprinkles on, totally fine).
- **Optional: A block of styrofoam or a cake pop stand:** Super handy for drying your decorated pops.
Step-by-Step Instructions
- **Bake the Cake:** Prepare your cake mix according to package directions. Let it cool completely. No peeking, no nibbling, just patience. **Seriously, let it cool!**
- **Crumble Time:** Once cooled, transfer the entire cake to a large mixing bowl. Use your hands (clean ones, please!) to crumble it into fine crumbs. We’re talking sand-like consistency here.
- **Mix with Frosting:** Add about **half a can of frosting** to the cake crumbs. Start small! Mix it in thoroughly with your hands. You’re looking for a dough-like consistency that holds together when squeezed but isn’t sticky or greasy. Add more frosting, a tablespoon at a time, if needed.
- **Roll ‘Em Up:** Scoop out small portions (about 1.5 tablespoons) and roll them into compact, smooth balls. Place them on a parchment-lined baking sheet.
- **Chill Out:** Pop that baking sheet into the fridge for at least **30 minutes**, or the freezer for 15. This step is non-negotiable for sturdy cake pops.
- **Prep for Dipping:** Melt a small amount of candy melts according to package directions. Dip the tip of each lollipop stick about half an inch into the melted candy, then insert it into a cake ball, stopping about halfway. This acts like edible glue!
- **Second Chill:** Back into the fridge for another 15 minutes. This ensures the sticks are firmly set.
- **Melt & Dip:** While your pops chill, melt the remaining candy melts in a deep, microwave-safe bowl. Dip each chilled cake pop directly into the melted candy, twisting gently to fully coat. Let any excess drip off. **Work quickly here!**
- **Decorate & Dry:** Immediately after dipping, adorn your cake pop with sprinkles or other decorations before the candy shell sets. Then, stand the pop upright in your styrofoam block (or whatever creative holder you’ve got) to dry completely.
- **Devour:** Once the candy is firm, it’s time to enjoy your masterpiece!
Common Mistakes to Avoid
Nobody’s perfect, but we can avoid some classic cake pop blunders with a little foresight (and my advice, of course!).
- **Too Much Frosting:** This is the #1 culprit for greasy, falling-apart cake pops. Start with less than you think you need! The goal is a firm, moldable dough, not a sticky mess.
- **Not Chilling Enough:** Thinking you can skip the chilling steps? Rookie mistake! Those cake balls need to be firm before dipping, or they’ll likely fall off the stick or crumble into your melted candy. Trust the process.
- **Dipping in Too-Hot Candy:** If your candy melts are too hot, they’ll be thin and runny, making for a translucent coat, and they might even melt your cake balls. Use a double boiler or microwave in short bursts, stirring frequently, to keep it at the right consistency.
- **Twisting Too Vigorously:** Gentle does it! A quick dip and a light twist are all you need to coat your pop.
Alternatives & Substitutions
Feeling adventurous? Here are some ways to jazz up your cake pop game:
- **Cake & Frosting Combos:** The world is your oyster! Chocolate cake with peanut butter frosting? Red velvet with cream cheese? Lemon cake with lemon frosting? Go wild! **IMO**, vanilla cake with chocolate frosting is a classic for a reason.
- **Candy Melt Flavors:** Beyond plain white or milk chocolate, try dark chocolate, strawberry, or even colored vanilla melts. You can also use good quality tempered chocolate for a more gourmet feel, but candy melts are definitely easier.
- **Garnish Galore:** Instead of just sprinkles, try crushed cookies (Oreos, Biscoff!), chopped nuts, shredded coconut, or a drizzle of contrasting melted candy.
- **Shape Shifters:** Instead of round balls, you can get fancy and use cookie cutters (after making a flat cake “dough” from the mix) to create different shapes. Just make sure they’re not too intricate for dipping.
FAQ (Frequently Asked Questions)
Got questions? I’ve got answers (mostly).
- **Q: My cake pops are falling off the stick! What gives?**
A: Ah, the dreaded pop-drop! This usually means you didn’t chill them enough, or your “glue” (the candy melt on the stick) wasn’t set. Make sure those sticks are firmly anchored and the cake balls are super cold before dipping. - **Q: Can I use regular chocolate chips instead of candy melts?**
A: Well, technically yes, but why hurt your soul with frustration? Chocolate chips require tempering to get that smooth, snap-when-you-bite coating, and that’s a whole extra step. Candy melts are designed for easy dipping, **FYI**. Stick with ’em for sanity’s sake. - **Q: How long do cake pops last?**
A: If stored in an airtight container at room temperature, they’re good for about 2-3 days. In the fridge, they can last up to a week. If you haven’t eaten them all by then, I’d be impressed. - **Q: Can I make these ahead of time?**
A: Absolutely! You can make the cake balls (before dipping) and store them in an airtight container in the fridge for up to 3 days, or freeze them for up to a month. Just thaw them slightly before dipping. - **Q: My candy melts are too thick. Help!**
A: Don’t panic! Add a tiny bit of shortening (like Crisco) or a few drops of vegetable oil to your melted candy melts and stir until it reaches a smoother, dippable consistency. - **Q: Do I really need to use a box mix? Can I use homemade cake?**
A: You absolutely can use homemade cake! Just make sure it’s a moist cake (not too dry or crumbly) and follow the same crumbling and frosting-mixing steps. The box mix just makes life a *tad* easier.
Final Thoughts
See? You just unlocked a new level in your dessert-making journey! These moist cake pops are not just delicious; they’re little edible trophies that prove you’re capable of creating something amazing (and fun!). Go ahead, pat yourself on the back. You’ve earned it. Now go impress someone—or yourself—with your new culinary skills. Happy popping!


