So, you’re craving something warm, cozy, and utterly delicious, but the thought of spending hours in the kitchen makes you want to crawl under a blanket? Same, friend. Same. Good news: I’ve got your back with a recipe so easy, so ridiculously moist, you’ll wonder why you ever bought apple bread from a bakery again. Let’s get into it!
Why This Recipe is Awesome
Okay, let’s be real. There are a gazillion apple bread recipes out there. So why *this* one? Because it’s practically idiot-proof. Seriously, even I, a person who once set off a smoke detector making toast, can nail this. It consistently churns out a loaf that’s unbelievably moist, packed with apple-y goodness, and makes your entire house smell like a fall festival threw up in the best way possible. Plus, it requires zero fancy equipment. Just a couple of bowls, a whisk, and your fabulous self. It’s a low-effort, high-reward situation, and who doesn’t love that?
Ingredients You’ll Need
Gather ’round, my aspiring bakers! Here’s your shopping list for a ticket to moist apple bread heaven. Don’t worry, nothing too exotic here:
- All-Purpose Flour: 1 ½ cups. The good old reliable.
- Granulated Sugar: 1 cup. Sweet, sweet magic.
- Baking Soda: 1 teaspoon. Our little lift-off agent.
- Ground Cinnamon: 1 teaspoon. Because apples and cinnamon are soulmates.
- Salt: ½ teaspoon. Just a pinch to make everything pop.
- Large Eggs: 2, lightly beaten. The binders of our bread-y goodness.
- Vegetable Oil (or another neutral oil): ½ cup. This is key for the MOIST factor, folks!
- Vanilla Extract: 1 teaspoon. A hug in extract form.
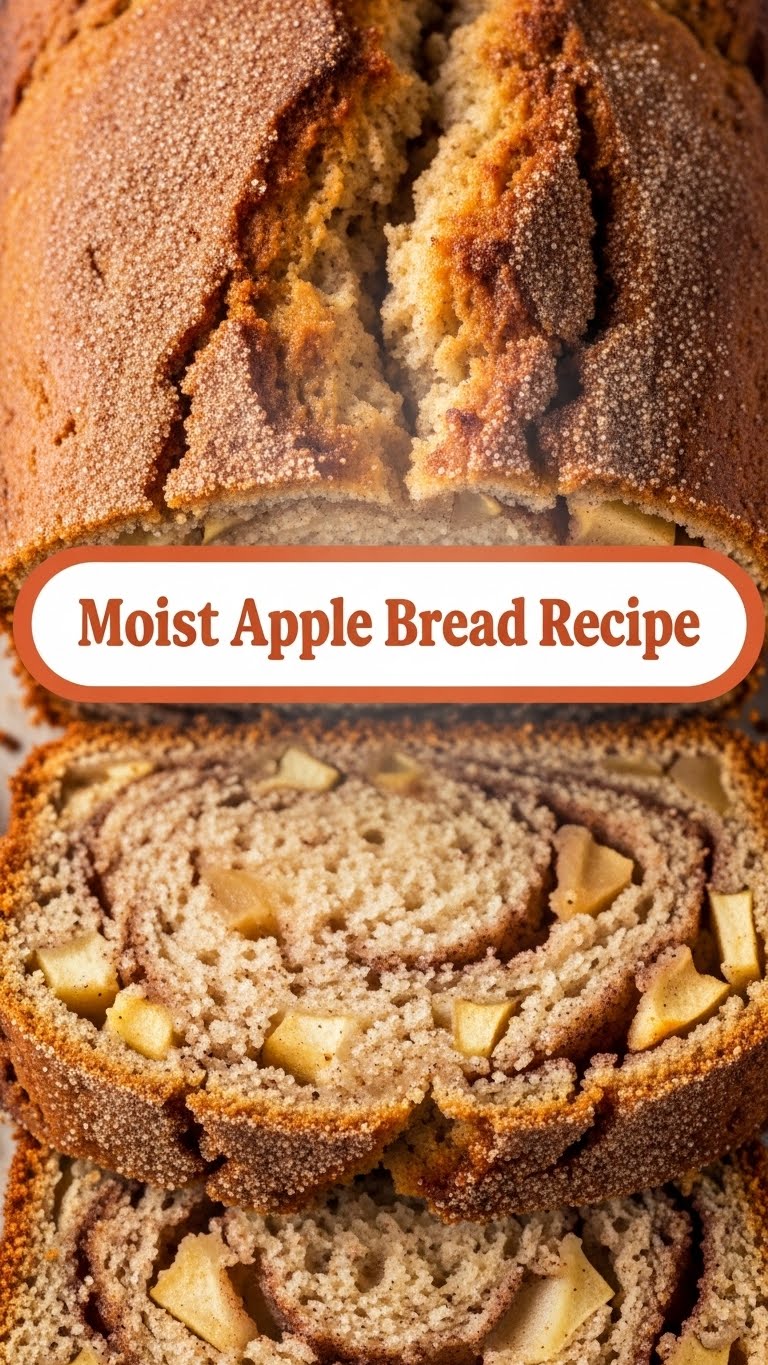
- Firm, Tart Apples: 2 medium, peeled, cored, and finely diced (about 1 ½ cups). Granny Smith, Honeycrisp, or Fuji are excellent choices. Don’t go mushy!
Step-by-Step Instructions
Time to get our bake on! Remember, keep it chill, keep it fun. You got this!
- Preheat & Prep: First things first, fire up that oven to 350°F (175°C). Then, grab a 9×5-inch loaf pan and give it a good spray with non-stick spray or butter and flour it. No one likes a stuck loaf, right?
- Whisk the Dry Squad: In a large bowl, whisk together the flour, sugar, baking soda, cinnamon, and salt. Give it a good swirl until everything is well combined and looking all uniform.
- Mix the Wet Crew: In a separate, medium-sized bowl, lightly beat your two eggs. Then, pour in the vegetable oil and vanilla extract. Whisk ’em together until they’re friends.
- Bring ‘Em Together: Now, pour the wet ingredients into the dry ingredients. Stir gently with a spoon or spatula until *just* combined. Don’t overmix! A few lumps are totally fine; overmixing leads to tough bread, and we want fluffy happiness.
- Fold in the Stars: Gently fold in your finely diced apples. Make sure they’re evenly distributed throughout the batter, ready to shine.
- Into the Pan: Pour the luscious batter into your prepared loaf pan. Give it a gentle tap on the counter to settle it, if you feel fancy.
- Bake It Up: Slide that beauty into the preheated oven and bake for 50-60 minutes. How do you know it’s done? A wooden skewer or toothpick inserted into the center should come out clean. If it’s looking too brown on top before it’s done, you can loosely tent it with foil.
- Cool Down & Devour: Once baked, let the bread cool in the pan for about 10-15 minutes. Then, carefully remove it and place it on a wire rack to cool completely. Or, if you’re like me, cut a slice while it’s still warm and risk burning your mouth. YOLO!
Common Mistakes to Avoid
We’ve all been there, staring at a culinary disaster wondering what went wrong. Learn from my past (and often humorous) blunders:
- Overmixing the Batter: This is a biggie! Overmixing develops gluten too much, leading to dense, tough bread. We want light and airy, so stop stirring as soon as the wet and dry ingredients are *just* combined. Lumps are your friends here!
- Not Greasing Your Pan Properly: Ever had to practically chisel your beautiful creation out of the pan? Yeah, me too. A good spray (or butter and flour) means easy release. Don’t skip this step!
- Using Mushy Apples: Soft apples will just turn to sad, disintegrated mush in your bread. Opt for firm, tart varieties like Granny Smith or Honeycrisp for the best texture and flavor.
- Opening the Oven Door Too Much: Patience, my friend! Every time you open that oven door, the temperature drops, affecting the baking process. Trust the timer and your nose, and only peek when necessary.
Alternatives & Substitutions
Feeling creative? Want to play around? Here are some simple swaps to keep things exciting:
- Oil for Butter? You *can* substitute melted butter for the oil, but FYI, the oil is what really gives this bread its legendary moistness. Butter will still be delicious but might result in a slightly different texture.
- Sugar Swap: Want a deeper, molasses-y flavor? Swap out half of the granulated sugar for packed light brown sugar. Yum!
- Spice it Up: Feel free to add ½ teaspoon of ground nutmeg or a pinch of allspice to your dry ingredients for an extra layer of warmth.
- Nuts or Choc Chips? Absolutely! Fold in ½ cup of chopped walnuts, pecans, or even chocolate chips with your apples for an added treat.
- Other Fruits? While this is *apple* bread, you could experiment with shredded zucchini (surprisingly good!), pears, or even cranberries. Just make sure to adjust moisture if needed.
FAQ (Frequently Asked Questions)
Got questions? I’ve got answers. Probably. Let’s tackle some common curiosities:
- What are the best apples to use for apple bread?
Go for firm, tart apples! Granny Smith, Honeycrisp, Fuji, or Braeburn are fantastic. They hold their shape and provide a lovely zing that complements the sweetness. Avoid Red Delicious; they’re too soft!
- Can I use applesauce instead of fresh apples?
While you *could* technically add a little unsweetened applesauce, it won’t give you those delightful chunks of apple texture. For this recipe, fresh, diced apples are definitely the way to go for the best results, IMO.
- How long does homemade apple bread last?
If it lasts longer than a day in your house, you have more willpower than me! Realistically, tightly wrapped at room temperature, it’s good for 3-4 days. In the fridge, it’ll last a bit longer, maybe up to a week.
- Can I freeze apple bread?
You betcha! Let it cool completely, then wrap the whole loaf (or individual slices) tightly in plastic wrap, then foil. It freezes beautifully for up to 2-3 months. Thaw at room temperature or pop a slice in the microwave for a quick warm-up.
- My apple bread turned out dry, what happened?
Oh no! Usually, a dry loaf means one of two things: you either overmixed the batter (developing too much gluten) or you overbaked it. Keep an eye on that baking time and the skewer test!
- Should I add a glaze?
A simple powdered sugar glaze (powdered sugar + a splash of milk or lemon juice) takes this bread to the next level. Or, sprinkle some coarse sugar on top before baking for a nice crunchy crust.
Final Thoughts
And there you have it, folks! Your new favorite, ridiculously moist apple bread recipe. See? I told you it was easy. Now go impress your family, your friends, your dog, or just yourself with your newfound (or newly perfected) baking prowess. You’ve earned that delicious slice of comfort. Enjoy every single bite!

