So you’re scrolling through recipes, tummy rumbling, thinking “I need something ridiculously delicious, but also, like, zero effort,” right? Good news, my friend. You’ve stumbled into the right corner of the internet. Because today, we’re making Moist Apple Bread, and it’s basically a hug in loaf form, without all the fuss. Seriously, put down that questionable takeout menu.
Why This Recipe is Awesome
Let’s be real, some recipes are like a cryptic treasure map, demanding obscure ingredients and a culinary degree. Not this one. This Moist Apple Bread recipe is so forgiving, it practically bakes itself. Here’s why it’s about to become your new kitchen MVP:
- It’s idiot-proof. Seriously, if I can do it without setting off the smoke alarm, you’re golden.
- Your kitchen will smell like an autumn wonderland, making everyone (including yourself) instantly happier.
- It’s perfect for breakfast, dessert, or a sneaky midnight snack. Versatility, baby!
- You get to use apples, which means it’s healthy, right? (Don’t burst my bubble.)
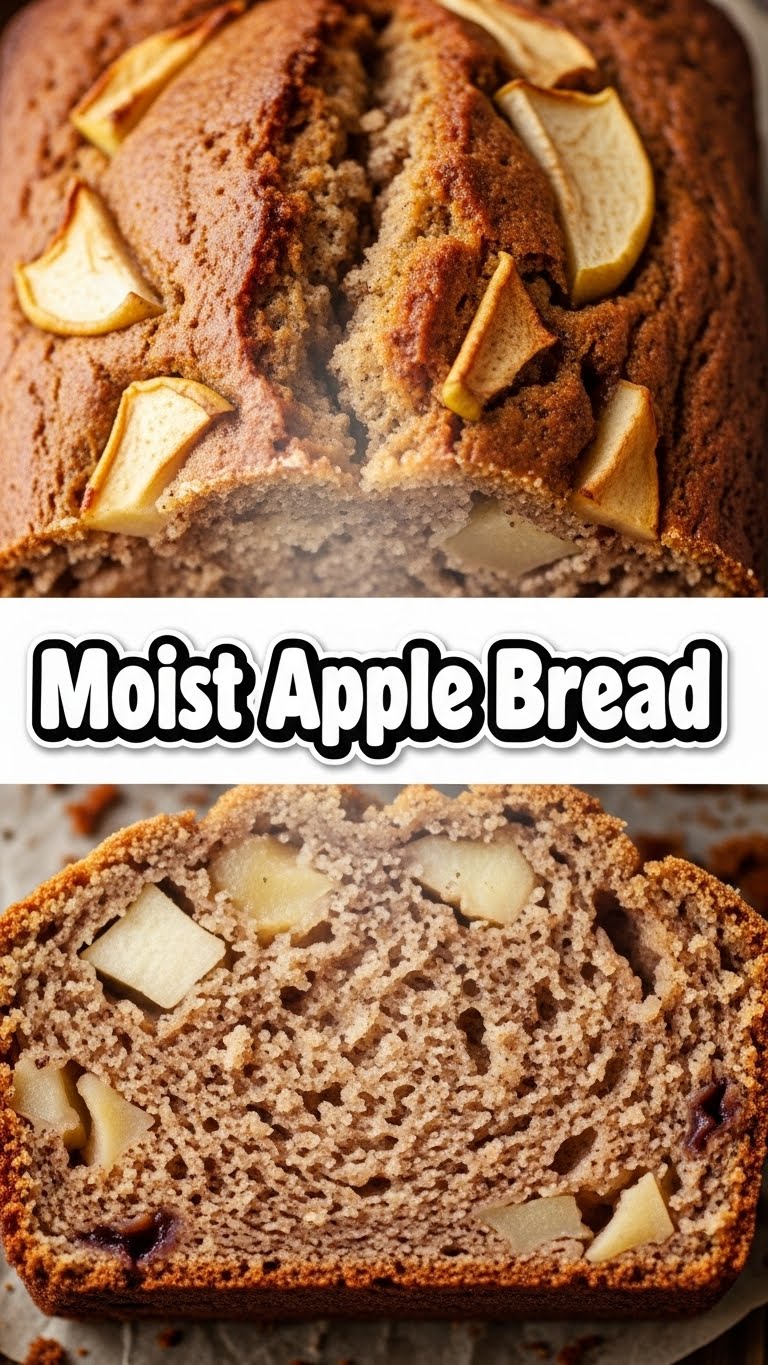
- The texture is out of this world – moist, tender, and ridiculously flavorful. Forget dry, crumbly sadness.
Ingredients You’ll Need
Alright, gather your troops! Most of these are probably lounging in your pantry already. If not, a quick grocery run won’t hurt. And yes, you actually need apples for this. Shocking, I know.
- Dry Stuff:
- 1 ½ cups all-purpose flour (the basic kind, no fancy stuff needed)
- 1 teaspoon baking soda (the magic leavening fairy)
- ½ teaspoon salt (don’t skip this, it makes everything pop!)
- 1 teaspoon ground cinnamon (your house is about to smell divine)
- ¼ teaspoon ground nutmeg (cinnamon’s slightly more subtle, sophisticated cousin)
- Wet Stuff:
- ½ cup (1 stick) unsalted butter, melted (don’t be shy with the butter, it’s flavor!)
- 1 cup granulated sugar (sweetness central)
- ½ cup packed light brown sugar (adds that deep, caramelly yum factor)
- 2 large eggs (straight from the fridge is fine)
- 1 teaspoon vanilla extract (the secret sauce for almost everything good)
- The Star of the Show:
- 2 medium apples, peeled, cored, and finely diced (Granny Smith or Honeycrisp work wonderfully; avoid mushy ones, we want texture!)
Step-by-Step Instructions
Deep breaths, you got this! We’re not performing surgery here, just baking something delicious. Follow these simple steps and prepare for greatness.
- Preheat & Prep: First things first, get your oven to 350°F (175°C). Grease and flour a 9×5 inch loaf pan. Or, if you’re lazy like me, line it with parchment paper with a bit of overhang – makes removal a breeze!
- Combine Dry Ingredients: In a medium bowl, whisk together the flour, baking soda, salt, cinnamon, and nutmeg. Give it a good whisk to make sure everything’s evenly distributed. Set aside for a moment.
- Cream Wet Ingredients: In a large bowl, melt your butter. Then, stir in the granulated sugar and brown sugar until well combined. Beat in the eggs one at a time, making sure each is fully incorporated before adding the next. Stir in the vanilla extract.
- Marry the Mixtures: Gradually add the dry ingredients to the wet ingredients, mixing until *just* combined. Do not overmix! A few lumps are totally fine; overmixing leads to tough bread, and nobody wants that.
- Fold in Apples: Gently fold in your diced apples. Make sure they’re nicely distributed throughout the batter. They’re going to keep everything wonderfully moist.
- Bake It Up: Pour the batter into your prepared loaf pan. Pop it into the preheated oven and bake for 50-60 minutes.
- Check for Doneness: The loaf is ready when a wooden skewer or toothpick inserted into the center comes out clean or with just a few moist crumbs attached. If it’s browning too fast, you can loosely tent it with foil during the last 15-20 minutes.
- Cool Down: Let your glorious apple bread cool in the pan for about 10-15 minutes before transferring it to a wire rack to cool completely. Or, you know, just slice into it warm because self-control is overrated.
Common Mistakes to Avoid (Unless You Like Disappointment)
Look, we all make mistakes. But some mistakes are just… avoidable. Learn from my past kitchen mishaps, won’t you?
- Thinking you don’t need to preheat the oven: Rookie mistake. Your bread won’t bake evenly, and you’ll end up with a sad, dense center. Just do it.
- Overmixing the batter: This is the arch-nemesis of moist bread. Once you add the dry to the wet, mix *just* until combined. Lumps are your friends here; gluten development is not.
- Using mushy apples: Please, for the love of all that is delicious, use firm apples. Mushy apples turn into… well, mush, and nobody wants apple sauce bread.
- Slicing it hot out of the oven: I know, the smell is intoxicating. But giving it 10-15 minutes to set up in the pan, then cooling on a rack, makes for cleaner slices and prevents crumbling. Patience, grasshopper.
- Forgetting the salt: It might seem tiny, but salt balances the sweetness and enhances all the flavors. Skipping it makes for a bland experience.
Alternatives & Substitutions (Because Rules Are Meant to Be Broken)
Feeling adventurous? Or maybe you’re just out of cinnamon (gasp!). No worries, here are some ways to switch things up:
- Spice it Up: Add a pinch of ground ginger or cardamom for an extra layer of warmth. Or go full pumpkin spice blend if you’re feeling autumnal.
- Nutty Professor: Fold in ½ cup of chopped walnuts or pecans with the apples for a delightful crunch. Toast them beforehand for even more flavor!
- Chocolate Lover: A handful of white chocolate chips or even dark chocolate chunks wouldn’t be unwelcome. Just sayin’.
- Different Fruit? Pears would be a lovely substitute for apples. Or try a mix of apples and cranberries for a tart kick!
- Buttermilk Boost: If you want an even *moister* crumb (is that even possible?), replace ½ cup of milk with ½ cup of buttermilk. The tang is delish!
- Dairy-Free: You can swap the butter for a neutral oil (like canola or vegetable) and use a dairy-free milk alternative (like almond or oat milk) if needed.
FAQ (Because You Have Questions, And I Have Answers… Mostly)
Alright, brain dump your burning questions! I’ve probably asked them myself at some point.
- Can I use margarine instead of butter? Well, technically yes, but why hurt your soul like that? Butter just tastes better, IMO. But in a pinch, margarine will do.
- How long does this apple bread last? If you manage not to devour it all in one sitting, it’ll stay fresh at room temp, tightly wrapped, for about 3-4 days. In the fridge, maybe a day or two longer.
- Can I freeze apple bread? Absolutely! Let it cool completely, then wrap it tightly in plastic wrap and then foil. It’ll last in the freezer for up to 3 months. Thaw at room temperature.
- What kind of apples are best? Granny Smith or Honeycrisp are fantastic because they hold their shape and provide a nice tart balance. Fuji or Gala work well too! Avoid Red Delicious, they just get mushy.
- Do I need to peel the apples? For a super smooth texture, yes. If you don’t mind a little peel in your bread (it adds fiber!), you can leave them on. Just make sure to wash them well.
- Can I add a glaze? Oh, you fancy, huh? A simple powdered sugar glaze (powdered sugar + a little milk/lemon juice) would be divine. Drizzle it on once the bread is completely cool.
- Is this recipe gluten-free friendly? You *can* try a 1:1 gluten-free flour blend, but I haven’t tested it myself, so results may vary. Some GF flours can make things a bit drier, so keep an eye on it!
Final Thoughts
And there you have it, my friend! A perfectly moist, utterly delicious apple bread, baked by *you*. See? I told you it was easy! Now go forth and bask in the glory of your culinary achievement. Slice yourself a generous piece, maybe add a dollop of whipped cream or a scoop of ice cream (because why not?), and enjoy every single bite. You’ve earned it! Now go impress someone—or just yourself—with your new baking superpowers. Happy baking!


