Ever had one of those days where you just *need* a hug in a bowl, but also, like, a party in your mouth? And maybe, just maybe, it should be delightfully green? Oh, just me? Cool, cool. Anyway, if you’re anything like me and think ice cream is a perfectly acceptable meal at any time of day, but also kinda want to pretend you *made* it yourself (without, you know, doing *too* much work), then buckle up, buttercup! We’re diving into a super easy, no-churn Mint Green Ice Cream with Sprinkles recipe that’s practically foolproof. You’re welcome.
Why This Recipe is Awesome
Let’s be real, most homemade ice cream recipes involve some fancy machine you pull out once a year, or a commitment to churning that rivals a marathon. Not this one, my friend! This recipe is the MVP of easy desserts. **It’s no-churn**, meaning zero fancy gadgets needed. Just a bowl, a mixer, and a freezer. Seriously, if I can whip this up after a long day (without setting off any alarms), you’re practically a Michelin-star chef already. It’s minty, it’s creamy, it’s ridiculously green, and it’s absolutely exploding with sprinkles. What’s not to love? It’s basically a party in your mouth that requires minimal effort. Win-win!
Ingredients You’ll Need
Gather ’round, pantry warriors! Here’s your simple shopping list. Don’t skimp on the good stuff, okay? Your taste buds will thank you.
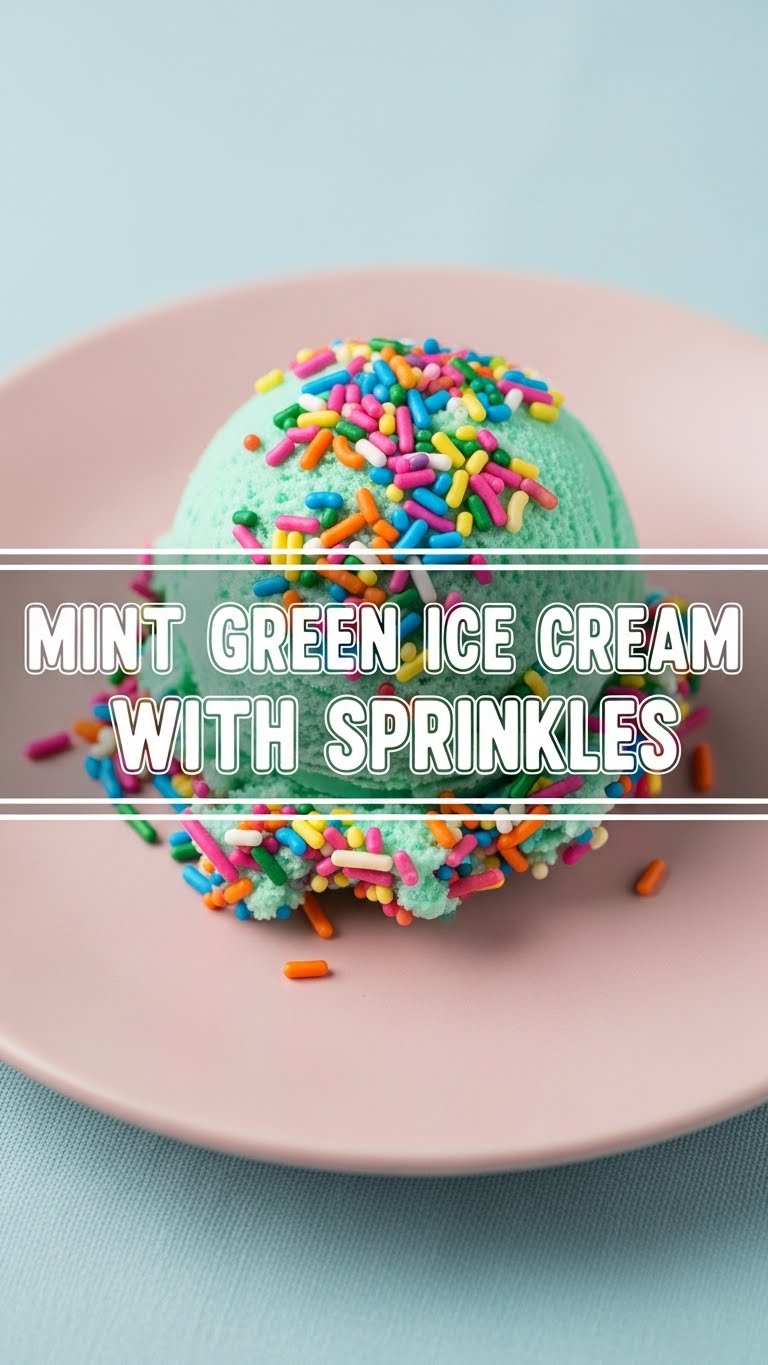
- 2 cups (480ml) Heavy Cream: The star of the show! Make sure it’s cold, like, straight-from-the-fridge cold. This is where all the luscious creaminess comes from, so no light cream shenanigans.
- 1 (14-ounce/397g) can Sweetened Condensed Milk: This is the magic potion that makes it sweet and smooth without any ice crystals. Don’t confuse it with evaporated milk; that’s a whole different beast.
- 1 teaspoon Peppermint Extract: Not spearmint, unless you’re aiming for a toothpaste flavor (which, no judgment, but probably not the goal here). Adjust to your minty preference.
- Green Food Coloring (gel works best!): This is entirely optional, but if you want that iconic “mint green” hue, you gotta add it. A few drops go a long way, so start small.
- 1/2 cup (or more!) Sprinkles: Rainbow jimmies are classic, but literally any sprinkles will do. The more, the merrier, IMO. Don’t be shy!
- Optional: 1/2 cup Mini Chocolate Chips or finely chopped chocolate: Because mint and chocolate are soulmates. Just sayin’.
Step-by-Step Instructions
Alright, let’s get down to business. These steps are so easy, you could probably do them in your sleep (but please don’t, safety first!).
- Chill Your Bowl: First things first, pop a large mixing bowl (and your whisk attachment, if using a stand mixer) into the freezer for about 10-15 minutes. A cold bowl helps the cream whip up like a dream.
- Whip That Cream: Pour your super cold heavy cream into the chilled bowl. Using an electric mixer (handheld or stand mixer), beat the cream on medium-high speed until it forms stiff peaks. We’re talking firm, glorious peaks that hold their shape. Don’t overdo it, though, or you’ll end up with butter (tasty, but not for ice cream!).
- Mix the Magic: In a separate bowl (or just gently fold into the whipped cream if your bowl is big enough), gently fold the sweetened condensed milk and peppermint extract into the whipped cream. Do this carefully so you don’t deflate all that lovely air you just whipped in. We want fluffy!
- Go Green (or Don’t): Now’s the time for color! Add a few drops of green food coloring and gently fold it in until you reach your desired shade of minty happiness. You can always add more, but you can’t take it away, so go easy at first.
- Sprinkle It Up: Gently fold in most of your sprinkles (and mini chocolate chips, if you’re using them). Leave a few for sprinkling on top later, because presentation matters, even if it’s just for you.
- Freeze for Glory: Transfer the mixture into a freezer-safe container. An airtight loaf pan or a sturdy Tupperware works perfectly. Smooth the top, then scatter those reserved sprinkles over it like confetti.
- Patience, Grasshopper: Cover your container tightly and freeze for at least 6 hours, or preferably overnight. **This is the hardest part: waiting.** Trust me, it’s worth it.
- Scoop and Devour: Once fully frozen, let it sit out for a few minutes to soften slightly, then scoop generously and enjoy your delicious, homemade mint green ice cream!
Common Mistakes to Avoid
Even the simplest recipes have potential pitfalls, usually involving impatience or a lack of attention. Learn from my past culinary misadventures!
- Over-whipping the Cream: One second it’s stiff peaks, the next it’s grainy butter. Keep an eye on it! It should be firm but still smooth.
- Using Warm Cream/Bowl: This is a recipe for sad, deflated cream that just won’t whip. **Always chill your cream and equipment!**
- Confusing Extracts: Peppermint and spearmint are NOT the same. Use peppermint extract for that classic mint ice cream taste.
- Impatience: Trying to scoop it before it’s fully frozen will result in a soupy mess. Give it the full 6+ hours. Your future self will thank you.
- Forgetting the Sprinkles: Seriously, what’s a party without confetti? Don’t commit this heinous crime.
Alternatives & Substitutions
Feeling adventurous? Or maybe you’re out of one tiny ingredient? Fear not, my creative culinary compadre!
- Flavor Fun: Instead of peppermint, try vanilla extract (for classic vanilla), almond extract, or even a citrus zest for a whole new vibe.
- Color Your World: Don’t like green? Skip the food coloring entirely for a pale mint color, or use a different color! Pink ice cream with rainbow sprinkles? Why not?!
- Add-In Adventures: Beyond chocolate chips, think crushed Oreos, chopped nuts, mini marshmallows, or even a swirl of fudge sauce before freezing. The world is your oyster… or, well, your ice cream mix-in.
- Dairy-Free Option: You *can* try this with full-fat coconut cream (the thick part from the top of a chilled can). Just be aware the flavor and texture will be slightly different, but still delicious!
FAQ (Frequently Asked Questions)
Got questions? I’ve got (casual) answers!
- Do I *really* need an electric mixer? Well, technically no, you could whisk it by hand. But your arm will seriously hate you, and it’ll take forever. So, yes, if you value your biceps, grab that mixer!
- Can I use light cream or half-and-half? Oh, sweet summer child, no. We need that high fat content of heavy cream for the luscious, creamy texture. Light stuff will just give you icy sadness.
- How long does it last in the freezer? If it actually lasts more than a week without being devoured, you’re doing something wrong. But seriously, it’s best enjoyed within 2-3 weeks for optimal freshness.
- Why is my ice cream icy instead of creamy? This usually happens if the cream wasn’t whipped to stiff peaks, or if the mixture wasn’t covered tightly enough in the freezer, allowing ice crystals to form. Make sure that lid is snug!
- Can I skip the food coloring? Absolutely! It’ll still taste amazing, just won’t have that iconic “mint green” look. It’ll be more of a “mint off-white” situation, which is perfectly fine.
- Where do I get sprinkles that aren’t sad? For truly vibrant, non-bleeding sprinkles, check out specialty baking stores or online retailers. But regular supermarket ones work too, especially if you’re eating it fast!
Final Thoughts
See? That wasn’t so hard, was it? You just whipped up a batch of delicious, vibrant, sprinkle-loaded mint green ice cream without breaking a sweat (or your budget on a fancy machine). Now you have something amazing to treat yourself, impress your friends (they don’t need to know how easy it was, shhh!), or just enjoy on a Tuesday evening because you deserve it. Go forth, my culinary friend, and conquer that freezer! You’ve earned every single scoop. Now go impress someone—or yourself—with your new culinary skills. You’ve earned it!


