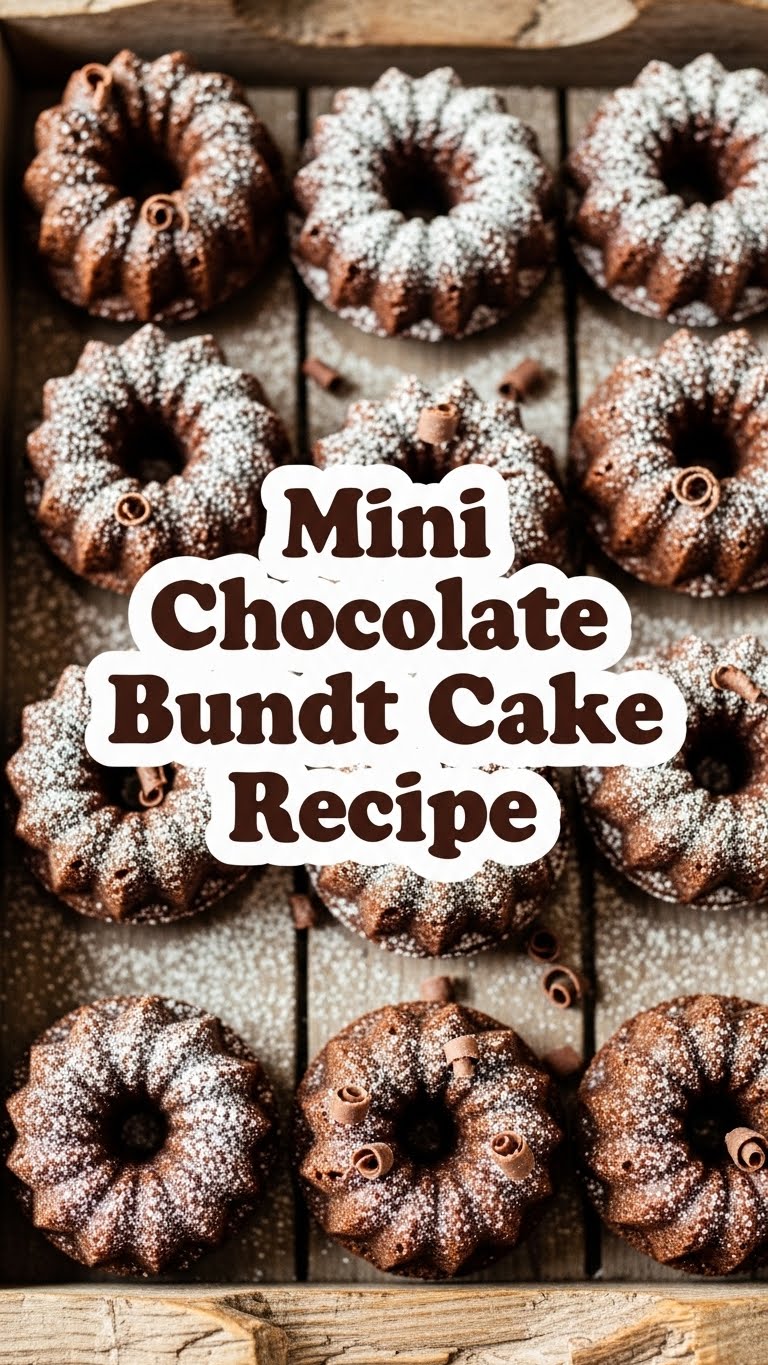
So you’re craving something tasty but too lazy to spend forever in the kitchen, huh? Same. Guess what? I’ve got your back with these adorable, ridiculously easy Mini Chocolate Bundt Cakes that practically make themselves. Seriously, they’re tiny bundles of joy, and we’re about to make some magic happen without needing a culinary degree. Let’s do this!
Why This Recipe is Awesome
Because who needs complicated when you can have delightful and stress-free? This recipe is the MVP for several reasons:
- It’s so easy, your dog could probably supervise. (Okay, maybe not your dog, but you get the idea.)
- **Super quick bake time** because who has patience for an hour-long cake? Not us, we’re on a chocolate mission!
- **Portion control** (or lack thereof, depending on how many you eat). They’re mini, so you can tell yourself “just one more.” It’s basically guilt-free, right?
- Seriously delicious – like, “hide them from your family” delicious. You’ve been warned.
- **Foolproof.** It’s idiot-proof, even I didn’t mess it up, and my kitchen sometimes resembles a war zone.
Ingredients You’ll Need
Gather ’round, fellow bakers! Here’s your shopping list. Keep it simple, keep it fun.
- 1 ½ cups All-Purpose Flour: Because we’re not fancy, and it gets the job done.
- 1 cup Granulated Sugar: For that sweet, sweet bliss. Don’t skimp.
- ½ cup Unsweetened Cocoa Powder: The good stuff. Not the hot chocolate mix, unless you’re feeling wild (don’t).
- 1 teaspoon Baking Soda: Our main lift-off agent!
- ½ teaspoon Baking Powder: Its trusty sidekick, ensuring maximum fluff.
- ¼ teaspoon Salt: Just a pinch, to balance the sweet and make everything pop. It’s a team player.
- 1 Large Egg: Room temperature if you’re feeling professional. Otherwise, straight from the fridge works too, we’re not judging.
- 1 cup Milk: Any kind, really. Dairy, non-dairy, whatever’s chilling in your fridge.
- ½ cup Vegetable Oil: For ultimate moistness. Butter is great, but oil makes these babies super tender.
- 1 teaspoon Vanilla Extract: The flavor superstar. Don’t you dare skip it!
- Optional toppings: Powdered sugar for dusting (for that ‘I’m fancy’ look), or some chocolate ganache for extra indulgence.
Step-by-Step Instructions
Alright, let’s get our bake on! Follow these simple steps, and you’ll be a mini Bundt boss in no time.
- First things first, preheat your oven to 350°F (175°C). While it’s warming up, **grease your mini Bundt pan like your life depends on it.** Seriously, nothing worse than a stuck cake. Use butter or cooking spray, and get into all those nooks and crannies.
- In a large mixing bowl, whisk together your dry ingredients: flour, sugar, cocoa powder, baking soda, baking powder, and salt. Give it a good whisk to make sure there are no lumpy surprises.
- In a separate, medium-sized bowl, whisk together your wet ingredients: the egg, milk, vegetable oil, and vanilla extract. Get it all nicely combined.
- Now, pour the wet mixture into the dry ingredients. Mix with a spatula or wooden spoon **just until combined.** Seriously, stop mixing the second you don’t see any more dry flour. A few lumps are totally okay; overmixing leads to tough cakes!
- Divide the batter evenly among the prepared mini Bundt cavities. Fill them about two-thirds full – they’re going to rise!
- Pop that pan into the preheated oven and bake for **12-15 minutes**, or until a toothpick inserted into the center of a cake comes out clean. Keep a close eye on them; mini cakes bake fast!
- Once baked, let the cakes cool in the pan for about 5 minutes. This little rest helps them firm up. Then, gently invert them onto a wire rack to cool completely.
- When they’re cool, dust ’em with powdered sugar, drizzle with ganache, or just eat them plain. Your call, superstar! You’ve earned it.
Common Mistakes to Avoid
We’ve all been there, staring at a baking disaster. Learn from my past kitchen woes and dodge these common blunders!
- Not greasing the pan enough: Thinking you don’t need to get into every single ridge of that Bundt pan? Rookie mistake. Your beautiful cakes will be forever stuck. Learn from my past trauma – grease, grease, and grease some more.
- Overmixing the batter: Channeling your inner energizer bunny with the batter? Stop! Overmixing develops gluten too much, which equals tough, sad cakes. We want tender, happy cakes, so mix gently until just combined.
- Overbaking: Leaving them in “just a little longer to be safe.” Nope! Mini cakes dry out super fast. Keep a vigilant eye on that timer and the toothpick test!
- Impatience: Trying to pop them out of the pan the second they come out of the oven. Let them cool for a few minutes, friend. They need to firm up a bit, otherwise, you might end up with crumbs instead of cakes.
Alternatives & Substitutions
Feeling creative? Or maybe you just ran out of something? No worries, we’ve got options!
- Different Glaze: Instead of plain powdered sugar, try a simple chocolate ganache (melt chocolate chips with a splash of warm cream) or even a luscious cream cheese frosting for extra decadence. **IMO**, a little drizzle makes everything better.
- Add-ins: Stir some mini chocolate chips, chopped nuts (like pecans or walnuts), or even a dash of espresso powder into the batter for an even deeper chocolate flavor. Coffee makes chocolate sing!
- Milk Alternatives: Any non-dairy milk works perfectly here – almond, soy, oat. No biggie, just use what you have.
- Oil vs. Butter: While I highly recommend oil for maximum moistness, melted butter can be used. Your cake might be slightly denser, but it’ll still be super tasty.
FAQ (Frequently Asked Questions)
Got questions? I’ve got (casual) answers!
- Can I use regular muffin tins instead? Absolutely! Just reduce the baking time slightly, probably 10-12 minutes. They won’t have the cute Bundt shape, but they’ll taste just as amazing. #NoBundtNoProblem
- How long do these keep? If they last that long? Kidding! They’ll stay fresh in an airtight container at room temperature for 3-4 days. You can also freeze them for up to a month if you’re planning ahead (or hiding them).
- My cakes are dry, what happened? Ah, probably overbaked them, my friend. Or maybe you overmixed the batter. Less baking time and gentler mixing next time! We’re aiming for moist, not Sahara desert.
- Can I make these dairy-free? Yep! Use your favorite non-dairy milk and ensure your chocolate chips (if using) are dairy-free. Easy peasy lemon squeezy.
- Can I make a larger Bundt cake with this recipe? You could, but you’d need to significantly scale up the recipe and adjust the baking time quite a bit. For perfectly portioned mini Bundts, this recipe is just right. Don’t mess with perfection, right?
- Do I really need to grease the pan so well? **FYI**, yes. I cannot stress this enough. If you want those pretty ridges and easy release, grease, flour (or cocoa powder for chocolate cakes), and then grease again. Trust me on this one.
Final Thoughts
And there you have it! Your very own batch of mini chocolate masterpieces. Go ahead, pat yourself on the back. You just whipped up something amazing without breaking a sweat (much). Now go impress someone—or yourself—with your new culinary skills. You’ve earned it! Enjoy every single delicious bite!

