So you’re craving something tasty but too lazy to spend forever in the kitchen, huh? Same. We’ve all been there – staring into the abyss of our fridge, dreaming of dessert but dreading the cleanup. Well, buckle up, buttercup, because I’ve got the perfect solution for your sweet tooth and your short attention span: Mini Apple Pies with Crumb Topping! Get ready to make some magic without breaking a sweat (or a single expensive kitchen gadget).
Why This Recipe is Awesome
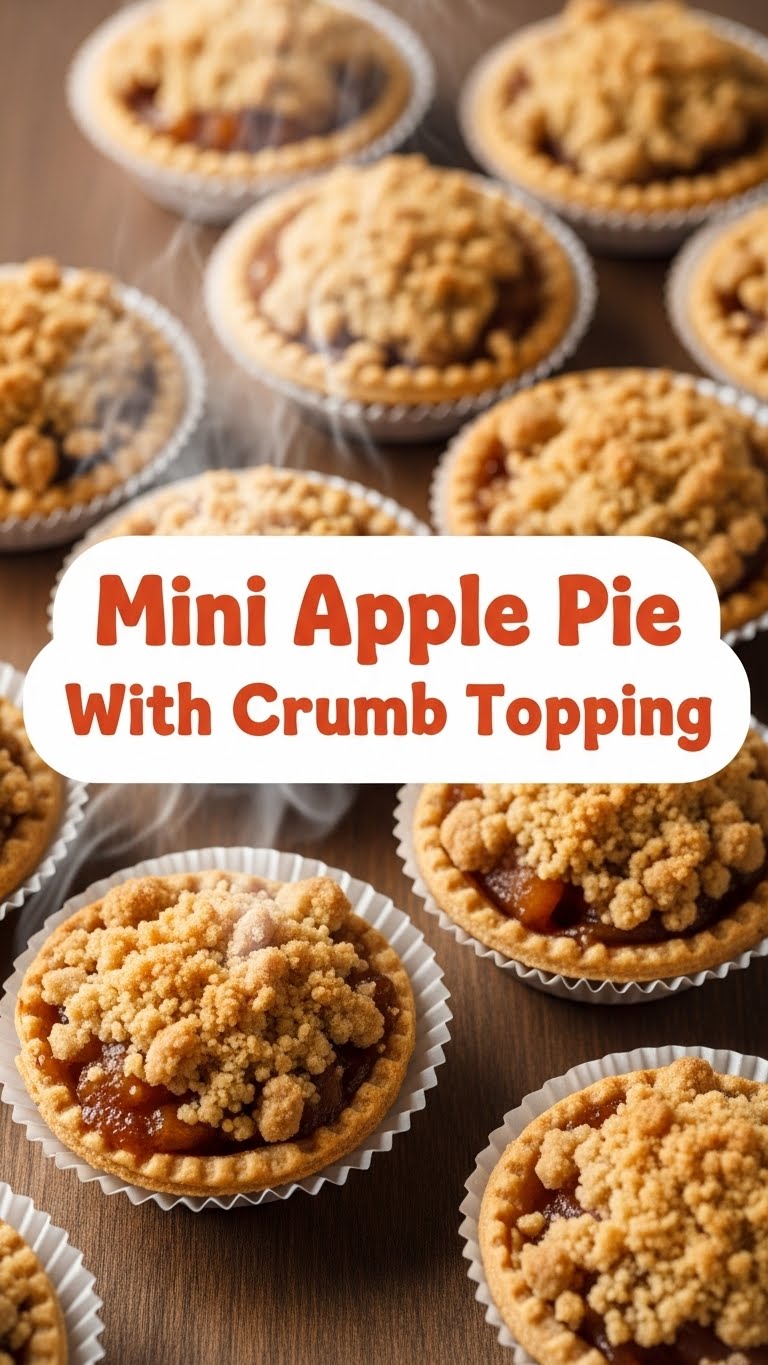
First off, they’re mini. This means portion control (if you can resist eating five, good luck!). Second, crumb topping! Who needs a fancy lattice when you can just sprinkle deliciousness? Third, it’s pretty much idiot-proof. Seriously, even my notoriously kitchen-averse cousin managed this one without setting off the smoke detector. **Big win!** Also, they’re individual, so no awkward knife skills needed. Just grab and devour. Pure bliss, I tell ya.
Ingredients You’ll Need
- **Pre-made Pie Crust:** (One box, usually two rolls inside) Because life’s too short to make your own from scratch, **IMO**.
- **Apples:** 2-3 medium Granny Smiths (or your favorite firm, tart apple). They hold their shape and give that perfect zing.
- **Granulated Sugar:** 1/4 cup (plus a little more for the crumb). For sweetness, obviously.
- **Ground Cinnamon:** 1/2 teaspoon. Because apple pie without cinnamon is just… baked apples.
- **Lemon Juice:** 1 teaspoon. A tiny squeeze to brighten things up and keep the apples from going brown.
- **Cold Butter:** 1/4 cup (half a stick), unsalted and cubed. The secret to crumbly goodness.
- **All-Purpose Flour:** 1/2 cup. The backbone of our crumbly dreams.
- **Light Brown Sugar:** 1/4 cup, packed. For that extra deep, molasses-y sweetness in the topping.
- **Salt:** A tiny pinch. Just to balance all that sweet. **Don’t skip it!**
Step-by-Step Instructions
- **Prep Your Crust:** Unroll your pre-made pie crusts. Using a 3.5-inch round cutter (or the rim of a small glass), cut out circles slightly larger than the openings of your standard muffin tin. Gently press each circle into a muffin tin cup. **No need to grease if your tin is non-stick!**
- **Apple Attack:** Peel, core, and dice your apples into small, bite-sized pieces. Toss them in a bowl with the 1/4 cup granulated sugar, cinnamon, and lemon juice until evenly coated.
- **Fill ‘Em Up:** Spoon the apple mixture into your crust-lined muffin cups. Don’t overfill; leave a little room for the glorious crumb topping to come.
- **Crumb Creation:** In a separate medium bowl, whisk together the flour, brown sugar, and a pinch of salt. Cut in the cold butter using a pastry blender or your fingertips until the mixture resembles coarse crumbs. **The colder the butter, the better the crumb!**
- **Top It Off:** Generously sprinkle the crumb topping over the apple filling in each mini pie. Don’t be shy; load ’em up!
- **Bake It Baby:** Pop those beauties into a preheated oven at **375°F (190°C)** for about 20-25 minutes, or until the crust is golden brown and the apples are tender. The crumb topping should also look deliciously golden and toasty.
- **Cool Down (If You Can Wait):** Let them cool in the muffin tin for about 5-10 minutes before carefully transferring them to a wire rack. This helps prevent sticking. **Resist the urge to burn your tongue!**
Common Mistakes to Avoid
- **Overfilling the Crusts:** You’ll end up with a sticky, bubbling mess in your muffin tin, and no one wants that cleanup. Keep the apple level just below the top of the crust.
- **Warm Butter for Crumb:** That’s how you get a paste, not a crumb. **Keep that butter chilled, people!** It’s the secret sauce (or rather, the secret crumb) to success.
- **Not Peeling the Apples:** Unless you enjoy chewy, slightly tough apple skins in your otherwise smooth pie filling, peel ’em. Seriously, it makes a difference.
- **Skipping the Lemon Juice:** Your apples might brown, and you’ll miss that little zing that cuts through the sweetness. It’s a small step, big impact.
- **Pulling Them Out Too Soon:** Give those apples time to get tender. A quick poke with a fork into one of the apple pieces (if you can reach it!) should confirm they’re soft.
Alternatives & Substitutions
- **Other Fruits:** Not an apple fan? Try pears, firm peaches (if canned, make sure they’re well-drained!), or a mix of berries. Just adjust the sugar to taste, as some fruits are naturally sweeter or tarter.
- **Spices:** Cardamom or a tiny pinch of nutmeg can join the cinnamon party for extra warmth and complexity. Chai spice blend? Go wild!
- **Nutty Crumb:** Add about 1/4 cup of finely chopped pecans or walnuts to your crumb topping for an extra crunch and flavor boost. Divine!
- **Gluten-Free:** Use a gluten-free pre-made pie crust and an all-purpose gluten-free flour blend for the crumb topping. Easy peasy lemon squeezy.
- **Vegan Version:** Swap out the butter for a plant-based butter alternative and ensure your pie crust is certified vegan. Voila, animal-friendly pies!
FAQ (Frequently Asked Questions)
- **Q: Can I use different types of apples?**
- A: Absolutely! A mix of tart (Granny Smith) and sweet (Fuji, Honeycrisp) can be amazing. Just don’t use super mealy ones like Red Delicious; they just turn to mush.
- **Q: My crumb topping isn’t crumbly! What happened?**
- A: Chances are your butter wasn’t cold enough, or you overmixed it. Remember, **cold butter is your best friend here!** You want pea-sized crumbs, not a paste.
- **Q: Do I really need pre-made crust? Can I make my own?**
- A: You *can* make your own, you superstar! But the whole point of this recipe is quick and easy. So, no judgment if you grab a store-bought one. **FYI**, it’s about having fun, not winning a pastry competition!
- **Q: How long do these last?**
- A: If you manage not to eat them all in one sitting (a feat of self-control!), they’ll be good for 2-3 days at room temp, or a bit longer in the fridge. Pop ’em in the microwave for a few seconds to warm them up.
- **Q: Can I freeze them?**
- A: You betcha! Bake, cool completely, then freeze them in an airtight container for up to a month. Thaw at room temp or warm gently in the oven for that fresh-baked feel.
- **Q: Should I add ice cream?**
- A: Is that even a question?! **YES. Always yes.** A scoop of vanilla bean ice cream melting over a warm mini pie is practically a religious experience.
Final Thoughts
So there you have it, your new go-to for when you need a little sweet treat but don’t want to spend all day slaving over a hot oven. These mini apple pies are cute, delicious, and dangerously easy to make. They’re perfect for impressing guests (who will think you’re some kind of pastry wizard) or, let’s be real, for treating your magnificent self.
Now go impress someone—or yourself—with your new culinary skills. You’ve earned it! And don’t forget to send me a pic of your masterpieces (or your glorious failures, we embrace those too). Happy baking, my friend!


