So you’re craving something tasty but too lazy to spend forever in the kitchen, huh? Same. We’ve all been there: staring into the fridge, wishing a gourmet meal would just *magically appear*. Well, I can’t promise magic, but I *can* give you the next best thing: a Mexican Pizza Casserole that’s basically a fiesta in a dish, minus the hours of prep. Think of it as your favorite Mexican pizza had a baby with a super chill casserole, and they both decided to take a nap in your oven. Intrigued? Good. Let’s get cooking, amigo!
Why This Recipe is Awesome
Okay, let’s be real: this isn’t just *another* casserole. This is *the* casserole. Why? Because it’s got all the good stuff without any of the fuss. We’re talking layers of seasoned beef (or whatever protein you fancy), soft tortillas, gooey cheese, and all your favorite toppings baked into one glorious, scoopable masterpiece. It’s **idiot-proof**, I swear—even *I* didn’t mess it up, and my kitchen adventures often involve smoke alarms. Plus, it’s a total crowd-pleaser, perfect for game night, potlucks, or just a Tuesday when you need a hug in food form. Leftovers? They’re practically a gift from the culinary gods. You’re welcome.
Ingredients You’ll Need
Alright, gather your troops! Here’s what you’ll need to assemble this magnificent beast. Don’t worry, nothing too fancy; just good ol’ pantry staples ready to party.
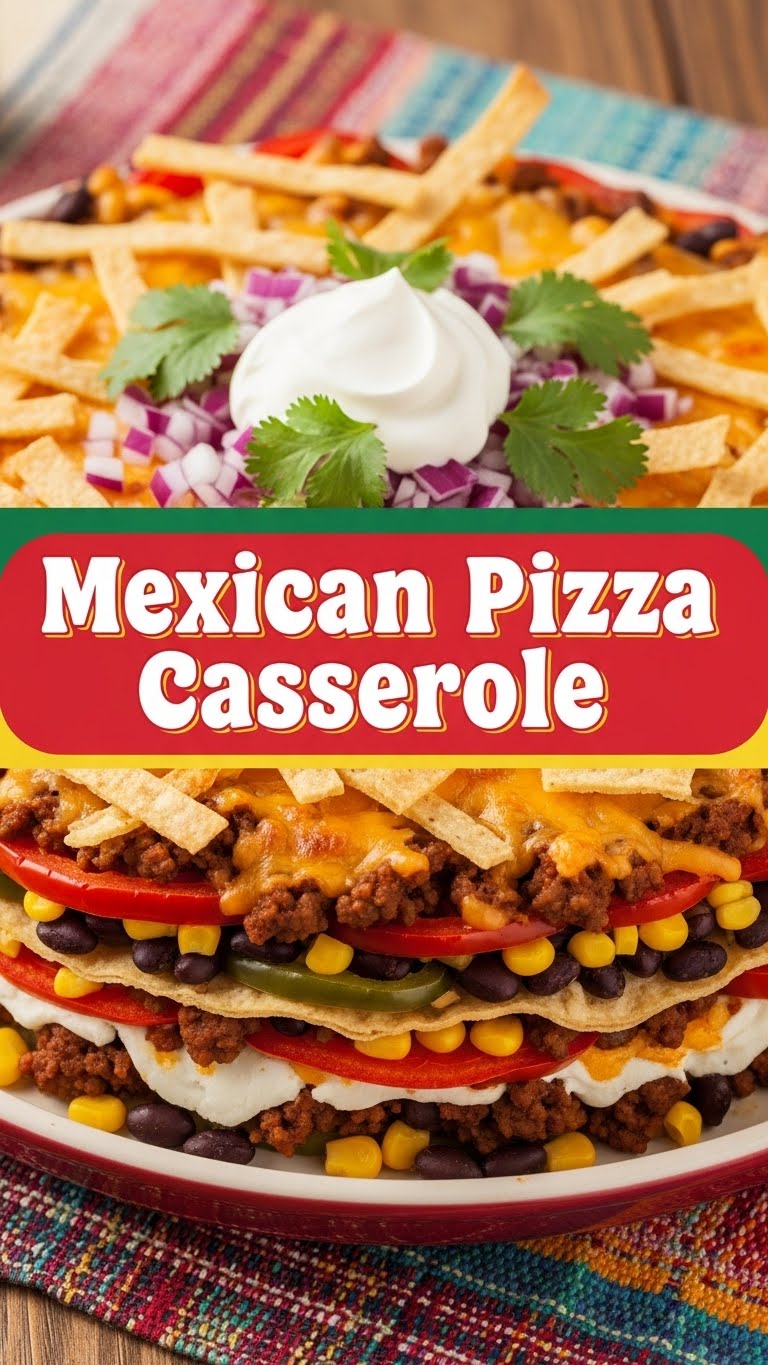
- 1 lb Ground Beef: Or turkey, chicken, plant-based crumbles—your call! Just make sure it’s lean, unless you’re into extra grease. (No judgment, just facts.)
- 1 packet Taco Seasoning: The secret weapon! Don’t skip this, unless you want bland meat. And who wants that?
- 1 cup Salsa: Your favorite jarred kind is perfect. Mild, medium, hot—pick your poison!
- 1 can (15 oz) Black Beans: Rinsed and drained, unless you like your casserole extra bubbly and, well, *beany* water.
- 1 can (15 oz) Corn: Drained. The sweet crunch is essential, trust me.
- 8-10 Flour Tortillas (8-inch): The soft kind, not the crispy taco shells. We’re building layers, not breaking teeth.
- 2 cups Shredded Mexican Cheese Blend: Or cheddar, Monterey Jack, colby—any melty cheese that makes your heart sing. More is always better, IMO.
- Optional Toppings: Sour cream, green onions, fresh cilantro, diced avocado, extra salsa, jalapeños. Because accessorizing is fun!
Step-by-Step Instructions
Ready? Set? Casserole! Follow these super simple steps and you’ll be digging into deliciousness in no time.
- Preheat Your Oven & Prep: Get that oven heated to **375°F (190°C)**. While it’s warming up, lightly grease a 9×13 inch baking dish. Don’t skip the grease; nobody likes a stuck casserole.
- Brown the Beef: In a large skillet, cook your ground beef (or chosen protein) over medium heat until it’s no longer pink. Drain off any excess fat—we want flavor, not an oil slick! Stir in the taco seasoning according to package directions.
- Combine & Conquer: Add the salsa, rinsed black beans, and drained corn to the skillet with the seasoned meat. Stir everything together and let it simmer for about 5 minutes. This lets all those delicious flavors get cozy.
- Layer It Up (The Fun Part!): Spoon about a third of the meat mixture evenly into the bottom of your greased baking dish. Top with a single layer of tortillas (you might need to overlap or cut some to fit). Sprinkle about 1/3 of your shredded cheese over the tortillas. Repeat these layers: meat, tortillas, cheese, until you run out of meat mixture.
- The Grand Finale Layer: For your top layer, place the final tortillas, then generously sprinkle with the remaining cheese. This is where the magic happens and you get that beautiful golden crust.
- Bake ‘Til Bubbly: Pop that beauty into the preheated oven for **20-25 minutes**. You’re looking for the cheese to be gloriously melted and bubbly, and the edges of the casserole to be slightly golden.
- Rest & Serve: Let the casserole rest for 5-10 minutes after pulling it out of the oven. This helps it set and makes for easier serving. Garnish with your favorite toppings and dig in! You earned this.
Common Mistakes to Avoid
Even though this recipe is practically a hug in a dish, there are a few rookie errors that can happen. Learn from my past culinary missteps (so you don’t have to!):
- Under-seasoning the Meat: Thinking a little salt and pepper is enough? **Nah, fam.** Taco seasoning is your friend here. It brings the fiesta to the meat. Don’t be shy!
- Not Draining the Fat: Nobody wants a greasy casserole. If your ground beef is putting out a swimming pool of fat, drain it! Your casserole (and arteries) will thank you.
- Overfilling the Dish: Don’t be an overachiever. Stick to the specified dish size. Trying to cram 12 tortillas into an 8×8 pan is just asking for a messy oven spill.
- Skipping the Rest Time: Impatient, much? Cutting into it right out of the oven will result in a messy, sloshy heap. Give it 5-10 minutes to settle down. **Patience is a virtue (especially with melted cheese).**
- Using Dry/Stale Tortillas: If your tortillas have seen better days, they won’t soften nicely in the casserole. Fresh, soft tortillas are key for a good texture.
Alternatives & Substitutions
Feel free to get wild with this! This recipe is super forgiving and loves a little personalization. Here are some ideas:
- Meat Swaps: Not feeling beef? **Ground turkey, chicken, or even plant-based crumbles** work beautifully. Just cook them up and season the same way.
- Veggie Power: Want to sneak in more veggies? **Diced bell peppers, onions, or zucchini** can be sautéed with the meat. Just make sure they’re cooked down a bit so they don’t release too much water.
- Bean Bliss: Out of black beans? **Pinto beans or kidney beans** are totally fine substitutes.
- Cheese, Please!: Any good melting cheese will do. **Pepper Jack** for a kick, **Colby-Jack** for mild creaminess, or a mix of several for cheese nirvana.
- Spice It Up!: Love the heat? Add **diced jalapeños or a pinch of cayenne pepper** to your meat mixture. Or, choose a spicier salsa!
- Tortilla Options: While flour tortillas are classic here, you could try **corn tortillas** for a different texture and flavor profile. Just make sure they’re soft and flexible!
FAQ (Frequently Asked Questions)
Got questions? I’ve got answers (mostly!).
- Can I make this ahead of time? **Absolutely!** You can assemble the whole casserole, cover it tightly, and refrigerate it for up to 24 hours. Just add an extra 10-15 minutes to the baking time when it goes into the oven.
- How long do leftovers last? Stored properly in an airtight container in the fridge, your Mexican Pizza Casserole is good for **3-4 days**. Reheats like a dream, BTW.
- Is it freezer-friendly? **You bet!** Assemble and bake, then let it cool completely. Wrap it tightly (double wrap is best to avoid freezer burn) and freeze for up to 2-3 months. Thaw overnight in the fridge before reheating.
- What if I don’t have taco seasoning? Disaster! Kidding (mostly). You can whip up your own with chili powder, cumin, paprika, oregano, garlic powder, onion powder, and a pinch of salt. **Google a recipe; there are tons!**
- Can I use corn tortillas instead of flour? Yes, you can! Just be aware they might be a bit more fragile and have a slightly different texture once baked. For a softer casserole, flour tortillas are generally preferred.
- My casserole is a bit dry, what happened? You probably didn’t use enough salsa or liquid in your meat mixture, or maybe your cheese dried out. Next time, add a splash more salsa or even a bit of chicken broth to the meat mixture. **Don’t skimp on the sauciness!**
Final Thoughts
And there you have it! A Mexican Pizza Casserole that’s ready to make your taste buds sing and your stomach happy. It’s comforting, cheesy, flavorful, and incredibly easy—basically, everything you want in a weeknight (or any night!) meal. So, what are you waiting for? Now go impress someone—or yourself—with your new culinary skills. You’ve earned it! Seriously, put on some music, grab a cold drink, and enjoy every single cheesy, glorious bite. Happy cooking, friend!


