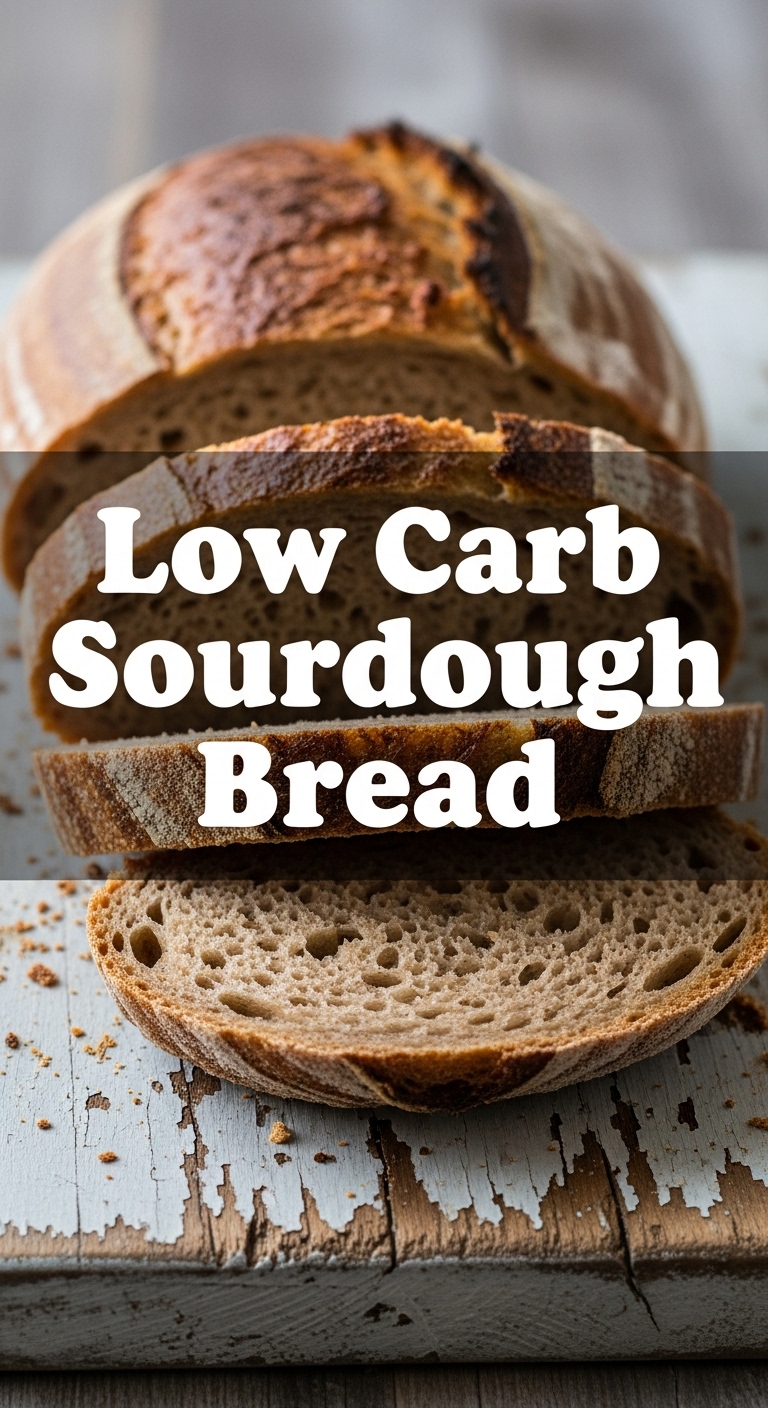
So, you’ve been eyeing those gorgeous, crusty sourdough loaves on Instagram, but the thought of all those carbs makes your low-carb-loving soul weep? Friend, I feel you. It’s a cruel, delicious world out there. But what if I told you we could have our sourdough and eat it too, without the carb-induced guilt trip? Oh yes, we’re going there. Get ready to impress yourself (and maybe your sourdough-snob friends) with this surprisingly simple low-carb sourdough magic.
Why This Recipe is Awesome
Okay, let’s be real. Most “low-carb bread” tastes like sad, dense disappointment. But this, my friend, this is different. It’s got that chewy texture, that glorious crust, and a hint of that signature sourdough tang that makes you feel like you’ve actually accomplished something in life. It’s practically idiot-proof (and if *I* can make it without a major kitchen disaster, you absolutely can too). No crazy 72-hour fermentation schedules here, just a relatively straightforward process that yields actual, edible, craveable bread. Plus, think of the bragging rights!
Ingredients You’ll Need
Gather your troops! Here’s what you’ll need to conquer the low-carb sourdough mountain:
- Active Sourdough Starter (½ cup): Your bubbly, living pet. Make sure it’s fed and super active – like, bubbling-over-the-jar-enthusiastic active. If it’s looking sluggish, give it a good feed a few hours before you start, or this whole thing is just a fancy bowl of flour.
- Almond Flour (1 ¾ cups, superfine): Our low-carb hero! Superfine is key for a smoother texture. Don’t go cheap on this, your bread deserves the best.
- Psyllium Husk Powder (⅓ cup): This stuff is pure magic. It’s what gives our low-carb bread actual bread-like chewiness and structure. Don’t skip it unless you want a sad, crumbly brick. Seriously.
- Warm Water (1 ¼ cups): Around 100-110°F (38-43°C). Not too hot to kill your starter, not too cold to make it grumpy.
- Salt (1 teaspoon): Crucial for flavor. Don’t be shy, but don’t overdo it.
- Olive Oil (2 tablespoons, optional but recommended): Adds a lovely richness and helps with the crust.
- Apple Cider Vinegar (1 tablespoon, optional): Boosts that sourdough tang!
Step-by-Step Instructions
Ready to bake some low-carb happiness? Let’s do this!
- Get Your Starter Ready: First things first, ensure your sourdough starter is active and fed. It should be bubbly and float if you drop a tiny bit into water. If not, feed it and wait a few hours. Patience, young grasshopper.
- Mix the Wet Ingredients: In a large bowl, combine your active sourdough starter, warm water, olive oil (if using), and apple cider vinegar (if using). Whisk it together until it’s somewhat uniform.
- Combine Dry Ingredients: In a separate bowl, whisk together the almond flour, psyllium husk powder, and salt. Make sure they’re thoroughly mixed – no one wants a pocket of unmixed psyllium!
- Bring Them Together: Pour the wet ingredients into the dry ingredients. Mix with a spoon or your hands until a shaggy dough forms. It will seem quite wet and sticky at first. That’s normal!
- Knead (Lightly): Turn the dough out onto a lightly floured (with almond flour) surface. Knead for about 5-7 minutes. The dough will thicken and become more pliable as the psyllium husk absorbs the liquid. It won’t be like regular dough, but it should hold together.
- First Proof: Shape the dough into a ball and place it back into the lightly oiled bowl. Cover it with plastic wrap or a damp towel. Let it rise in a warm place for 4-6 hours, or until it has noticeably increased in volume (it won’t double like traditional dough, so manage expectations!). A warm spot is your friend here.
- Preheat & Shape: About 30-45 minutes before you’re ready to bake, preheat your oven to 450°F (232°C) with a Dutch oven inside. While the oven preheats, gently shape your dough into a tight ball. You can do this on a piece of parchment paper to make transferring easier.
- Second Proof (Optional but Recommended): If you want, you can let it rest for another 30-60 minutes while the oven heats up. This isn’t strictly necessary but can help with texture.
- Bake It!: Carefully remove the hot Dutch oven. Transfer your dough (on the parchment paper, if using) into the Dutch oven. Score the top of the dough with a sharp knife or razor blade (a simple cross or a few slashes will do). Pop the lid back on and bake for 30 minutes.
- Final Bake: Remove the lid and continue baking for another 15-20 minutes, or until the crust is golden brown and sounds hollow when tapped.
- Cool Down: Transfer the bread to a wire rack and let it cool completely before slicing. I know, it’s torture, but slicing it hot will mess with the texture. Trust me on this one.
Common Mistakes to Avoid
Look, we all make mistakes. It’s part of the journey. But here are a few common blunders you can totally skip:
- Sluggish Starter Syndrome: Trying to bake with a starter that’s barely breathing. It’s like trying to run a marathon on an empty stomach. Feed your starter!
- Forgetting to Weigh: Baking is a science, especially with low-carb flours. Don’t eyeball it; get a kitchen scale. Your future self (and your bread) will thank you.
- Slicing Too Soon: Thinking you can just slice into that gorgeous loaf right out of the oven. Rookie mistake! That steam needs to redistribute, or you’ll end up with a gummy interior. Cool it completely!
- Expecting a Traditional Rise: This isn’t your grandma’s sourdough. Low-carb flours won’t give you the same dramatic oven spring. It will rise, just not “hello-clouds” high. Adjust your expectations, my friend.
- Skipping the Psyllium Husk: We already talked about this. You want bread, not a sad frisbee.
Alternatives & Substitutions
Feeling a little adventurous? Or maybe you just ran out of something. Here are a few ideas:
- Flour Power: While almond flour is my go-to, you *could* try a blend of almond and lupin flour for a slightly different texture and protein boost. Just be mindful that lupin flour can have a strong flavor some don’t love. Coconut flour is tricky because it’s super absorbent, so you’d need to adjust liquid significantly. IMO, stick to almond for your first go.
- Seed It Up: Want some extra crunch and nutrients? Fold in a few tablespoons of flax seeds, chia seeds, or sunflower seeds when you’re mixing the dough. Adds a lovely texture and makes it even prettier.
- Spice It Up: A pinch of garlic powder or dried herbs (rosemary, thyme) can turn this into a savory loaf perfect for dipping.
- No Dutch Oven? No Problem: You can bake this on a regular baking sheet. To create some steam (which helps with the crust), place a tray of hot water on the bottom rack of your oven while it bakes. The crust might not be as perfectly crunchy, but it’ll still be delicious!
FAQ (Frequently Asked Questions)
- My dough is super sticky, what did I do wrong? It’s okay, low-carb doughs, especially with psyllium, can be a bit sticky at first. Just add a tiny bit more almond flour to your work surface when kneading, and remember to oil your hands if it’s really tenacious. It will firm up as the psyllium works its magic.
- Why didn’t my bread rise much? Are you sure your starter was active? Did you give it a warm enough place to proof? And as mentioned, low-carb doughs won’t rise as dramatically as traditional wheat doughs. So, a modest rise is actually a win!
- Can I make this without a sourdough starter? Well, then it wouldn’t really be *sourdough* bread, would it? You’d just be making a low-carb quick bread. If you want that sourdough tang and texture, the starter is non-negotiable, FYI.
- How do I store this masterpiece? Once completely cool, store it in an airtight container at room temperature for 3-4 days, or slice and freeze for longer storage. Toasting slices from frozen works beautifully!
- Does it taste *exactly* like regular sourdough? Let’s manage expectations here. It tastes *like* sourdough, with a fantastic texture, but it won’t be an identical clone of a wheat-based loaf. It’s a delicious, low-carb alternative that hits all the right notes!
- My bread is too dense. Help! This could be a few things: inactive starter, not enough proofing time in a warm spot, or possibly slicing too early. Ensure your starter is lively and give the dough ample time to proof.
Final Thoughts
So there you have it! You just conquered low-carb sourdough. Go ahead, pat yourself on the back, you culinary genius! This isn’t just bread; it’s a statement. A statement that says, “I love delicious food, but I also love my blood sugar, and I can have both!” Now go impress someone—or yourself—with your new culinary skills. You’ve earned it!

