So you’re craving something tasty but too lazy to spend forever in the kitchen, huh? Same. We’ve all been there, staring into the abyss of an empty fridge, dreaming of a snack that won’t undo all our hard work (or, let’s be real, our good intentions). Fear not, my friend, because I’ve got a recipe so ridiculously easy, it practically makes itself. We’re talking low-carb, high-protein bars that taste like a hug for your tastebuds but won’t send your blood sugar on a roller coaster. Ready to be a kitchen wizard without the actual magic?
Why This Recipe is Awesome
Okay, let’s break it down. Why should you even bother with these? First off, they’re **no-bake**. That’s right, no oven-preheating anxiety, no burnt edges, no wondering if your smoke alarm is about to throw a party. It’s truly idiot-proof – even I didn’t mess it up, and my kitchen skills sometimes peak at microwaving popcorn. These bars are packed with protein, which means they’ll actually keep you full and satisfied, unlike that bag of chips you *accidentally* finished. Plus, they’re super customizable, so you can make them exactly how you like, no judgment here! Think of them as your personal, portable snack heroes.
Ingredients You’ll Need
Gather ’round, my aspiring snack maestro. Here’s what you’ll need for this deliciousness. Don’t worry, nothing too fancy, just the good stuff.
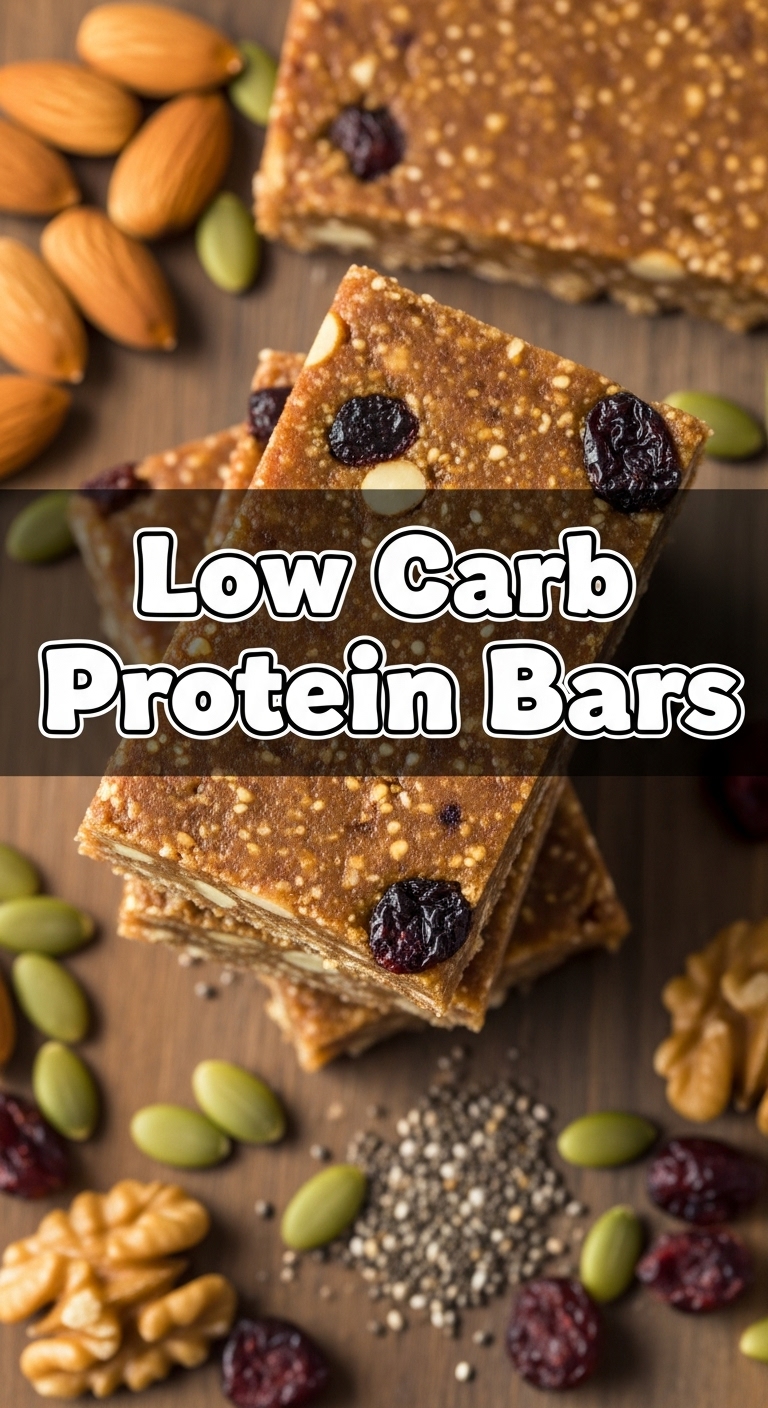
- 1 cup creamy nut butter: Almond butter, peanut butter, cashew butter – pick your poison! Just make sure it’s the natural kind, with no added sugar or weird oils. Your future self will thank you.
- 1/2 cup sugar-free syrup: Think maple-flavored, or a sugar-free honey substitute. This is our sticky-sweet magic, holding everything together.
- 1/2 cup unflavored or vanilla protein powder: This is your muscle-building secret weapon! Whey, casein, plant-based – whatever floats your boat. If it’s vanilla, even better for flavor.
- 1/4 cup almond flour: Not the normal flour your grandma uses for cookies, but the finely ground almonds. Adds some lovely texture and keeps things low-carb.
- 1/4 cup sugar-free chocolate chips (optional, but highly recommended): Because life’s too short to skip chocolate.
- 1/4 teaspoon sea salt: Just a pinch to really make those flavors pop. Trust me on this one.
- 1-2 tablespoons unsweetened almond milk (or other milk of choice): Only if your mixture needs a little loosening up. Like a tiny spa treatment for your dough.
Step-by-Step Instructions
Get ready for the easiest recipe you’ve ever made. Seriously, if you can stir, you can make these.
- Prep Your Pan: Grab an 8×8 inch baking dish. Line it with parchment paper, leaving an overhang on the sides. This is key for easy removal later. Don’t skip this part, unless you enjoy a sticky mess!
- Mix the Wet Stuff: In a large mixing bowl, combine the nut butter and sugar-free syrup. Stir them together until they’re super smooth and well-combined. This might take a minute or two, so get those biceps ready.
- Add the Dry Goodies: Now, add the protein powder, almond flour, and sea salt to the wet mixture. Stir, stir, stir! It’ll start to look like a thick dough. If it’s too dry and crumbly, add almond milk, one tablespoon at a time, until it comes together.
- Fold in the Fun: If you’re using chocolate chips (and you totally should!), gently fold them into the dough. Don’t overmix, just distribute them evenly.
- Press and Chill: Transfer the glorious dough into your prepared baking dish. Using your hands or the back of a spoon, press it down firmly and evenly into the pan. You want a nice, compact layer. Once pressed, pop the dish into the fridge for at least 2 hours. The chill time is non-negotiable! This helps them firm up perfectly.
- Slice and Serve: After chilling, lift the parchment paper to remove the slab from the pan. Place it on a cutting board and slice it into 10-12 bars. Store them in an airtight container in the fridge for up to a week.
Common Mistakes to Avoid
Even though this recipe is practically foolproof, there are a few rookie errors that can derail your snack-making dreams. Learn from my past blunders, folks!
- Skipping the Parchment Paper: Oh, you think you’re tough? You’ll be scraping stuck bars off the bottom of your pan all day. Just use the paper. Please.
- Not Chilling Enough: Impatience is not a virtue here. If you try to cut them too soon, they’ll be a soft, glorious mess. Delicious, yes, but not bar-shaped. Give ’em their full beauty sleep in the fridge.
- Using Sugary Nut Butter/Syrup: This ain’t that kind of party! Check labels for “no added sugar” to keep these bars truly low-carb. Otherwise, you’re making a different (but probably still tasty) kind of bar.
- Over-Adding Liquid: When adding almond milk, go slow! Too much and your “dough” will become “soup.” We’re aiming for a thick, pressable consistency, not a smoothie.
Alternatives & Substitutions
Feeling creative? This recipe is super flexible! Here are some ideas to make it your own:
- Nut Butter Swap: Not a fan of almond? Peanut butter, cashew butter, or even sunflower seed butter (for nut-free options!) work great. Just ensure they’re creamy and natural.
- Protein Powder Flavors: Vanilla is a classic, but chocolate protein powder would make a richer bar. Strawberry, cookies & cream – go wild! Just be mindful of added sugars if your chosen flavor is super sweet.
- Sweetener Options: Instead of sugar-free syrup, you could use a small amount of erythritol or stevia mixed with a tiny bit of water or almond milk to create a paste, though the syrup really helps with texture. IMO, the syrup is superior for binding.
- Add-ins Galore: Want more crunch or flavor? Throw in some shredded coconut, chopped nuts (pecans, walnuts), a sprinkle of cinnamon, or even some sugar-free sprinkles for fun.
FAQ (Frequently Asked Questions)
Got questions? I probably asked them too. Here are the answers to the burning queries you might have.
- Can I use regular sugar or maple syrup instead of sugar-free? Well, technically yes, but then they wouldn’t be “low-carb protein bars,” would they? And your blood sugar might not be too thrilled. Stick to sugar-free for this recipe’s intended purpose.
- How long do these last? In an airtight container in the fridge, they’ll happily hang out for about a week. If they last that long, that is!
- Can I freeze them? Absolutely! Wrap individual bars in parchment paper, then store them in a freezer-safe bag or container for up to a month. Thaw in the fridge or at room temp for a quick grab-and-go snack.
- My mixture is too crumbly, what do I do? Add almond milk, one teaspoon at a time, until it reaches a dough-like consistency that you can press together. Don’t drown it!
- Can I use crunchy nut butter? You can! It’ll just give your bars a bit more texture. If you prefer a smoother bar, stick to creamy.
- Are these good for meal prep? Oh heck yes! Make a batch on Sunday, and you’ve got snacks for days. **FYI**, they’re perfect for silencing those 3 PM snack monster cravings.
Final Thoughts
There you have it, folks! A ridiculously easy, incredibly tasty, and surprisingly healthy snack that will make you feel like a culinary genius without, you know, actually being one. These low-carb protein bars are your new best friend for busy days, pre- or post-workout fuel, or just when you need a little something-something that won’t sabotage your goals. Now go impress someone—or yourself—with your new culinary skills. You’ve earned it!

