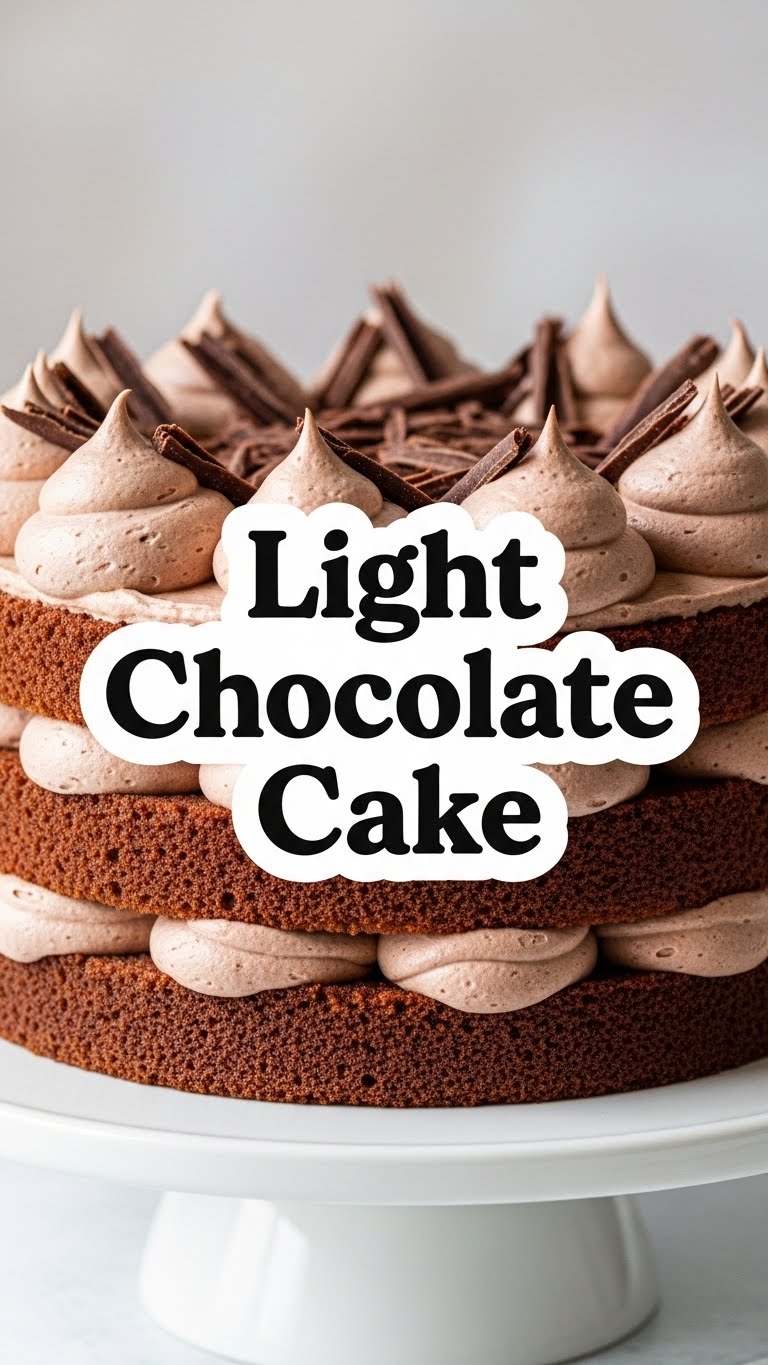
So, you’re staring into the abyss of your fridge, craving something chocolatey, but also secretly dreading that heavy, ‘I just ate a brick’ feeling, huh? Been there, done that, bought the T-shirt. But what if I told you there’s a chocolate cake that’s light enough to make you feel like you’re floating on a cloud, but still packs all the chocolatey punch you desire? And the best part? It’s so easy, your cat could probably make it (if it had opposable thumbs and an apron). Welcome to your new favorite obsession: The Light Chocolate Cake!
Why This Recipe is Awesome
Okay, let’s be real. We all want to impress our friends/family/ourselves with minimal effort. This recipe? It’s basically your culinary wingman. Here’s why it’s about to become your go-to:
- It’s ridiculously easy. Seriously, if I can do it without setting off the smoke alarm, anyone can. It’s practically **idiot-proof**.
- Light & Fluffy: Forget dense, gut-busting cakes. This one is airy, moist, and tastes like a chocolate dream, not a chocolate brick.
- Minimal Fuss: No fancy techniques, no separating eggs, no obscure ingredients. Just straightforward baking magic.
- Quick Bake Time: You’ll be eating cake before you know it. Instant gratification, my friend.
- Chocolatey Goodness: Don’t let “light” fool you. It’s still packed with rich, deep chocolate flavor. Score!
Ingredients You’ll Need
Gather ’round, my little baking warriors! Here’s your shopping list. Most of these are probably chilling in your pantry already, FYI.
- 1 ½ cups All-Purpose Flour: The backbone of our cake. No fancy stuff needed.
- 1 ½ cups Granulated Sugar: For sweetness, because, duh.
- ½ cup Unsweetened Cocoa Powder: The star of the show. Get a good quality one; it makes a difference.
- 1 tsp Baking Soda: Our lift-off crew. Gives it that beautiful rise.
- ½ tsp Baking Powder: Baking soda’s trusty sidekick. Double the lift, double the fun.
- ½ tsp Salt: Don’t skip this! It enhances the chocolate flavor like a secret superpower.
- 2 Large Eggs: The glue that holds it all together.
- ½ cup Milk: Any kind works – whole, 2%, almond, oat… your choice, boo.
- ¼ cup Vegetable Oil: For ultimate moistness. Trust me, it makes a huge difference.
- 1 tsp Vanilla Extract: Because everything is better with a splash of vanilla.
- ½ cup Hot Water (or hot brewed coffee): This is the secret weapon! Hot liquid “blooms” the cocoa, intensifying the chocolate flavor like nobody’s business. If you use coffee, the cake won’t taste like coffee, just *more* chocolatey!
Step-by-Step Instructions
Alright, apron on (or not, no judgment here), let’s get baking!
- Preheat & Prep: First things first, crank that oven to **350°F (175°C)**. Grease and flour a 9×13 inch baking pan. You can also line it with parchment paper for easy removal.
- Whisk the Dry Squad: In a large bowl, whisk together the flour, sugar, cocoa powder, baking soda, baking powder, and salt. Make sure there are no lumpy bits!
- Mix the Wet Crew: In a separate, medium-sized bowl, lightly whisk the eggs, then stir in the milk, vegetable oil, and vanilla extract until well combined.
- Combine & Conquer: Pour the wet ingredients into the dry ingredients. Stir them together with a spatula or wooden spoon until *just* combined. Don’t overmix! Lumps are okay.
- Add the Magic: Carefully pour the hot water (or coffee) into the batter. It will look thin, don’t panic! Stir gently until everything is incorporated and the batter is smooth.
- Bake It Up: Pour the batter evenly into your prepared baking pan. Pop it into the preheated oven and bake for **25-30 minutes**.
- Check for Doneness: The cake is ready when a wooden skewer or toothpick inserted into the center comes out clean or with a few moist crumbs.
- Cool Down: Let the cake cool in the pan on a wire rack for about 10-15 minutes before attempting to invert it onto the rack to cool completely. Patience, grasshopper!
- Frost & Devour: Once completely cool, frost with your favorite light chocolate frosting, whipped cream, or just a dusting of powdered sugar. Or eat it plain, it’s that good!
Common Mistakes to Avoid
Even the pros make mistakes (I’ve definitely had my share of baking fails!), so let’s learn from them and avoid these rookie blunders:
- Overmixing the Batter: This is a big one! When you overmix, you develop the gluten in the flour too much, leading to a tough, rubbery cake. Mix until *just* combined, and no more. A few lumps are perfectly fine!
- Not Preheating the Oven: Impatience is not a virtue here. A cold oven will mess with your cake’s rise and texture. **Always preheat!**
- Opening the Oven Door Too Early: Resist the urge to peek! Opening the oven door lets out heat, causing your cake to sink in the middle. Give it at least 20 minutes before you even think about looking.
- Not Measuring Correctly: Baking is a science, not an art (mostly). Eyeballing ingredients is a recipe for disaster. Use proper measuring cups and spoons!
- Cutting Into a Warm Cake: I know, the temptation is real. But a warm cake is fragile and can crumble easily. Let it cool a bit. Your patience will be rewarded.
Alternatives & Substitutions
Want to tweak things a bit? No problem! This recipe is super flexible:
- Gluten-Free: Swap out the all-purpose flour for a 1:1 gluten-free baking blend. Make sure it contains xanthan gum!
- Dairy-Free: Use your favorite plant-based milk (almond, soy, oat) instead of dairy milk. No biggie.
- No Cocoa Powder? Okay, this is a *chocolate* cake, so I highly recommend it. But if you’re in a pinch and just want a vanilla cake base, omit the cocoa and use an extra 1/4 cup of flour, along with an extra teaspoon of vanilla.
- Different Frosting: I love this cake with a simple whipped ganache or even just a dusting of powdered sugar. But hey, it plays well with a classic buttercream or cream cheese frosting too. Your cake, your rules!
- Add-ins: Fold in a handful of chocolate chips for extra indulgence, or a sprinkle of espresso powder (just a teaspoon or two) into the dry ingredients to deepen that chocolate flavor even further.
FAQ (Frequently Asked Questions)
Got questions? I’ve got (casual and hopefully helpful) answers!
- Can I use margarine instead of vegetable oil?
Well, technically yes, but why hurt your soul like that? Vegetable oil gives a superior moistness and doesn’t interfere with the chocolate flavor. IMO, stick to oil for this one! - My cake sank in the middle! What happened?
Ah, the dreaded crater! Usually, this means you either opened the oven door too early, your baking soda/powder is old (check the expiry!), or your oven temperature isn’t accurate. Get an oven thermometer, they’re lifesavers! - Can I make this cake ahead of time?
Absolutely! This cake actually tastes even better the next day. Store it unfrosted, tightly covered, at room temperature for up to 3 days, or in the fridge for up to 5. Just let it come to room temp before serving. - Is the hot water (or coffee) really necessary?
YES! It’s the secret sauce! Hot liquid “blooms” the cocoa powder, bringing out a much richer, deeper chocolate flavor. Don’t skip this step if you want maximum chocolatey goodness. - How do I know when it’s perfectly done?
The toothpick test is your best friend. Insert a toothpick into the center; if it comes out clean or with just a few moist crumbs clinging to it, you’re golden. If it’s wet batter, give it a few more minutes. - Can I bake this in cupcake form?
You betcha! Line a muffin tin with paper liners, fill them about two-thirds full, and bake for 18-22 minutes. Voila, chocolate cupcakes!
Final Thoughts
See? I told you it was easy peasy lemon squeezy (but with chocolate, which is way better than lemons). This light chocolate cake is truly a game-changer for those moments when you need a dessert that feels indulgent but won’t weigh you down. It’s perfect for a weeknight treat, a casual get-together, or just because it’s Tuesday and you deserve it. Now go impress someone—or yourself—with your new culinary skills. You’ve earned it!

