So, you’re craving something ridiculously tasty, something that transports you to a sunny, bustling marketplace without even changing out of your PJs? And, let’s be real, you want it with minimal fuss because adulting is hard enough, right? Same, friend, same. Get ready to have your mind blown (and your taste buds delighted) by the gloriousness that is Lebanese Ice Cream with Pistachio. It’s basically a hug from the Middle East, in a cone.
Why This Recipe is Awesome
Okay, let’s be real. This isn’t just *any* ice cream. This is the Beyoncé of ice creams. It’s got this amazing, stretchy, almost chewy texture that’ll make you question everything you thought you knew about frozen desserts. Plus, the subtle floral notes mingling with those nutty pistachios? Pure genius. And guess what? It’s pretty darn **idiot-proof**. Even I, Queen of Kitchen Calamities, manage to pull this off without setting off the smoke detector. So, you’ve got this.
Ingredients You’ll Need
Gather your troops! Most of these are probably chilling in your pantry already, but a couple might require a quick trip to a specialty store (or a super cool online shop). Trust me, it’s worth it.
- Full-Fat Milk (about 3 cups / 700ml): Don’t even think about skim. This isn’t a diet plan, friend. This is happiness in a bowl.
- Heavy Cream (about 1 cup / 240ml): Because everything is better with cream. Fact.
- Granulated Sugar (about 3/4 cup / 150g, adjust to your sweet tooth): Sweetness! Or less sweetness if you’re feeling virtuous. Your call.
- Mastic Gum (3-4 tiny pieces, like little crunchy tears): The secret weapon! Find it at Middle Eastern stores. It’s kinda piney and magical and gives that signature chew. **Don’t skip it, seriously.**
- Salep Powder (1-2 tsp, optional but highly recommended): Another secret weapon for that signature stretchy texture. If you can’t find it, don’t cry, but definitely try to track it down for the authentic experience.
- Rosewater or Orange Blossom Water (1-2 tsp): For that ‘I’m in a faraway, exotic land’ vibe. Pick your poison, or use both for extra flair.
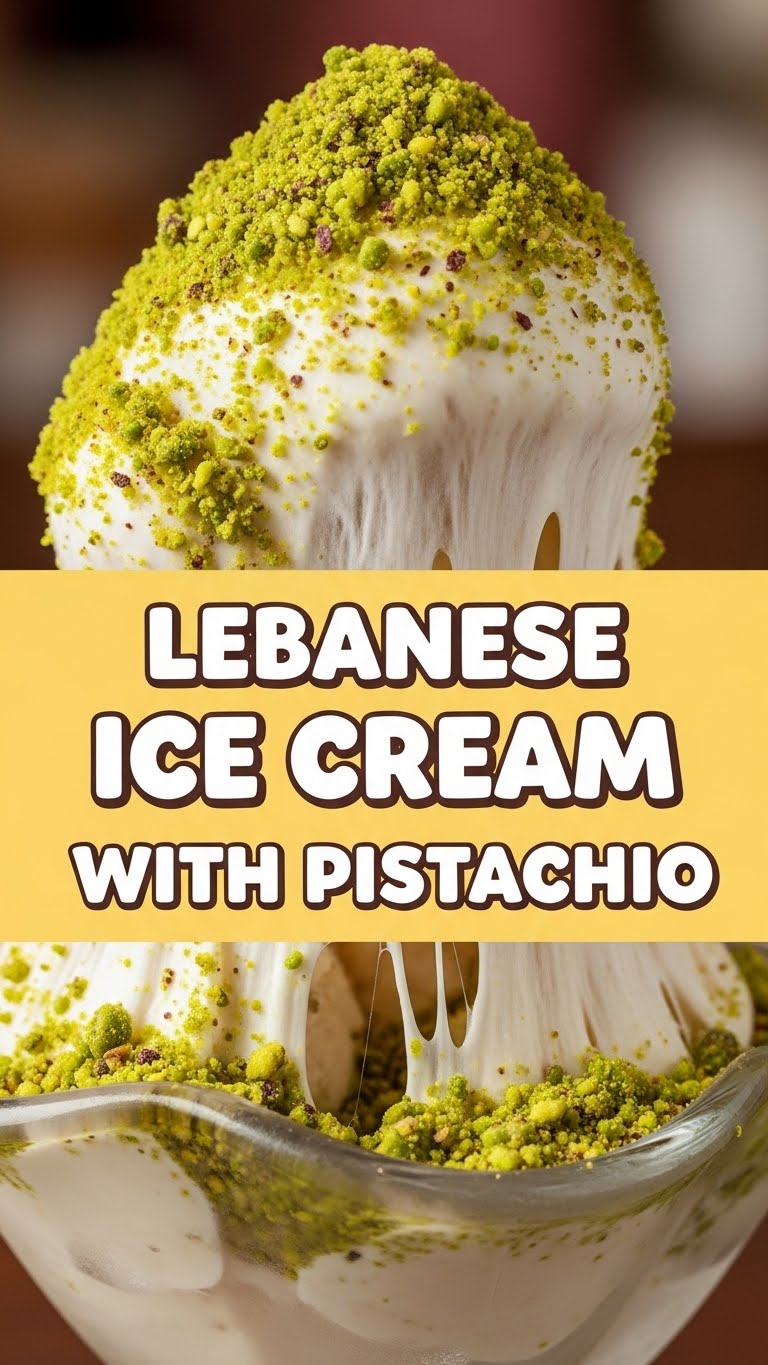
- Pistachios (1 cup / 120g, shelled, roasted, and roughly chopped): The green stars of our show! Roast ’em yourself for extra oomph, or buy them pre-roasted.
- A tiny Pinch of Salt: Because even sweet things need a little balance, right?
Step-by-Step Instructions
Alright, apron on, good vibes only! Let’s get this show on the road.
- First things first, let’s prep those pistachios. If they’re not roasted, spread ’em on a baking sheet and toast them in a 350°F (175°C) oven for about 5-7 minutes until fragrant. Let them cool, then chop them roughly. We want texture!
- Next, grab a mortar and pestle (or a coffee grinder dedicated to spices, FYI). Add the mastic gum and a tablespoon of your sugar. Grind it into a fine powder. This helps the mastic dissolve properly. If using salep, add it to this mixture too.
- In a medium saucepan, combine the full-fat milk, heavy cream, the remaining sugar, your mastic/salep mixture, and that tiny pinch of salt.
- Heat the mixture over medium heat, stirring constantly, until the sugar dissolves and the mixture is hot but not boiling. You’ll notice it start to thicken slightly as the mastic and salep do their magic. **Don’t let it boil!**
- Remove the saucepan from the heat. Let the mixture cool down to room temperature, then stir in the rosewater or orange blossom water. Give it a taste – want more floral? Add another dash!
- Now for the fun part: the freezing!
- If you have an ice cream maker: Chill the mixture completely in the fridge for at least 4 hours (or overnight). Then, churn it according to your machine’s instructions until it’s thick and creamy.
- No ice cream maker? No problem! Pour the cooled mixture into a freezer-safe container. Freeze for about 1 hour, then take it out and give it a vigorous whisk to break up ice crystals. Repeat this every 30-45 minutes for about 3-4 hours, until it reaches a scoopable consistency. It’s a bit of an arm workout, but so worth it!
- Once your ice cream is mostly set, gently fold in about half of your chopped pistachios. If you’re feeling fancy, layer the ice cream and pistachios in your container for pretty swirls.
- Freeze the ice cream for at least another 2-4 hours to firm up completely.
- When you’re ready to serve, let it sit out for 5-10 minutes to soften slightly, then scoop, sprinkle with the remaining pistachios, and bask in the glory!
Common Mistakes to Avoid
Even though it’s idiot-proof, there are a few little pitfalls to sidestep if you want truly epic results. Consider this your cheat sheet:
- Skipping the Mastic/Salep: Oh, bless your heart. You’ll get ice cream, sure, but it won’t be *Lebanese* ice cream. It’s like making a burger without the patty. **Don’t do it.** These are the non-negotiables for that signature texture.
- Not Grinding the Mastic Properly: If you don’t grind it finely with a bit of sugar, it might clump or give you crunchy bits of mastic. We’re going for smooth, stretchy magic here, not a dental emergency.
- Letting it Boil: While cooking, keep that heat medium and stir often. If it boils, it might mess with the integrity of the mastic/salep, leading to less stretchiness. Gentle heat is key.
- Impatience (No-Churn Method): Thinking you can just dump it in the freezer and walk away? Rookie mistake! You *have* to whisk it every so often to break up those ice crystals and achieve that creamy, non-icy texture.
Alternatives & Substitutions
Life happens, and sometimes you don’t have every exotic ingredient on hand. Here are a few tweaks:
- No Mastic or Salep? Okay, fine, if you *absolutely* can’t find them, you could try using 1-2 teaspoons of cornstarch mixed into a slurry with a bit of milk to thicken the base. It won’t give you the exact same stretchy chewiness, but it will help with texture. Just know, it won’t be *authentically* Lebanese. Sorry, not sorry.
- Different Nuts? While pistachios are the classic, feel free to experiment! Almonds or cashews would be tasty, but IMO, nothing beats the vibrant green and distinct flavor of pistachios in this recipe.
- No Rosewater/Orange Blossom Water? You could use vanilla extract for a different (but still delicious) flavor profile. However, the floral notes are a big part of what makes this ice cream so unique and Lebanese!
- Dairy-Free? I haven’t personally tried it, but you could experiment with full-fat coconut milk and cream, along with plant-based milks. Just be aware the texture might vary.
FAQ (Frequently Asked Questions)
- What the heck is mastic? It’s a resin from the mastic tree, friend! Sounds weird, tastes amazing (kinda piney, slightly vanilla-like). It’s what gives this ice cream its signature chewiness.
- And salep? Is it also some kind of tree goo? Haha, not quite! Salep is a flour made from the tubers of orchids. It’s another natural thickener that contributes to the unique stretchy texture of Lebanese and Turkish ice creams (dondurma).
- Can I make this without an ice cream maker? Absolutely! Just follow the no-churn instructions above. It takes a little more effort (and arm strength!), but the results are totally worth it.
- How long does this glorious ice cream keep in the freezer? Ideally, eat it within 1-2 weeks for the best texture and flavor. After that, it might start to get a bit icy, though it’ll still be edible!
- Can I reduce the sugar? You can, but remember sugar also helps prevent ice crystals from forming, contributing to the smooth texture. If you significantly reduce it, your ice cream might be a bit harder or icier.
- My mastic isn’t dissolving! Help! Make sure you ground it into a super fine powder with a bit of sugar first. If it’s still chunky, your heat might be too low, or you didn’t grind it fine enough. Keep stirring!
- Why do I need full-fat everything? Can’t I be healthy *just once*? Look, we’re making ice cream, not kale salad. The fat content is crucial for the creamy, rich texture. Go all in, or go home! Treat yo’ self!
Final Thoughts
And there you have it! Your very own, totally impressive, Lebanese Ice Cream with Pistachio. You’ve navigated exotic ingredients, mastered the art of non-boiling, and probably got a good arm workout in the process. Now go impress someone—or yourself—with your new culinary skills. You’ve earned it! Seriously, go make this. Your future self (the one with a spoon in hand) will thank you.


