Short, Catchy Intro
So, you’ve scrolled past one too many glorious dessert photos on your feed, and now that sweet tooth is doing a full-blown samba in your mouth, huh? But the idea of baking something that requires a diploma in pastry arts? Hard pass. If you’re anything like me – a lover of fancy-looking food that’s deceptively easy to make – then you’re in the right place. Today, we’re whipping up a Layered Tiramisu Dessert with Berries that looks like you spent hours, but actually takes less time than deciding what to watch on Netflix. Get ready to feel like a culinary genius without, you know, doing much genius-level work. You’re welcome.
Why This Recipe is Awesome
Let’s be real, who doesn’t love tiramisu? But sometimes, it feels a bit… brown. Deliciously brown, sure, but visually it could use a pick-me-up. Enter: BERRIES! This recipe takes that classic Italian hug-in-a-bowl and layers it with vibrant, juicy berries, making it not just incredibly tasty but also stunningly beautiful. It’s essentially the supermodel of desserts – looks amazing, but totally approachable. Plus, **no oven required!** Yep, you heard that right. If you can dunk a cookie and stir some cream, you’re pretty much qualified. It’s so idiot-proof, even my cat could probably supervise. (And she mostly just supervises my nap schedule.)
Ingredients You’ll Need
Gather your troops, fellow dessert adventurers! Here’s what we’re wrangling for this epic feast:
- For the Creamy Dream Layers:
- 3 large egg yolks: Make sure they’re fresh. We’re going to treat ’em right!
- 1/2 cup granulated sugar: Just enough sweetness to make everything sing.
- 16 ounces (2 tubs) mascarpone cheese: The star of the show! Make sure it’s softened a bit at room temp – makes mixing way easier.
- 1 teaspoon vanilla extract: The secret ingredient that makes everything taste like a warm hug.
- 1 1/2 cups heavy cream: We’re whipping this bad boy up to stiff peaks, so it helps everything hold its shape.
- For the Coffee & Cookie Magic:
- 1 1/2 cups strong brewed coffee or espresso: Chilled, please! Hot coffee will give you sad, soggy ladyfingers.
- 1/4 cup coffee liqueur (like Kahlua) or dark rum (optional, but highly recommended): For that extra oomph! If you’re going alcohol-free, no worries, just add a splash more coffee.
- Approx. 24-30 ladyfingers (savoiardi): The sturdy, spongey backbone of our tiramisu. Don’t cheap out on these, they’re important!
- For the Berry Burst:
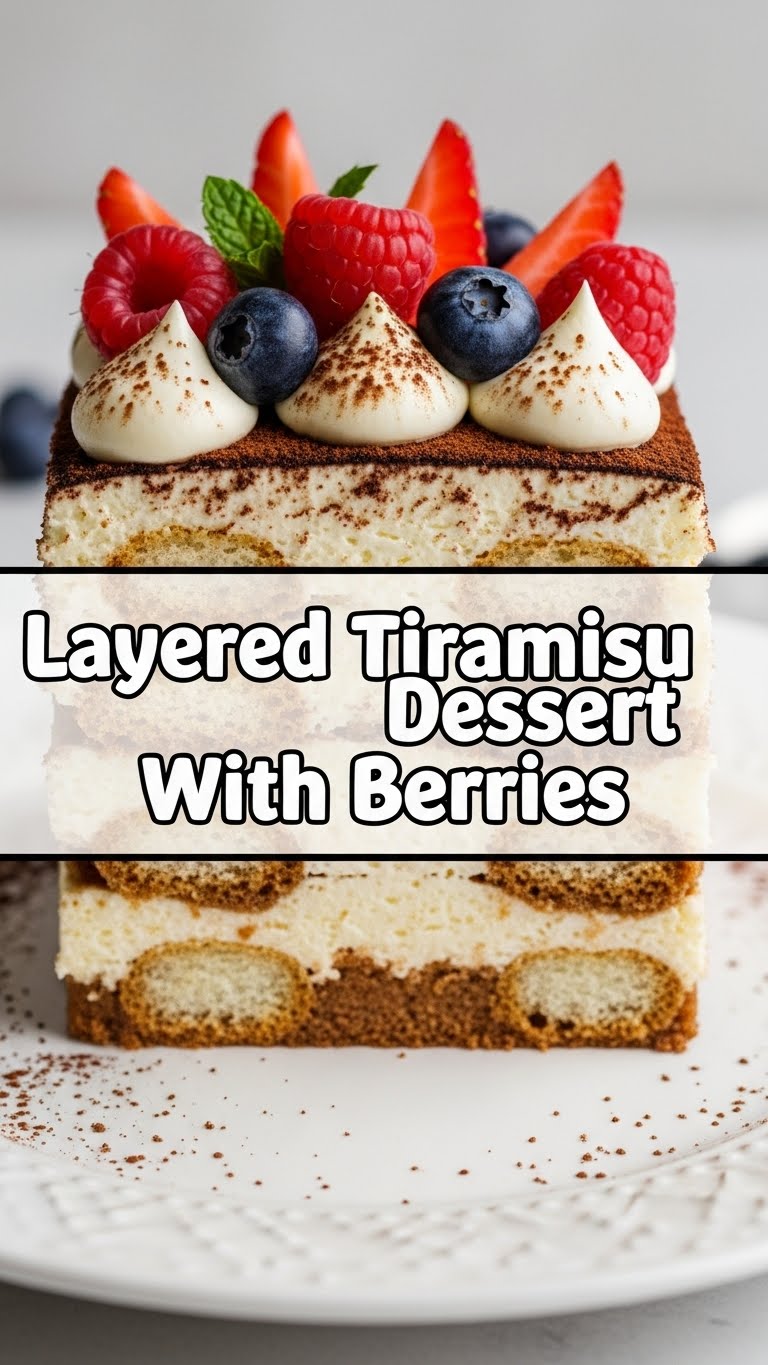
- 2 cups mixed fresh berries: Strawberries (sliced), raspberries, blueberries, blackberries – whatever makes your heart happy and looks colorful.
- 1-2 tablespoons granulated sugar (optional): If your berries aren’t super sweet, a little sprinkle helps them shine.
- For Garnish (because we’re fancy):
- Cocoa powder: A light dusting on top.
- Extra fresh berries: For that final pop of color.
Step-by-Step Instructions
- Prep the Coffee Dip: In a shallow dish, combine your chilled strong coffee and the coffee liqueur (if using). Set aside. This is where the magic starts!
- Whip the Cream: In a large, super clean bowl, whip the heavy cream until it forms stiff peaks. You want it firm enough to hold its shape. Gently set aside. Don’t overmix, or you’ll have butter, and while butter is great, it’s not what we’re going for here.
- Make the Mascarpone Dream: In another large bowl, whisk together the egg yolks and 1/2 cup sugar until light, fluffy, and pale yellow. It should look like a glorious yellow cloud. Then, beat in the vanilla extract and the softened mascarpone cheese until everything is smooth and creamy.
- Fold it Together: Gently, oh so gently, fold the whipped cream into the mascarpone mixture. You want to keep all that beautiful air in there, so use a spatula and a light hand. This is your luscious tiramisu cream!
- Prep the Berries: If your berries need a little sweetening, gently toss them with 1-2 tablespoons of sugar in a separate bowl. Let them sit for a few minutes; they’ll get a little juicy.
- Assemble the First Layer: Quickly dip each ladyfinger into the coffee mixture, just for a second or two per side – you don’t want them totally saturated. Arrange a single layer of these coffee-kissed ladyfingers at the bottom of a 9×13 inch (or similar) serving dish.
- Layer it Up! Spread half of your glorious mascarpone cream mixture over the ladyfingers. Then, sprinkle about half of your prepped berries evenly over the cream.
- Repeat the Layers: Create a second layer of coffee-dipped ladyfingers on top of the berries. Follow with the remaining mascarpone cream and then the rest of your berries.
- Chill Out: Cover the dish with plastic wrap and **refrigerate for at least 4-6 hours, but ideally overnight.** This is crucial! It allows the flavors to meld and the dessert to set properly. Patience, young padawan!
- Garnish & Serve: Just before serving, remove the plastic wrap and dust generously with cocoa powder. Add a few extra fresh berries on top for that “chef’s kiss” aesthetic. Slice, serve, and bask in the adoration!
Common Mistakes to Avoid
Listen, we all make mistakes. It’s part of the fun, right? But here are a few rookie errors you can totally skip:
- Over-soaking the Ladyfingers: This is a big one! Dunk ’em too long, and they’ll turn into a sad, soggy mess. Think “quick dip,” not “spa day.” A second or two per side is plenty.
- Not Chilling Enough: Impatience is the enemy of a perfectly set tiramisu. If you cut into it too soon, it’ll be a gloopy, albeit tasty, mess. **Chilling is non-negotiable!**
- Using Hot Coffee: Remember step 1? Chilled coffee is key. Hot coffee will disintegrate your ladyfingers, turning your elegant dessert into a warm breakfast mush. (Still tasty, but not the goal!)
- Overmixing the Whipped Cream: As mentioned, stiff peaks are good, but past that, you’re making butter. Keep an eye on it!
- Skipping the Liqueur (if you drink): I mean, it’s optional, but that little boozy kick really elevates the flavor profile. Don’t be shy!
Alternatives & Substitutions
Feeling creative? Or maybe you just can’t find mascarpone in your tiny town? No sweat! Here are some ways to shake things up:
- Different Fruits: Not a berry fan (gasp!)? Or maybe they’re out of season? Try sliced peaches, cherries, or even a citrus curd. Just keep it on the lighter, less watery side.
- Liqueur Swap: Kahlua or rum are classics, but feel free to experiment with amaretto, brandy, or even an orange liqueur for a different twist. For an alcohol-free version, extra vanilla or a touch of almond extract in the coffee works wonders.
- Cheese Alternatives: Okay, this is a tough one for tiramisu, as mascarpone is pretty unique. Some brave souls use a mix of cream cheese and heavy cream (about 1:1 ratio) with a bit of extra sugar and vanilla. It won’t be *exactly* the same, but it’ll still be delicious in its own right.
- Coffee Replacement: Decaf works just fine if you’re sensitive to caffeine. You could also try a strong hot chocolate or even chai tea for a totally different vibe, but then it’s not really “tiramisu” anymore, is it? Just a delicious layered dessert!
- No Ladyfingers? In a pinch, you can use slices of sponge cake or even pound cake. Just be aware they might absorb liquid differently, so adjust your dipping time.
FAQ (Frequently Asked Questions)
- “Can I make this ahead of time for a party?”
Oh honey, absolutely! This dessert practically *begs* to be made ahead. In fact, it tastes even better the next day once all those glorious flavors have had a chance to mingle and fall in love. Just keep it covered in the fridge. - “Do I have to use raw egg yolks?”
Traditionally, yes. If you’re nervous about raw eggs (totally understandable!), you have a few options: use pasteurized eggs, or gently temper the yolks over a double boiler with the sugar until they thicken slightly and reach 160°F (71°C) before mixing with the mascarpone. Some recipes even skip the eggs entirely and just use whipped cream and mascarpone, but you’ll lose a bit of that classic richness. - “What if I don’t have a 9×13 dish?”
No worries! Any similar-sized rectangular or square dish will work. You can even make individual servings in small glasses or ramekins for a super fancy presentation. Just adjust the layering as needed. - “How long does it last in the fridge?”
It’ll last happily for about 3-4 days in the fridge, covered. But let’s be honest, will it actually last that long? Probably not. It has a way of disappearing mysteriously. - “Can I freeze tiramisu?”
Technically, yes, but the texture might change a little upon thawing, especially with the berries. The ladyfingers can get a bit mushier. If you *must* freeze it, wrap it super well and thaw it slowly in the fridge. IMO, it’s best fresh or just a day old.
Final Thoughts
See? That wasn’t so scary, was it? You just created a show-stopping dessert that’s going to make jaws drop and taste buds sing. This Layered Tiramisu with Berries is the perfect blend of classic comfort and fresh, vibrant fun. So go on, bask in your glory! Share it with friends, impress your in-laws, or (my personal favorite) hoard it all to yourself for a truly epic Netflix and chill session. You’ve earned it, you culinary wizard, you!


