
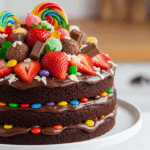
Oh. My. Goodness. Is there anything more impressive than showing up at a dinner party with a homemade layered cake that looks like it came from a fancy bakery? I think not! Today we’re tackling the ultimate crowd-pleaser: a layered cake with nuts and chocolate that’ll make your friends think you’ve been secretly training with pastry chefs. Spoiler alert: it’s way easier than it looks.
Why This Recipe is Awesome
Let’s get real for a second. This cake is basically the superhero of desserts. It’s:
- Ridiculously impressive-looking with minimal effort (my favorite combo)
- Customizable for whatever nuts you have rolling around in your pantry
- The perfect balance of “I’m an adult who appreciates complex flavors” and “I still want chocolate cake, dammit”
- Forgiving enough that even if you mess up a bit, nobody will notice because… chocolate covers everything
Ingredients You’ll Need
For the cake layers:
- 2 cups all-purpose flour (the regular stuff, nothing fancy)
- 1 ¾ cups granulated sugar (you know, the white stuff)
- ¾ cup unsweetened cocoa powder (the good kind, not the sad hot chocolate packets)
- 1 ½ tsp baking powder
- 1 ½ tsp baking soda
- 1 tsp salt
- 2 large eggs (room temperature, because cold eggs are drama queens in baking)
- 1 cup buttermilk (or regular milk with a splash of vinegar if you’re not that fancy)
- ½ cup vegetable oil
- 2 tsp vanilla extract (real vanilla, not that imitation nonsense)
- 1 cup hot coffee (or hot water if coffee isn’t your thing)
For the frosting and filling:
- 1 cup unsalted butter, softened (patience is key here, folks)
- 4 cups powdered sugar (also called confectioner’s sugar for the posh bakers)
- ½ cup unsweetened cocoa powder
- ¼ cup heavy cream
- 2 tsp vanilla extract
- Pinch of salt (trust me on this one)
- 1 ½ cups mixed nuts, toasted and chopped (walnuts, pecans, hazelnuts—whatever makes your heart sing)
- 6 oz semi-sweet chocolate, chopped (for ganache and decoration)
Step-by-Step Instructions
1. Prep your workspace. Preheat your oven to 350°F (175°C). Grease and line two 9-inch round cake pans. Pro tip: put parchment paper circles on the bottom. Your future self will thank you.
2. Mix the dry ingredients. In a large bowl, whisk together flour, sugar, cocoa powder, baking powder, baking soda, and salt. Break up any cocoa clumps—nobody wants to bite into a powder bomb later.
3. Add the wet team. Add eggs, buttermilk, oil, and vanilla to the dry ingredients. Mix until just combined. Slowly add the hot coffee, mixing until smooth. The batter will be thin, but don’t panic—that’s normal!
4. Bake those babies. Pour the batter evenly into your prepared pans and bake for 30-35 minutes, or until a toothpick inserted in the center comes out mostly clean. Cool in pans for 10 minutes, then transfer to wire racks to cool completely.
5. Meanwhile, toast your nuts. Spread nuts on a baking sheet and toast in the oven for 8-10 minutes until fragrant. Let cool, then chop roughly. Set aside ¼ cup for decoration.
6. Make the frosting. Beat the softened butter until creamy. Gradually add powdered sugar and cocoa powder, alternating with heavy cream. Add vanilla and salt. Beat until fluffy and spreadable. If it’s too thick, add a splash more cream.
7. Create the quick ganache. Heat ⅓ cup heavy cream until almost boiling, pour over 4 oz of the chopped chocolate. Let sit for 2 minutes, then stir until smooth. Cool until thickened but still pourable.
8. Assembly time! Place one cake layer on your serving plate. Spread a generous layer of frosting, then sprinkle with half the chopped nuts. Top with the second cake layer.
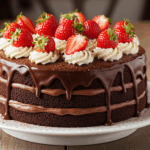
9. Frost and decorate. Cover the entire cake with the remaining frosting. Drizzle the ganache around the edges so it drips down dramatically (this is your Instagram moment). Sprinkle the reserved nuts on top and arrange remaining chocolate chunks artfully.
10. Chill out. Refrigerate for at least 30 minutes before serving to let everything set up. This also gives you time to clean up the hurricane that’s now your kitchen.
Common Mistakes to Avoid
- Rushing the cooling process. Hot cakes + frosting = slippery disaster. Let those layers cool completely, or you’ll create a melty landslide.
- Skipping the parchment paper. Unless you enjoy leaving half your cake stuck to the pan, use the parchment.
- Forgetting to toast the nuts. Raw nuts are like unseasoned food—a missed opportunity for flavor. Toast ’em!
- Overbeating the batter. This isn’t a workout session. Mix just until combined unless you want a tough cake.
- Applying frosting with crumbs everywhere. Use a thin “crumb coat” first, chill, then add the final layer of frosting. Trust me on this one.
Alternatives & Substitutions
Not everyone’s pantry is stocked like a professional bakery (shocking, I know). Here are some swaps that won’t ruin everything:
- Buttermilk alternative: Mix 1 cup of milk with 1 tablespoon of lemon juice or vinegar. Let it sit for 5 minutes and—boom—fake buttermilk.
- Nut options: Allergic to nuts? Try toasted coconut flakes or crushed pretzels for that crunchy texture.
- Coffee substitute: Not a coffee fan? Use hot water instead, but consider adding a tablespoon of espresso powder—it enhances chocolate flavor without tasting like coffee. IMO, it’s worth it even if you hate coffee.
- Make it boozy: Add 2 tablespoons of Kahlúa, Baileys, or bourbon to the batter for an adult version. You’re welcome.
- Make it a 3-layer cake: Divide the batter among three 8-inch pans instead. Reduce baking time to 25-28 minutes. More layers = more impressive.
FAQ (Frequently Asked Questions)
Can I make this cake in advance?
Absolutely! The cake layers can be made a day ahead and wrapped tightly in plastic wrap. The fully assembled cake will stay fresh in the refrigerator for up to 3 days. Just bring it to room temperature before serving (cold cake = sad cake).
Why add hot coffee to the batter?
The heat helps “bloom” the cocoa powder, intensifying the chocolate flavor. The coffee itself enhances the chocolate without making it taste like a mocha. Science is delicious!
My frosting looks curdled. Am I doomed?
Nope! Your butter was probably too cold. Keep beating and it’ll smooth out. If it’s truly a disaster, warm the bowl slightly over a pan of hot water for a few seconds, then try again.
Can I freeze leftover cake?
Sure can! Cut into slices, freeze individually on a baking sheet, then wrap in plastic wrap and store in a freezer bag. Defrost at room temperature when the cake craving strikes. FYI, frozen cake is also delicious eaten slightly chilled.
Do I really need two cake pans?
If you only have one pan, you can bake half the batter at a time. Keep the remaining batter at room temperature while the first layer bakes. Or use a 9×13 pan for a single-layer version (bake for about 40-45 minutes).
My ganache is too runny/thick. What now?
Too runny? Let it cool longer. Too thick? Add a teaspoon of warm cream. Chocolate is forgiving if you’re patient with it.
Final Thoughts
Look at you, cake master! You’ve just created something that would make those fancy bakery folks nod in approval. The beauty of this layered chocolate and nut cake is that it looks like you slaved away for hours, but between us, it’s pretty straightforward.
Remember, even if the layers aren’t perfectly even or the frosting isn’t perfectly smooth, everyone will be too busy experiencing chocolate euphoria to notice. And if all else fails, just call it “rustic” or “artisanal”—those words magically transform mistakes into intentional style choices.
Now go cut yourself the first slice—baker’s privilege! You deserve it after all that hard work. And maybe don’t tell anyone how easy it actually was… let them believe you’re a dessert genius. Because honestly? You kind of are.
