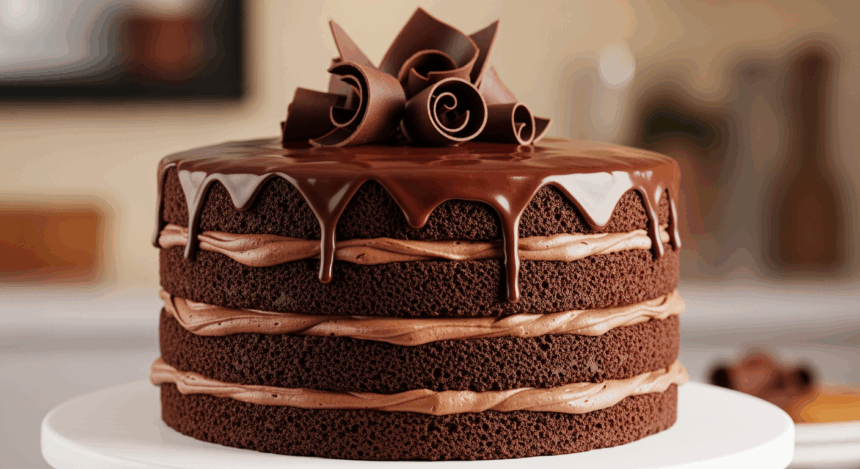
Let’s be real—there’s something magical about chocolate cake layers stacked together with creamy frosting that makes even the worst days better. If you’ve ever stood in a bakery, drooling over those perfect layered cakes with their impossibly even chocolate layers, and thought “I could never make that”… well, think again, friend! This recipe is about to change your chocolate-loving life.
Why This Recipe is Awesome
First off, this cake is basically therapy in food form. Bad day at work? Chocolate layer cake. Breakup? Chocolate layer cake. Tuesday? CHOCOLATE LAYER CAKE. But besides being emotional support disguised as dessert, this recipe is genuinely foolproof. The layers are moist but sturdy (nobody wants a cake landslide), and the chocolate flavor is deep without being overwhelming. Plus, it looks impressive as heck with minimal artistic ability required. Win-win!
Ingredients You’ll Need
For the Chocolate Cake Layers:
- 2 cups all-purpose flour (yes, the regular cheap stuff works fine)
- 2 cups granulated sugar (because we’re not pretending this is healthy)
- ¾ cup unsweetened cocoa powder (the darker, the better, chocolate fanatics)
- 2 teaspoons baking soda (not baking powder, they’re different—trust me on this)
- 1 teaspoon salt (to make the sweet taste sweeter, science!)
- 2 large eggs (room temperature, please—cold eggs are party poopers in baking)
- 1 cup buttermilk (no buttermilk? Check the substitutions section before panicking)
- ½ cup vegetable oil (makes it moist without having to use that word too much)
- 2 teaspoons vanilla extract (the real stuff, not that imitation nonsense)
- 1 cup hot coffee (brings out the chocolate flavor—and no, the cake won’t taste like coffee)
For the Frosting:
- 1 cup unsalted butter, softened (patience, grasshopper—truly soft butter matters)
- 4 cups powdered sugar (also called confectioners’ sugar for the fancy folks)
- ½ cup unsweetened cocoa powder (more chocolate, because duh)
- ¼ cup heavy cream (makes it silky smooth—diet culture can wait)
- 2 teaspoons vanilla extract (again, the real deal please)
- Pinch of salt (balances sweetness like emotional support in a toxic workplace)
Step-by-Step Instructions
Prep Work (Don’t Skip This!)
- Preheat your oven to 350°F (175°C). I know it’s tempting to skip this, but a cold oven is where good cakes go to die.
- Grease and line three 8-inch round cake pans with parchment paper. If you only have two pans, that’s fine—we’ll work with it.
- Brew that cup of coffee. Need caffeine motivation? This step doubles as your baking fuel.
Making the Chocolate Cake Layers:
- In a large bowl, whisk together flour, sugar, cocoa powder, baking soda, and salt. Break up any cocoa clumps—nobody wants to bite into a cocoa bomb.
- In another bowl, beat the eggs, then add buttermilk, oil, and vanilla. Mix until it looks like a weird science experiment gone right.
- Slowly add the wet ingredients to the dry ingredients, mixing on low speed. It’ll look thick and slightly concerning—that’s normal.
- Pour in the hot coffee and mix until just combined. The batter will be thin. Trust the process. This isn’t banana bread.
- Divide the batter evenly between your prepared pans. Use a kitchen scale if you’re a perfectionist (or just eyeball it if you’re more of a chaotic baker like me).
- Bake for 22-25 minutes, or until a toothpick inserted comes out with a few moist crumbs. Not wet batter, not bone dry—we’re aiming for that sweet spot.
- Let cakes cool in pans for 10 minutes (set a timer or you’ll forget), then flip onto wire racks to cool completely. Seriously—completely cool. Hot cakes + frosting = disaster.
Making the Chocolate Frosting:
- Beat the softened butter until creamy. If your arm gets tired, remember calories burned = more cake earned.
- Gradually add powdered sugar and cocoa powder, alternating with heavy cream. Start your mixer on low unless you enjoy wearing your ingredients.
- Add vanilla and salt, then beat on medium-high until fluffy and spreadable. If it’s too thick, add a splash more cream. Too thin? More powdered sugar.
Assembling Your Masterpiece:
- Level your cake layers if they’ve domed. Eating the scraps is chef’s privilege, FYI.
- Place your first layer on a cake board or serving plate. Pro tip: put strips of parchment under the edges for clean borders.
- Spread about ¾ cup of frosting on top, going all the way to the edges.
- Add your second layer, more frosting, then the final layer (flat side up for a level top).
- Apply a thin crumb coat all over, then chill for 15-20 minutes. This step prevents those annoying cake crumbs from ruining your frosting game.
- Finish with remaining frosting, swirling decoratively. Remember, rustic is just a fancy word for “I tried my best.”
Common Mistakes to Avoid
The Chocolate Cake Layer Fails:
- Overmixing the batter – You’re making cake, not bread. Overmixing = tough cake = sad mouths.
- Opening the oven too early – I know you’re excited, but your cake will sink faster than my motivation on Monday mornings.
- Skipping the parchment paper – Unless you enjoy cake permanently attached to pans, use the paper.
- Frosting warm cakes – This causes the “melting snowman” effect. Nobody wants that tragedy.
- Using cold ingredients – Room temperature eggs and buttermilk mix better. Science doesn’t care about your impatience.
Alternatives & Substitutions
Not everyone has a perfectly stocked pantry (or wants to put on pants and go to the store). Here are some hacks:
- No buttermilk? Add 1 tablespoon of vinegar or lemon juice to regular milk and let it sit for 5 minutes. Boom—fake buttermilk.
- Coffee hater? Use hot water instead, but add an extra tablespoon of cocoa powder to maintain chocolate intensity.
- Want a less sweet frosting? Try a chocolate ganache instead—equal parts heavy cream and chocolate chips, melted together. Simple yet sophisticated.
- Gluten issues? A good quality 1:1 gluten-free flour blend works surprisingly well in this recipe. Your celiac friends will weep with joy.
- Want to fancy it up? Add a raspberry jam layer between the cakes, or spike the frosting with a tablespoon of espresso powder or bourbon (for adult cakes only, obviously).
FAQ (Frequently Asked Questions)
Can I make this cake ahead of time?
Absolutely! The unfrosted layers can be wrapped in plastic and stored at room temperature overnight, or frozen for up to a month. The assembled cake keeps well in the fridge for 3-4 days. Just let it come to room temp before serving because cold chocolate cake is a crime against humanity.
Why do you use hot coffee in a chocolate cake?
Coffee enhances chocolate flavor without making the cake taste like coffee. It’s like how a good wingman makes you look better without stealing the spotlight. If you don’t believe me, do a side-by-side taste test and prepare to have your mind blown.
My cake layers sank in the middle. What went wrong?
You probably either 1) opened the oven too early, 2) used old baking soda, or 3) overmixed the batter. Baking is basically science for hungry people, and these variables matter.
Can I make cupcakes instead of a layer cake?
Sure thing! Fill cupcake liners about 2/3 full and bake for 18-20 minutes. This recipe makes about 24 cupcakes, so either invite friends or prepare to enter a sugar coma.
How do I get perfectly even layers?
First, use a kitchen scale to divide the batter equally. Then, after baking, use a serrated knife or cake leveler to trim the tops flat. Or just stack them as is and call it “rustic” – that’s what I do.
My frosting looks grainy. Help!
Your butter was probably too cold. Let it come fully to room temperature next time. For now, warm the outside of the mixing bowl slightly with a hairdryer (low setting!) and beat again. I’m not even kidding—this works.
Final Thoughts
Look at you, about to create a chocolate layer cake that would make bakery windows jealous! Remember, the beauty of homemade cake is that it’s made with love (and maybe a few choice words when things don’t go perfectly). Even if your layers aren’t perfectly even or your frosting swirls wouldn’t win any awards, it’ll still taste amazing.
The best part? You get to lick the bowl, spoon, and beaters—a privilege denied to those who merely purchase their cakes. So channel your inner baking diva, make a glorious mess of your kitchen, and enjoy every single chocolate-infused moment. After all, life’s too short for bad cake!
Now go forth and create that chocolate masterpiece. Your taste buds are already sending thank-you notes.
