Ever wake up with a craving so intense for a giant, chewy, chocolate chip cookie that you consider breaking into a bakery? No? Just me? Okay, cool. But seriously, if you’re like me and your spirit animal is a warm cookie, but you’re too lazy to spend forever in the kitchen (and definitely not leaving the house), then you’ve come to the right place. We’re about to make some **Bakery Style Chocolate Chip Cookies** that are so good, people will wonder if you hired a professional. Spoiler: You didn’t. You just followed *my* incredibly brilliant and totally humble recipe.
Why This Recipe is Awesome
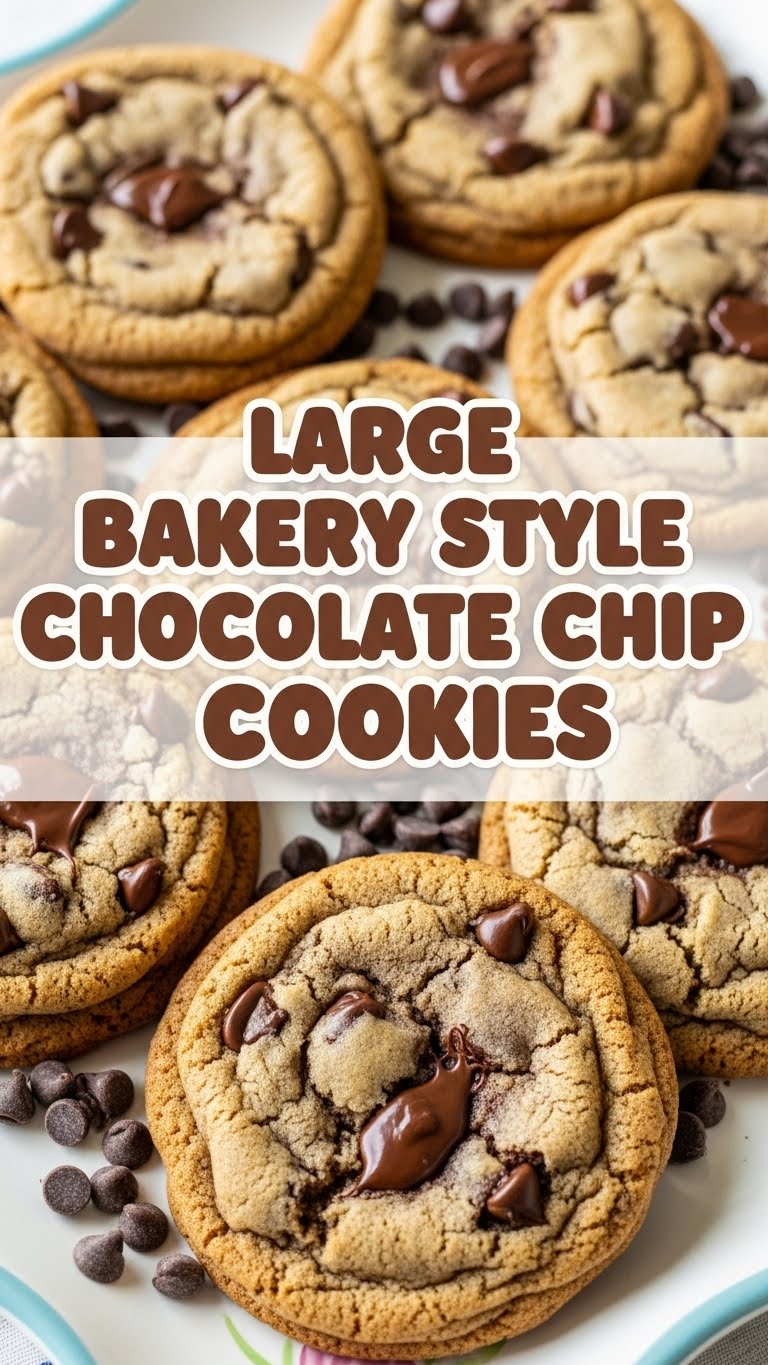
Okay, let’s be real. There are a bazillion chocolate chip cookie recipes out there. But this one? This one is different. It’s designed to give you that perfect, slightly crisp edge, a wonderfully chewy center, and a ridiculous amount of gooey chocolate in every single bite. It’s the kind of cookie that makes you close your eyes and do a little happy dance. Plus, it’s pretty much idiot-proof. Seriously, even I didn’t mess it up, and my track record with baking can be… unpredictable, to say the least. We’re talking big, beautiful, flat-ish, crinkly-edged marvels. Get ready for some serious cookie magic!
Ingredients You’ll Need
Gather your troops, folks! Here’s what you need to enlist for this delicious mission:
- 1 cup (2 sticks) unsalted butter: Room temperature, please! If it’s rock hard, microwave it for about 10 seconds. Don’t melt it completely, though; we’re making cookies, not butter soup.
- 1 cup packed light brown sugar: This is key for chewiness and that lovely caramel flavor.
- ½ cup granulated sugar: The white stuff. Works with the brown sugar for the perfect texture.
- 2 large eggs: Also room temperature! They just mix better that way, trust me.
- 2 teaspoons vanilla extract: Don’t skimp here. Good vanilla makes a huge difference.
- 2 ¼ cups all-purpose flour: Don’t pack it in; lightly spoon and level it.
- 1 teaspoon baking soda: Our magical leavening agent.
- 1 teaspoon salt: Balances all that sweetness. Don’t skip it!
- 1 ½ – 2 cups chocolate chips: Your choice! A mix of semi-sweet and milk chocolate chips is my personal faves. Go for quality; it shows.
- Optional: Flaky sea salt for sprinkling: A little sprinkle on top makes them look fancy and tastes amazing.
Step-by-Step Instructions
Alright, apron on, good vibes only! Let’s get baking.
- Butter Up: In a large mixing bowl, or using a stand mixer, cream together the room temperature butter, brown sugar, and granulated sugar. Beat them on medium speed until the mixture is light, fluffy, and looks like a dream – about 2-3 minutes.
- Egg-cellent Addition: Add the eggs one at a time, beating well after each addition. Scrape down the sides of the bowl to make sure everything’s incorporated. Then, stir in the vanilla extract. It’ll smell amazing already, BTW.
- Dry Goods Unite: In a separate medium bowl, whisk together the flour, baking soda, and salt. Give it a good whisk to make sure everything’s evenly distributed.
- Combine Forces: Gradually add the dry ingredient mixture to the wet ingredients, mixing on low speed until just combined. **Do not overmix!** As soon as you don’t see any streaks of flour, stop. Overmixing leads to tough cookies, and nobody wants that.
- Chocolate Avalanche: Fold in the chocolate chips with a spatula. Be generous! We’re going for bakery-style, which means plenty of melty chocolate goodness.
- Chill Out: Cover the dough with plastic wrap and refrigerate for at least 30 minutes. **This step is non-negotiable for bakery-style cookies!** It helps prevent them from spreading too much and deepens the flavor. For best results, chill for 2 hours, or even overnight.
- Preheat & Prepare: When you’re ready to bake, preheat your oven to 375°F (190°C). Line a baking sheet with parchment paper or a silicone baking mat.
- Scoop & Space: Scoop generous balls of dough (about 2-3 tablespoons each, or use a large ice cream scoop) onto the prepared baking sheet. Leave plenty of space between them because these babies are going to spread. If you’re using flaky sea salt, sprinkle a little on top of each dough ball now.
- Bake to Perfection: Bake for 10-12 minutes, or until the edges are golden brown and the centers are still slightly soft and puffy. Remember, they’ll continue to set up as they cool.
- Cool Down: Let the cookies cool on the baking sheet for 5-10 minutes before transferring them to a wire rack to cool completely. This is crucial for maintaining their chewy texture.
Common Mistakes to Avoid
Listen up, buttercup! Don’t let these rookie errors ruin your cookie dreams:
- **Skipping the Chill Time:** “Oh, I’ll just bake them now, it’ll be fine.” Nope! You’ll end up with flat, greasy pancakes instead of glorious, thick cookies. **Chilling the dough is essential!**
- **Using Cold Ingredients:** Cold eggs and butter don’t emulsify properly with the sugar, leading to a less cohesive and often tougher dough. Let them warm up, they deserve a spa day.
- **Overmixing the Flour:** Once you add the flour, mix until *just* combined. Too much mixing develops the gluten, making your cookies tough. We want soft and chewy, not bicep-building.
- **Overbaking:** Pull those beauties out when the edges are golden but the centers still look a tad underdone. They’ll firm up on the pan. If you wait until they look fully baked, they’ll be hard.
- **Ignoring Oven Temperature:** Thinking you don’t need to preheat the oven? Rookie mistake! A properly preheated oven ensures even baking from the start.
Alternatives & Substitutions
Feeling adventurous? Here are some ways to shake things up:
- Chocolate Choices: Not a fan of semi-sweet? Go all milk chocolate, or all dark! You can also chop up your favorite chocolate bar for melty pools of deliciousness. White chocolate chips are also an option, if that’s your jam.
- Nutty Additions: Want some crunch? Fold in ½ cup of chopped walnuts or pecans along with the chocolate chips. Just a heads-up, not everyone loves nuts in their cookies, so consider your audience (or just keep them all for yourself!).
- Different Flours: While all-purpose is best for this recipe, you could substitute up to ¼ cup of the all-purpose flour with whole wheat flour for a slightly nuttier flavor and a touch more fiber. IMO, though, stick with all-purpose for the ultimate bakery experience.
- Flavor Boosters: Add a pinch of cinnamon or a tiny dash of almond extract (like ¼ teaspoon) for an extra layer of flavor. Don’t go overboard, though; vanilla is still the star.
FAQ (Frequently Asked Questions)
- Can I use margarine instead of butter? Well, technically yes, but why hurt your soul like that? Butter provides the best flavor and texture. Margarine can result in flatter, less flavorful cookies. So, stick with the real deal if you can!
- How long do these cookies last? In my house? About an hour, maybe less. Realistically, they’ll stay fresh in an airtight container at room temperature for 3-4 days. If they last that long, you have more willpower than I do!
- Can I freeze the cookie dough? Absolutely! Roll the dough into balls, place them on a baking sheet, and freeze until solid. Then transfer them to a freezer-safe bag. You can bake them straight from frozen (add 2-4 minutes to the baking time), or let them thaw slightly on the counter. Future you will thank present you!
- My cookies spread too much! What did I do wrong? A few culprits: your butter might have been too soft, the dough wasn’t chilled enough, or your oven temperature might be off (an oven thermometer is your friend!). Also, make sure you’re not using too much baking soda or not enough flour.
- Do I *really* need room temperature ingredients? Yes, my friend, you really, truly do. Room temperature butter and eggs cream together much better, creating an emulsified mixture that traps air. This air creates a lighter, fluffier cookie texture. Trust the process!
Final Thoughts
So there you have it, your ticket to cookie nirvana. You’re now equipped with the wisdom (and recipe) to create large, luscious, bakery-style chocolate chip cookies that will make your kitchen smell divine and your taste buds sing. Go forth and bake, my friend! Impress your family, wow your friends, or just hoard them all for yourself (no judgment here). You’ve earned this cookie glory!


