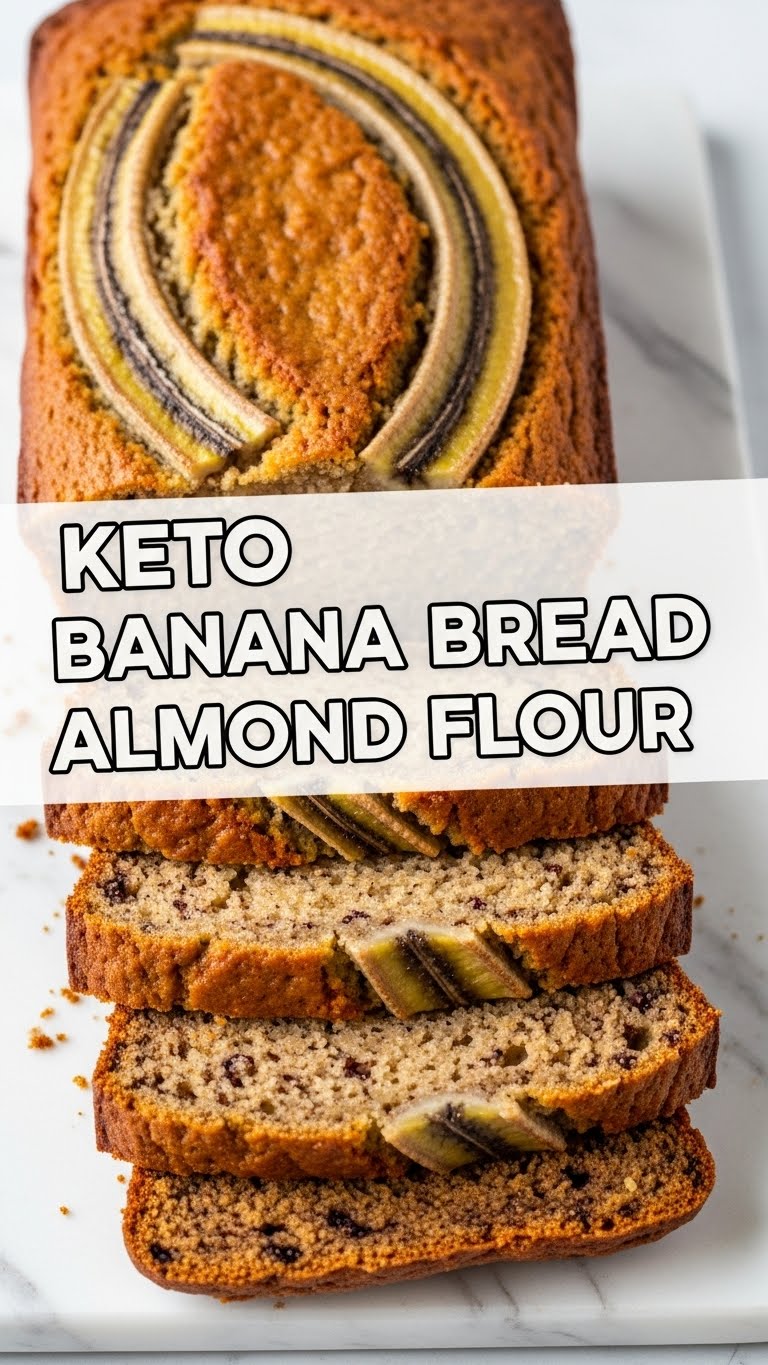
So you’re craving something tasty but too lazy to spend forever in the kitchen, huh? Same. Alright, friend, let’s be real. There are days when you just want a slice of something warm, comforting, and utterly delicious – something that smells like Grandma’s kitchen but won’t send your blood sugar on a roller coaster. And, if you’re like me, you also want it without spending an entire afternoon playing “master chef.” Enter: Keto Banana Bread with Almond Flour. Yup, you heard that right. We’re talking banana-y goodness without the actual sugar-bomb bananas. Magic? Maybe. Delicious? Absolutely.
Why This Recipe is Awesome (Besides Being Delicious, Duh!)
Okay, let’s list the reasons this recipe is about to become your new best friend. First off, it’s **ridiculously easy**. Seriously, if I, a person whose kitchen sometimes looks like a war zone after making toast, can pull this off, you definitely can. No complicated steps, no obscure ingredients you have to hunt down in an ancient wizard’s lair. It’s also **super moist and flavorful**, which, let’s be honest, can be a challenge with keto baking sometimes. We’re dodging the dry, crumbly cardboard situation here, big time. Plus, it smells divine while baking – prepare for immediate compliments from anyone within sniffing distance. And **FYI**, it’s perfect for breakfast, a guilt-free snack, or even a low-carb dessert. Basically, it’s a winner. Period.
Ingredients You’ll Need (No Quest for the Holy Grail Required)
Gather your troops, folks! Here’s what you’ll need to make this keto masterpiece. Don’t worry, nothing too wild.
- Almond Flour (2 cups): The OG of keto baking. Make sure it’s superfine for the best texture. Not almond meal – that’s a whole different beast.
- Granulated Keto Sweetener (½ cup): Erythritol, Monk Fruit, Allulose – pick your poison! Just make sure it measures like sugar. We want sweetness without the carb-induced coma.
- Eggs (3 large): Our glorious binders. Let them hang out on the counter for a bit to come to room temp; they mix better that way.
- Melted Butter (½ cup): Unsalted, please! Or coconut oil if you’re feeling tropical. This is where the moisture magic happens.
- Unsweetened Almond Milk (¼ cup): Or any keto-friendly milk alternative. Just a splash to keep things smooth.
- Baking Powder (1½ teaspoons): Our lift-off agent. Don’t skip this unless you want a very dense paperweight.
- Banana Extract (1-2 teaspoons): **This is the secret sauce!** It gives us that authentic banana flavor without the actual bananas (and their carbs). Start with 1 tsp, taste, and add more if you’re a banana fanatic.
- Vanilla Extract (1 teaspoon): Because vanilla just makes everything better, doesn’t it?
- Cinnamon (½ teaspoon, optional): A little warmth never hurt anyone.
- Salt (¼ teaspoon): Just a pinch to balance all that glorious sweetness.
- Optional Mix-ins (¼ cup): Sugar-free chocolate chips, chopped walnuts, or pecans. Because sometimes you just gotta live a little!
Step-by-Step Instructions (Even I Can Follow These!)
Get Your Oven Ready: First things first, preheat your oven to 350°F (175°C). Then, line a 9×5 inch loaf pan with parchment paper or grease it really well. No sticking disasters on our watch!
Whisk the Dry Stuff: In a medium bowl, combine your almond flour, keto sweetener, baking powder, cinnamon (if using), and salt. Give it a good whisk until everything is super friendly with each other.
Mix the Wet Stuff: In a separate, larger bowl, whisk the eggs until they’re slightly frothy. Then, pour in the melted butter, almond milk, banana extract, and vanilla extract. Whisk it all up until it’s a smooth, fragrant concoction.
Combine and Conquer: Gently add the dry ingredients to the wet ingredients. Mix until just combined. **Don’t overmix!** A few lumps are totally fine; overmixing can make your bread tough. If you’re adding any optional goodies like chocolate chips or nuts, fold them in now.
Pour and Bake: Pour your lovely batter into the prepared loaf pan. Spread it evenly. Pop it into the preheated oven and bake for 40-50 minutes, or until a toothpick inserted into the center comes out clean. If it starts getting too brown on top, you can loosely tent it with foil.
Cool Down, Buttercup: Once baked, remove the loaf from the oven and let it cool in the pan for about 10-15 minutes. Then, carefully transfer it to a wire rack to cool completely. Patience is a virtue, my friend – it slices much better when fully cooled!
Common Mistakes to Avoid (Unless You Like Disasters, Then Carry On!)
- Not Preheating the Oven: Rookie mistake! Your bread won’t rise properly if it goes into a cold oven. Think of it as sending your dough into battle without proper warm-up.
- Overmixing the Batter: Remember what I said about tough bread? Yeah, that. Mix just until combined, then step away from the whisk!
- Ignoring Room Temp Eggs: Cold eggs don’t emulsify as well with other ingredients. Your batter will thank you for letting them chill out (literally, then figuratively) for a bit.
- Cutting it While Hot: I know, I know, the smell is intoxicating. But warm keto bread is fragile and crumbly. **Seriously, let it cool!** You’ll get much cleaner slices.
- Using Almond Meal Instead of Flour: Almond meal is coarser and will give you a very different, often grainier, texture. Stick to superfine almond flour for that soft, tender crumb.
Alternatives & Substitutions (Because We’re Flexible Like That)
- Sweetener Swap: Not a fan of erythritol? Feel free to use allulose, monk fruit blend, or your preferred keto-friendly granulated sweetener. Just make sure it’s a 1:1 replacement for sugar in terms of sweetness.
- Fat Facts: If butter isn’t your jam (or you’re dairy-free), **melted coconut oil** works beautifully as a substitute. Avocado oil could also work, but butter/coconut oil gives better flavor.
- Nut-Free? For a nut-free version, some people use sunflower seed flour, but the texture will be denser and you might need more liquid. **IMO**, almond flour is king here, but if allergies are a concern, research nut-free keto flours carefully!
- Add-in Adventures: Don’t limit yourself to chocolate chips or walnuts! Try a sprinkle of nutmeg, some sugar-free dried cranberries (in moderation for carb count), or a dash of cardamom for a different twist.
FAQ (Frequently Asked Questions – Because You Know You’re Curious!)
Got questions? I probably did too. Here are the common ones:
- Can I use a real banana instead of extract? Well, technically yes, but then it wouldn’t be very keto anymore, would it? A single medium banana has around 27g of carbs. We’re dodging that for this recipe, hence the extract!
- How do I store this deliciousness? Store it in an airtight container at room temperature for up to 3 days, or in the fridge for up to a week. It also freezes beautifully for up to a month – just wrap slices individually!
- My bread is too dense, what went wrong? Probably overmixing (see above!) or your leavening agents (baking powder) might be old. Always check their expiry dates!
- Can I make this into muffins? Absolutely! Just divide the batter into a 12-cup muffin tin (line ’em up!). Bake for about 20-25 minutes, or until a toothpick comes out clean.
- Why did my bread brown so much on top? Almond flour can brown faster than regular flour. If you notice it getting too dark before it’s cooked through, just tent it loosely with aluminum foil for the rest of the baking time. Easy peasy!
- Is this actually healthy? As far as delicious baked goods go, for a keto lifestyle, yes! It’s low-carb, sugar-free, and packed with healthy fats. But, you know, still a treat, so enjoy in moderation!
Final Thoughts (Now Go Forth and Bake!)
There you have it, folks! Your new go-to recipe for when that banana bread craving hits, but your keto commitment is stronger. This isn’t just a recipe; it’s a revelation. It’s permission to indulge without the guilt. So, what are you waiting for? Grab those ingredients, get baking, and prepare to amaze yourself (and maybe your skeptical friends/family). Now go impress someone – or yourself – with your new culinary skills. You’ve earned it!

