So, you’re craving something warm, gooey, and utterly delicious but the thought of a tiny, unsatisfying cookie just *doesn’t* cut it, huh? Been there, bought the T-shirt. You need a cookie that’s a meal, a statement, a hug in edible form. And you don’t want to spend all day on it. Good news, buttercup! You’ve officially landed in the right place because these aren’t just chocolate chip cookies; they’re **JUMBO** chocolate chip cookies, and they’re about to change your life (or at least your snack time).
Why This Recipe is Awesome
Let’s be real: most cookie recipes are fine. But “fine” is for people who don’t understand the sheer joy of biting into a cookie bigger than your face, perfectly crisp at the edges, and gloriously chewy in the middle, absolutely packed with chocolate. This recipe isn’t just “fine”; it’s a masterpiece of minimal effort for maximum reward. Seriously, it’s so **idiot-proof**, even I managed not to burn the house down. Plus, fewer cookies mean fewer dishes, right? It’s basically a win-win situation for your taste buds and your chore list. **Winning!**
Ingredients You’ll Need
Gather ’round, my fellow kitchen adventurers! Here’s your treasure map to cookie glory:
- **Unsalted Butter** (1 cup / 2 sticks, softened) – Because we control the salt, not the butter, right?
- **Granulated Sugar** (¾ cup) – The regular white stuff.
- **Packed Light Brown Sugar** (1 cup) – Make sure it’s packed in there like it owes you money.
- **Large Eggs** (2, room temperature) – Because eggs that aren’t shivering make better friends with butter.
- **Vanilla Extract** (1 tablespoon) – Yes, a whole tablespoon. Don’t skimp; this is where the magic happens!
- **All-Purpose Flour** (2 ¼ cups) – The backbone of our cookie empire.
- **Baking Soda** (1 teaspoon) – Our secret weapon for that perfect puff.
- **Salt** (½ teaspoon) – Balances all that sweetness. Don’t skip it!
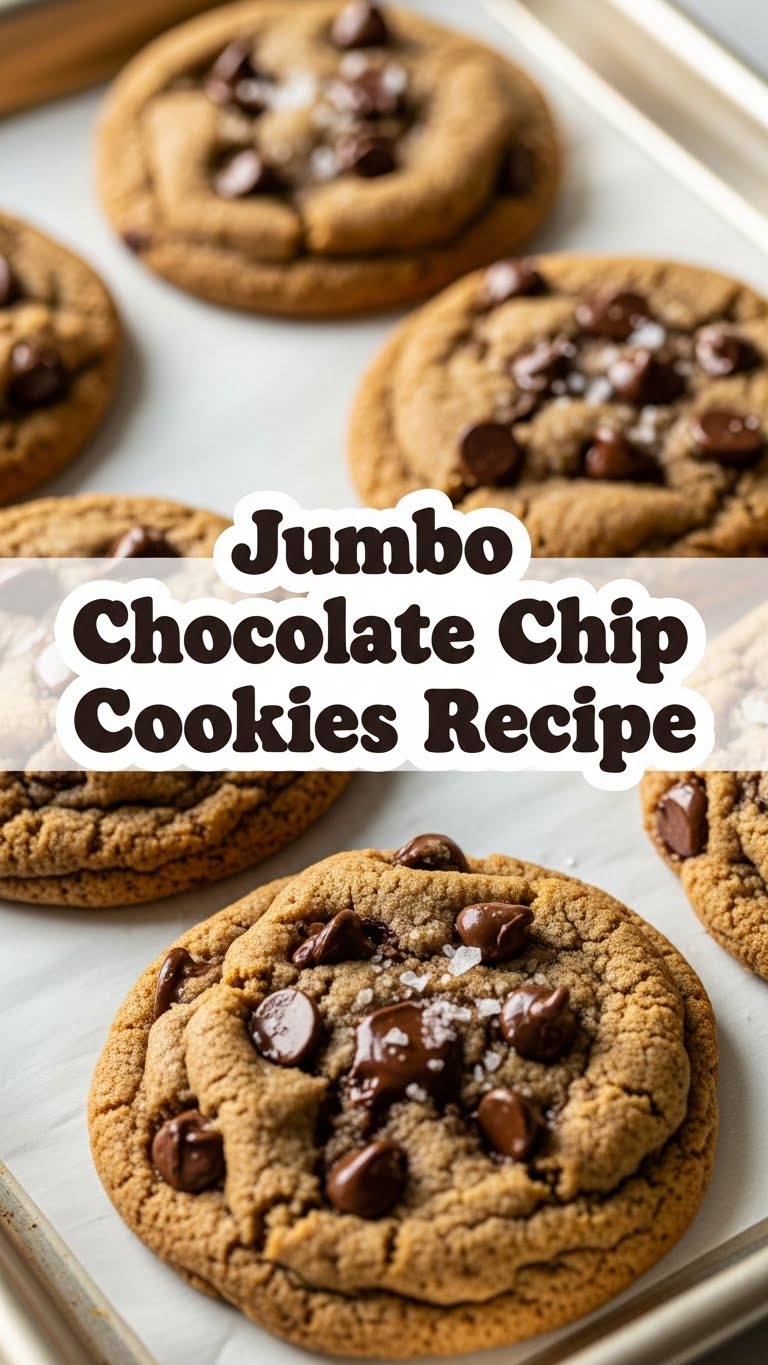
- **Chocolate Chips** (2 cups, a mix of milk, semi-sweet, or even chunks!) – Go wild! More chocolate is always the answer.
Step-by-Step Instructions
- **Butter Up!** In a large bowl, cream together your softened butter, granulated sugar, and brown sugar until it’s light and fluffy. We’re talking about 2-3 minutes here. Your arm might get a little workout, but it’s worth it.
- **Egg-cellent Addition:** Beat in the eggs one at a time, making sure each is fully incorporated before adding the next. Then, stir in that glorious tablespoon of vanilla. Mmm, smells good already, doesn’t it?
- **Dry Team Assembles:** In a separate medium bowl, whisk together the flour, baking soda, and salt. Give it a good whisk to make sure everything’s evenly distributed. Nobody wants a salty patch or a flat patch!
- **Combine Forces:** Gradually add the dry ingredients to the wet ingredients, mixing on low speed until *just* combined. And I mean *just*. **Overmixing is the enemy of chewy cookies!**
- **Chocolate Time!** Fold in those magnificent chocolate chips. Use a spatula for this part; it’s less aggressive than a mixer and ensures you don’t overmix the dough.
- **Chill Out:** Cover the bowl with plastic wrap and refrigerate the dough for at least 30 minutes. An hour is even better. This helps prevent spreading and deepens the flavor. Patience, my friend, patience.
- **Preheat & Prep:** While the dough chills, preheat your oven to 350°F (175°C). Line a baking sheet with parchment paper or a silicone mat. This is non-negotiable for easy cleanup and no-stick success.
- **Scoop ‘Em Big:** Use a large ice cream scoop (or a 1/4 cup measure) to scoop generous mounds of dough onto your prepared baking sheet. Leave plenty of space between them; these cookies spread out like they own the place! I usually do 4-5 per sheet, **max.**
- **Bake Away!** Bake for 12-15 minutes, or until the edges are golden brown but the centers still look a little soft. Trust your gut. And your nose.
- **Cool Down:** Let the cookies cool on the baking sheet for 5-10 minutes before transferring them to a wire rack to cool completely. This is crucial for them to set properly and stay deliciously chewy.
Common Mistakes to Avoid
- **Ignoring the Chill:** Thinking you can skip chilling the dough? Rookie mistake! You’ll end up with flat, greasy disappointments. Don’t do it to yourself.
- **Overmixing:** See step 4. Seriously. Mix until *just* combined. Unless you want tough, sad cookies, back away from the mixer.
- **Under-Baking Fear:** Pulling them out too early because they look gooey. A slightly underbaked center is the goal for ultimate chewiness. They’ll continue to cook a bit on the hot pan, promise!
- **Crowding the Pan:** Trying to squeeze too many cookies onto one sheet. They need their personal space to spread and brown evenly. Respect the cookie boundaries!
- **Imitation Vanilla:** Using that fake stuff. IMO, it makes a huge difference. Splurge a little on the real deal; your taste buds will thank you.
Alternatives & Substitutions
Feeling a little rebellious? Here are some ways to shake things up:
- **Chocolate Swap:** Not feeling semi-sweet? Use all milk chocolate, all dark chocolate, or even white chocolate chips! Or go wild with chopped chocolate bars for an extra melty, luxurious experience. FYI, a mix is usually the bomb.
- **Mix-Ins Galore:** Want more than just chocolate? Add ½ cup of chopped nuts (walnuts, pecans!), shredded coconut, toffee bits, or even a sprinkle of sea salt on top before baking for a salty-sweet kick.
- **Butter vs. Margarine:** Can I use margarine instead of butter? Well, technically yes, but why hurt your soul like that? Butter tastes better, performs better, and frankly, these cookies deserve the best. If you absolutely must, grab a good quality stick, but fair warning, texture might be different.
- **Gluten-Free Flour:** You can usually substitute a 1:1 gluten-free baking blend for the all-purpose flour. Just make sure it contains xanthan gum, or add about ½ teaspoon if it doesn’t.
FAQ (Frequently Asked Questions)
Got questions? I’ve got answers (mostly humorous ones).
- **Can I make these smaller?** Sure, if you’re into tiny things. Just adjust your scoop size and reduce baking time by a few minutes. But why?!
- **How long do these last?** In my house? About 24 hours, tops. Realistically, in an airtight container at room temp, they’re good for 3-5 days. They tend to get chewier over time, which some people love!
- **Can I freeze the dough?** Absolutely! Scoop the dough balls onto a baking sheet, freeze until solid, then transfer to a freezer-safe bag. When a craving hits, just bake from frozen, adding a few extra minutes to the baking time. Future you will thank past you.
- **My cookies are too crispy, what went wrong?** Probably overbaked, or your oven runs hot. Try reducing baking time by a minute or two next time, or check your oven temperature with an oven thermometer. Also, make sure your butter isn’t too melted when you start.
- **Do I really need to use room temperature eggs?** Yes, please! Room temperature eggs incorporate better into the batter, leading to a smoother, more even dough and a better texture in your final cookies. Science, baby!
- **What’s the best kind of chocolate to use?** The kind you love to eat! Personally, I’m a big fan of a mix of semi-sweet chips and chopped milk chocolate for maximum melty goodness. But hey, your cookie, your rules.
Final Thoughts
So there you have it, my friend! The ultimate guide to crafting jumbo chocolate chip cookies that will make your taste buds sing and your belly happy. These aren’t just cookies; they’re a declaration of delicious independence. Go forth, conquer your kitchen, and bake something truly magnificent. Now go impress someone—or yourself—with your new culinary skills. You’ve earned it!


