So you’ve had one of those days where your brain just *demands* something warm, sweet, and comforting, but your motivation meter is stuck at ‘meh’? You’re in the right place, my friend. We’re diving into Jewish Cinnamon Rolls, and trust me, they’re basically a hug you can eat, with less fuss than you’d think. Get ready to fill your kitchen with the most amazing smell!
Why This Recipe is Awesome
Look, I get it. Baking can feel like a high-stakes science experiment. But this recipe? It’s practically **idiot-proof**. Seriously, if I can make these without accidentally setting off the smoke detector (a common occurrence, FYI), you totally can too. It’s got that perfect balance of chewy, soft, and just enough spice to make your kitchen smell like a dream. Plus, it’s not overly sweet, so you can have two (or three, no judgment here!). Think classic comfort with a delicious, slightly less intense sugary kick than your average mall cinnamon roll. Your tastebuds will thank you, and your ego? Through the roof!
Ingredients You’ll Need
For the Dough (the main event!):
- Warm Water (about 105-115°F / 40-46°C): Not too hot, not too cold. Think a nice warm bath for your yeast.
- Active Dry Yeast: The magic powder that makes things rise! Don’t use expired stuff, unless you like flat pastries.
- Granulated Sugar: Just a touch, to feed our yeast and make the dough happy.
- All-Purpose Flour: The backbone of our rolls. Don’t go fancy here; plain old AP works perfectly.
- Salt: Just a pinch to bring out all the flavors. Don’t skip it, even if you think it’s weird in a sweet roll.
- Vegetable Oil (or another neutral oil): Keeps things moist and tender, and adds a Jewish twist (butter’s out, oil’s in!).
- Egg: Binds everything together and gives it a richer color and texture.
For the Filling (where the magic really happens):
- Brown Sugar: Dark or light, doesn’t matter too much. This is our sticky, sweet base.
- Ground Cinnamon: The star of the show! Don’t skimp. Good quality makes a difference.
- Melted Vegetable Oil (or melted vegan butter): To spread all that goodness around.
For the Glaze (optional, but highly recommended):
- Powdered Sugar (confectioners’ sugar): Sift it if you’re feeling fancy (or just avoid lumps).
- Milk (or plant-based milk): Just a tiny bit to make a pourable glaze.
- Vanilla Extract: For that extra “oomph!”
Step-by-Step Instructions
- Activate Your Yeast: In a large bowl, mix the warm water, yeast, and 1 teaspoon of the sugar. Let it sit for about 5-10 minutes. It should get frothy and bubbly. If it doesn’t, your yeast is probably dead. Start over, or buy new yeast, boo.
- Mix the Dough: Add the remaining sugar, flour, salt, vegetable oil, and egg to the yeast mixture. Mix with a wooden spoon or your hands until a shaggy dough forms.
- Knead It Out: Turn the dough out onto a lightly floured surface. Knead for about 5-7 minutes until it’s smooth and elastic. It should spring back when you poke it. This is your arm workout for the day!
- First Rise: Place the dough in a lightly oiled bowl, turning it once to coat. Cover with plastic wrap or a damp towel and let it rise in a warm place for 1-1.5 hours, or until doubled in size. **Patience, young padawan!**
- Prep the Filling: While the dough rises, combine the brown sugar and cinnamon in a small bowl. Melt the oil in another small bowl.
- Roll It Out: Once risen, punch down the dough gently to release the air. On a lightly floured surface, roll it into a large rectangle, about 12×18 inches (30×45 cm). Don’t aim for perfection, just a decent rectangle.
- Spread the Love: Brush the melted oil evenly over the dough, leaving a small border at one of the longer edges. Sprinkle the cinnamon-sugar mixture over the oil, pressing it down lightly.
- Roll ‘Em Up: Starting from the long edge opposite the border you left, tightly roll the dough into a log. Pinch the seam closed.
- Slice and Dice: Using a sharp knife or unflavored dental floss, cut the log into 12-15 equal slices, about 1-1.5 inches thick.
- Second Rise: Arrange the rolls cut-side up in a greased 9×13 inch baking pan. Cover loosely and let them rise again for another 30-45 minutes, or until puffy.
- Bake ‘Em Up: While the rolls rise for the second time, **preheat your oven to 375°F (190°C)**. Bake for 20-25 minutes, or until golden brown and cooked through.
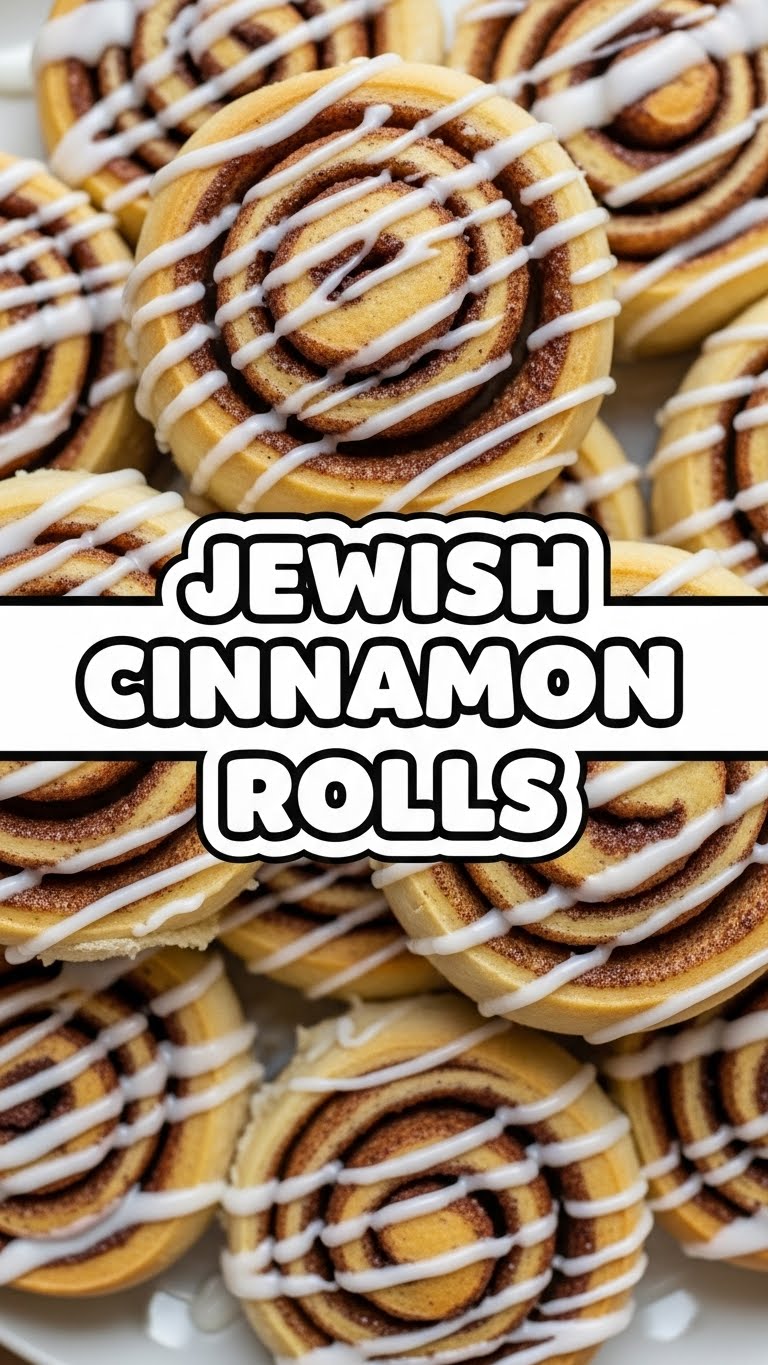
- Glaze Time (if you dare): While the rolls are still warm (but not piping hot), whisk together the powdered sugar, milk, and vanilla extract until smooth. Drizzle generously over the rolls.
Common Mistakes to Avoid
- Ignoring the Yeast: Thinking you can just throw in old yeast and it’ll work. **Always test your yeast!** A flat roll is a sad roll.
- Water Temperature Woes: Using water that’s too hot will kill the yeast. Too cold, and it won’t activate. Use a thermometer if you’re unsure, it’s worth it.
- Over-flouring: Adding too much flour during kneading makes the dough tough. Use just enough to prevent sticking. A slightly sticky dough is often a happy dough.
- Skipping the Second Rise: You might be tempted to rush it, but that second rise is crucial for light, fluffy rolls. Trust the process!
- Overbaking: Dry cinnamon rolls are no fun. Keep an eye on them; they should be golden, not rock hard.
Alternatives & Substitutions
- Oil Swap: Not a fan of vegetable oil? You can use melted coconut oil or even a good quality olive oil (just make sure it’s not too strong-flavored). **IMO, neutral is best here.**
- Dairy-Free Glaze: Super easy! Just swap regular milk for any plant-based milk (almond, soy, oat – whatever floats your boat) in the glaze.
- Add-ins: Feeling adventurous? Sprinkle some chopped walnuts or pecans along with the cinnamon sugar. Or a little orange zest for a brighter flavor. It’s your kitchen, go wild!
- No Yeast? No Problem (kind of): While this recipe is yeast-based, if you’re in a real pinch and just *have* to have cinnamon rolls, you *could* technically use store-bought crescent roll dough or puff pastry. It won’t be the same, but it’ll satisfy the craving in a different way. But for the full experience, stick with the yeast, my friend!
FAQ (Frequently Asked Questions)
- “Can I make these ahead of time?” Absolutely! You can let the rolls do their second rise in the fridge overnight. Just pull them out about an hour before baking to come to room temp, then bake as usual. **Lazy baker’s hack!**
- “My dough isn’t rising, what gives?” Ugh, the worst! Usually, it’s one of two things: dead yeast (did you test it?) or your water wasn’t the right temperature. Or perhaps your kitchen is an icebox. Find a warm spot!
- “Can I use whole wheat flour?” Technically, yes, but your rolls will be denser and not as fluffy. Stick to all-purpose for the best texture, unless you’re intentionally going for a heartier roll.
- “How long do these last?” Fresh is always best, but they’re still delicious for 2-3 days stored in an airtight container at room temperature. A quick zap in the microwave brings them back to life.
- “Why Jewish cinnamon rolls? What makes them different?” Great question! The main difference is the use of oil instead of butter, making them pareve (neither meat nor dairy), which is a common practice in Jewish cooking, especially when avoiding mixing dairy with meat. Plus, they often have a slightly less sweet profile, letting the cinnamon really shine.
- “Can I skip the glaze?” You *can*, but why would you want to? The glaze adds a lovely touch of sweetness and moisture. But hey, if you’re a purist, you do you.
Final Thoughts
There you have it, folks! Your very own batch of warm, fragrant, utterly irresistible Jewish Cinnamon Rolls. You’ve officially conquered the kitchen, impressed your inner chef (and probably anyone within sniffing distance of your home), and earned yourself a seriously delicious treat. So go on, grab one (or two, seriously, I told you it was okay!), make yourself a hot beverage, and bask in the glory of your baking prowess. You deserve it! Now go impress someone—or yourself—with your new culinary skills. You’ve earned it!


