Short, Catchy Intro
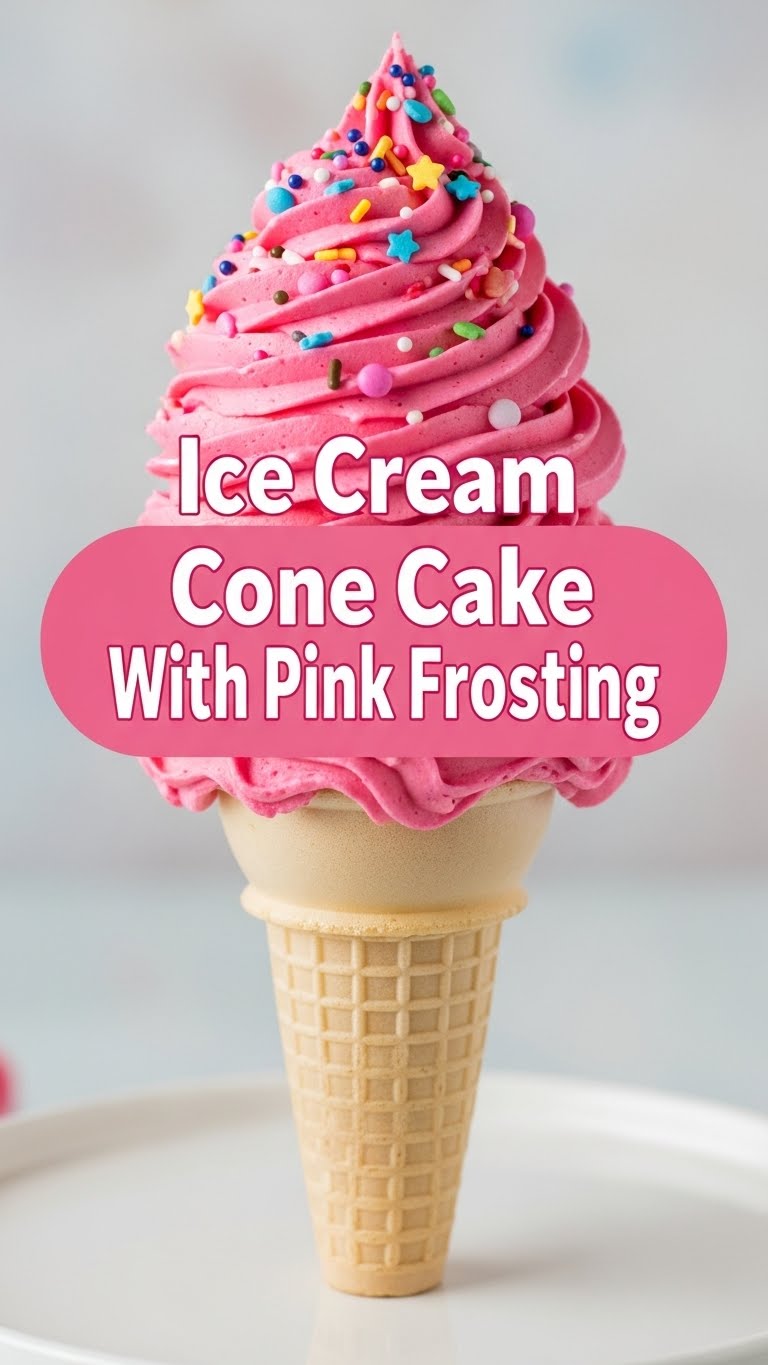
So, you’re craving something tasty but too lazy to spend forever in the kitchen, huh? Same. And maybe you’re also wrestling with the eternal dilemma: cake or ice cream? Why not both, but make it *cute*? Today, we’re ditching the cutlery and diving into the glorious world of Ice Cream Cone Cakes with luscious pink frosting. Get ready for a dessert that’s as fun to make as it is to eat!
Why This Recipe is Awesome
Okay, let’s be real. This isn’t just a cake; it’s a party in a cone. It’s single-serving perfection, meaning no awkward slicing, no dirty plates (huzzah!), and absolutely zero commitment issues. Plus, it looks like you put in *way* more effort than you actually did. **It’s idiot-proof, even I didn’t mess it up**, and that’s saying something considering my track record with anything involving yeast. It’s portable, adorable, and frankly, just plain cool. Your inner child (and outer adult) will thank you.
Ingredients You’ll Need
Here’s your grocery list, simplified. Don’t worry, nothing too fancy, just the good stuff!
- All-purpose flour: About 1 ½ cups. The backbone of our cakey dreams.
- Granulated sugar: 1 cup. For that sweet, sweet joy.
- Baking powder: 1 ½ teaspoons. Our little magic poof-maker.
- Salt: ½ teaspoon. Just a pinch to make everything pop.
- Unsalted butter: ½ cup (1 stick), softened. Because everything’s better with butter, right?
- Large eggs: 2. Room temp is ideal for a smoother batter, FYI.
- Milk: ¾ cup. Whole milk makes for a richer cake, but honestly, whatever you’ve got will probably work.
- Vanilla extract: 1 teaspoon. Don’t skip this, it’s the soul of the cake!
- Flat-bottomed ice cream cones: 12-15. **Flat bottoms are your best friend here** for stability!
For the Pink Frosting:
- Unsalted butter: ½ cup (1 stick), softened. Again, the good stuff.
- Powdered sugar (confectioners’ sugar): 3-4 cups, sifted. To avoid lumpy frosting, unless you’re into that.
- Milk or heavy cream: 2-3 tablespoons. To get that perfect, spreadable consistency.
- Vanilla extract: 1 teaspoon. More vanilla, more happiness!
- Pink food coloring: A few drops. Gel food coloring gives the best vibrant pink without watering down your frosting.
- Sprinkles: An optional but highly recommended party starter!
Step-by-Step Instructions
Let’s get this party started! No stress, just deliciousness.
- First things first: **Preheat your oven to 350°F (175°C).** Line a 12-cup muffin tin with your ice cream cones. This is crucial for stability. Don’t skip it!
- In a medium bowl, whisk together your dry ingredients: flour, sugar, baking powder, and salt. Give it a good swirl so everything’s nice and mixed.
- In a larger bowl, using an electric mixer, cream together the softened butter until it’s light and fluffy. Add the eggs one at a time, beating well after each, then stir in the vanilla extract. Scrape down the sides of the bowl to make sure everything’s incorporated.
- Now, it’s time to bring the wet and dry together! Gradually add the dry ingredients to the wet ingredients, alternating with the milk, starting and ending with the flour mixture. **Mix until just combined; don’t overmix!** Overmixing leads to tough cakes, and nobody wants a tough cake.
- Carefully fill each ice cream cone with about 2-3 tablespoons of batter. You want it about two-thirds full. Remember, they’re going to rise! Less is definitely more here.
- Bake for 20-25 minutes, or until a toothpick inserted into the center of a cake comes out clean. Keep an eye on them—oven times can vary.
- Let the cone cakes cool completely in the muffin tin on a wire rack. Patience, grasshopper! You absolutely cannot frost warm cakes.
- While they’re cooling, let’s make that dreamy pink frosting! In a large bowl, beat the softened butter until creamy. Gradually add the sifted powdered sugar, alternating with milk/cream, until smooth. Stir in the vanilla extract.
- Add a few drops of pink food coloring until you reach your desired shade of fabulous. Mix it up!
- Once the cakes are fully cooled, pipe or spread the frosting onto each cone cake. Go wild with those sprinkles! You’ve earned it.
Common Mistakes to Avoid
We’ve all been there. Learn from my oopsies so you don’t have to!
- Thinking you don’t need to preheat the oven: Rookie mistake! Your cakes need a hot, consistent temperature to rise properly.
- **Over-filling your cones:** Seriously, resist the urge. They will overflow, make a mess, and look like sad, lopsided muffins. Aim for 2/3 full, tops.
- **Overmixing the batter:** This is a biggie. Keep mixing to a minimum after adding flour. Otherwise, hello, gluten development and a dense, chewy cake.
- **Frosting warm cakes:** Unless you’re going for a ‘melted ice cream’ look (which, no), wait until they are completely cool. Your frosting will thank you.
- **Using flimsy cones:** Waffle cones look cute but can get soggy fast and are harder to fill. Stick to the sturdy flat-bottomed ones for best results.
Alternatives & Substitutions
Feeling adventurous, or just missing an ingredient? No worries, we’ve got options!
- Cake Mix Shortcut: Feeling extra lazy? A box of your favorite cake mix (follow package directions, then proceed from Step 5) works perfectly. I won’t tell if you don’t!
- Different Cone Types: While I’m a staunch advocate for flat-bottomed cones, you *can* use sugar cones or waffle cones. Just be aware they might get softer faster, and you’ll need to stabilize them in the muffin tin even more securely.
- Flavor Variations: Swap vanilla extract for almond extract in the cake or frosting for a different vibe. Or add lemon zest for a zippy kick.
- Color Me Happy: Not feeling pink? Go blue, green, rainbow, or even embrace pure white. It’s your cake, your rules.
- Dairy-Free Option: Use plant-based milk and vegan butter. The texture might vary slightly, but they’ll still be delicious!
FAQ (Frequently Asked Questions)
Got questions? I’ve got (casual) answers!
- Can I use margarine instead of butter?
- Well, technically yes, but why hurt your soul like that? Butter just tastes better, IMO. For baking, the fat content in margarine can be inconsistent, affecting texture. Stick to butter if you can!
- How do I keep the cones from getting soggy?
- The key is baking them just right (not underbaking) and letting them cool completely before frosting. If you’re making them ahead, bake and cool, then store unfrosted in an airtight container. Frost just before serving!
- My cakes sunk! What happened?
- Did you open the oven door too early? Impatience is a virtue, but not in baking, my friend. Also, overmixing or too much leavening can sometimes cause a collapse. Double-check your measurements!
- Can I make the batter ahead of time?
- You can, but it’s best to bake it relatively soon after mixing. Letting batter sit for too long can cause the leavening agents to lose their oomph, leading to flatter cakes. Make the frosting ahead, though!
- What if my frosting is too runny/thick?
- Easy fix! Too thick? Add milk or cream, a tiny bit at a time, until it’s perfect. Too runny? Add more sifted powdered sugar, a tablespoon at a time, until it thickens up. You’ve got this!
- Can I add sprinkles or chocolate chips into the batter?
- Absolutely! Mini chocolate chips or sprinkles mixed into the batter are a fantastic idea. Just don’t go overboard, or it might weigh down your cakes.
Final Thoughts
And there you have it! Your very own batch of adorable, delicious Ice Cream Cone Cakes with pink frosting. Aren’t they just the cutest things you ever did see? These are perfect for parties, playdates, or just a Tuesday evening when you need a little extra joy in your life. Don’t be afraid to get a little messy, and most importantly, have fun with it! Now go impress someone—or yourself—with your new culinary skills. You’ve earned it!

