So you’re craving something tasty but too lazy to spend forever in the kitchen, huh? Same. And let’s be real, sometimes a regular scoop of ice cream just isn’t cutting it. You need drama! You need layers! You need… crunchies! Welcome, my friend, to the glorious, no-bake, utterly decadent world of Ice Cream Cake with Crunchies. It’s basically a party in a pan, and guess what? You’re invited to make it!
Why This Recipe is Awesome
Okay, so why bother with *this* particular ice cream cake when you could just buy one, right? Because this one is YOURS. And it’s legit *amazing*. It’s got that delightful textural party happening – creamy ice cream, chewy fudge, and those irresistible crunchy bits that make you go, ‘Mmm, what IS that?!’ Plus, it’s pretty much idiot-proof. Seriously, even I managed not to mess this up, and my kitchen skills sometimes peak at microwaving leftovers. It looks super impressive, but the actual effort? Minimal. It’s the ultimate ‘I look like I tried harder than I did’ dessert. You’re welcome.
Ingredients You’ll Need
- Your Favorite Ice Cream (2 half-gallon tubs): Pick contrasting flavors for extra pizzazz, or just go all in on one. Chocolate and vanilla is a classic for a reason, people! Or be wild, try mint chip and coffee. Your call, rockstar.
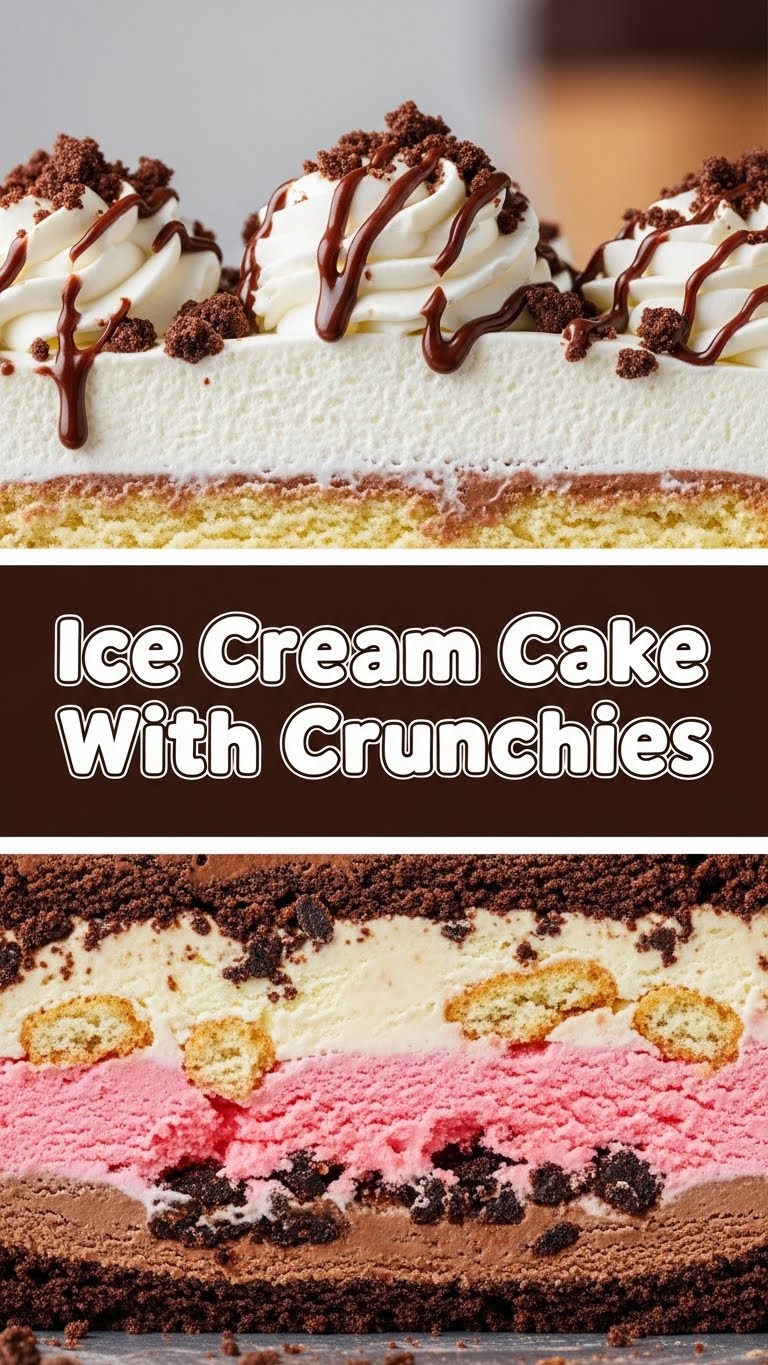
- Oreo Cookies (or similar chocolate sandwich cookies, 1 family-size pack): These are the backbone of our crunchies and our base. Crush ’em up!
- Melted Butter (1/2 cup): The glue that holds our cookie crust together. Don’t skimp on the real stuff here; margarine is a sad substitute, IMO.
- Hot Fudge Topping (1 jar, about 16 oz): The gooey, chocolatey binder for our crunchies layer and a delicious drizzle. Make sure it’s the kind that hardens slightly when cold.
- Chocolate Sprinkles (optional, but highly recommended for fun): Because everything’s better with sprinkles, right?
Step-by-Step Instructions
- Prep Your Pan: Grab a 9×13 inch baking dish. Line it with foil or parchment paper, leaving an overhang on the sides. This makes lifting the cake out later a total breeze. Trust me, future you will thank present you.
- Crush Those Cookies: Take about two-thirds of your Oreos and crush them into fine crumbs. The easiest way? A food processor. No food processor? Stick ’em in a Ziploc bag and bash away with a rolling pin or a trusty frying pan. Release that stress!
- Make the Base: In a bowl, mix your finely crushed Oreos with the melted butter. Press this mixture firmly into the bottom of your prepared pan. Use the back of a spoon or your clean hands. Pop it in the freezer for about 15-20 minutes to firm up.
- First Ice Cream Layer: While the base chills, let one tub of your ice cream soften slightly on the counter (about 10-15 minutes). You want it spreadable, not soupy. Once ready, spread this glorious first layer evenly over your chilled cookie crust. Freeze for at least 30 minutes until firm.
- Crunchy Time! While that layer firms up, let’s make the magic happen. Crush the remaining one-third of your Oreos a bit coarser this time – you want distinct *crunchy bits*, not powder. Mix these coarser crumbs with about half of your hot fudge topping.
- Layer the Crunchies: Take your pan out of the freezer. Spread your chocolatey, crunchy mixture over the first ice cream layer. Don’t worry if it’s not perfectly even; rustic is charming! Return to the freezer for another 30 minutes.
- Second Ice Cream Layer: Repeat step 4 with your second tub of ice cream (or the rest of the first if you’re a one-flavor fan). Spread it over the crunchy layer. Smooth it out with an offset spatula or the back of a spoon.
- Final Freeze: Cover the whole magnificent creation loosely with foil and freeze for at least 4-6 hours, or ideally, overnight. This is crucial for sliceability!
- Serve It Up: When you’re ready to serve, lift the cake out of the pan using the foil/parchment overhang. Let it sit at room temperature for 5-10 minutes to soften slightly for easier slicing. Drizzle with the remaining hot fudge and shower with sprinkles if you’re feeling fancy. Slice and devour!
Common Mistakes to Avoid
- Impatience: Trying to spread rock-hard ice cream or slice the cake before it’s properly frozen. Rookie mistake! You’ll end up with a messy, unlayered disaster. Patience is a virtue, especially when ice cream is involved.
- Over-softening Ice Cream: You want “spreadable,” not “melted puddle.” If it’s too soft, your layers will blend into one sad, uniform goo. Keep an eye on it!
- Skimping on the Freeze Time Between Layers: Each layer needs to firm up. Otherwise, your beautiful tiers will migrate, and you’ll lose that satisfying clean slice. This is key!
- Forgetting the Foil Lining: Think you’re too cool for parchment? You’ll be scraping cake out of the pan and questioning all your life choices. Seriously, use the lining!
Alternatives & Substitutions
- Cookie Base: Not a fan of Oreos? Graham cracker crumbs mixed with butter work beautifully, or even crushed shortbread cookies. Just adjust butter content if needed.
- Ice Cream Flavors: This is where you get to truly express yourself! Try coffee ice cream with chocolate cookies, strawberry with vanilla wafers, or even a decadent peanut butter ice cream. The world is your ice cream parlor.
- Crunchy Bits: Instead of Oreos and fudge, try mixing crushed pretzels with melted white chocolate for a salty-sweet twist. Or use your favorite cereal (like Rice Krispies or Corn Flakes) mixed with melted chocolate for a different kind of crunch. FYI, a mix of chopped nuts and chocolate is also divine.
- Toppings: Get creative! Caramel sauce, whipped cream, chopped candy bars, more crushed cookies, fresh berries – anything goes.
FAQ (Frequently Asked Questions)
- “Can I make this ahead of time?” Absolutely! This cake is a total superstar for make-ahead planning. In fact, it *needs* to be made ahead. Just wrap it well and keep it in the freezer for up to a week.
- “My ice cream is too hard to spread! Help!” Did you just pull it straight from the back of the freezer? Let it sit on the counter for 10-15 minutes. Or, if you’re in a hurry, microwave it for about 15-20 seconds on low power, checking frequently. Just don’t nuke it into a milkshake!
- “What if I don’t have a 9×13 pan?” A 9-inch springform pan works wonderfully too, for a taller, round cake. Just be mindful of layer thickness and adjust ingredients slightly if the pan is significantly smaller or larger.
- “Can I use store-bought whipped topping instead of hot fudge for the crunchies?” Nah, friend, not for the *crunchies*. The hot fudge sets up nicely and really binds those cookie bits together. Whipped topping won’t give you the same effect and might get icy. Stick to the fudge for the crunch layers!
- “How do I get clean slices?” This is the holy grail! Dip a long, sharp knife in hot water, wipe it clean, and then slice. Repeat this for each slice. Seriously, it makes all the difference.
Final Thoughts
See? That wasn’t so scary, was it? You just whipped up a show-stopping dessert that tastes like a dream and probably earned you some serious bragging rights. So go ahead, pat yourself on the back! Now go impress someone—or yourself—with your new culinary skills. You’ve earned it! And maybe save me a slice?


