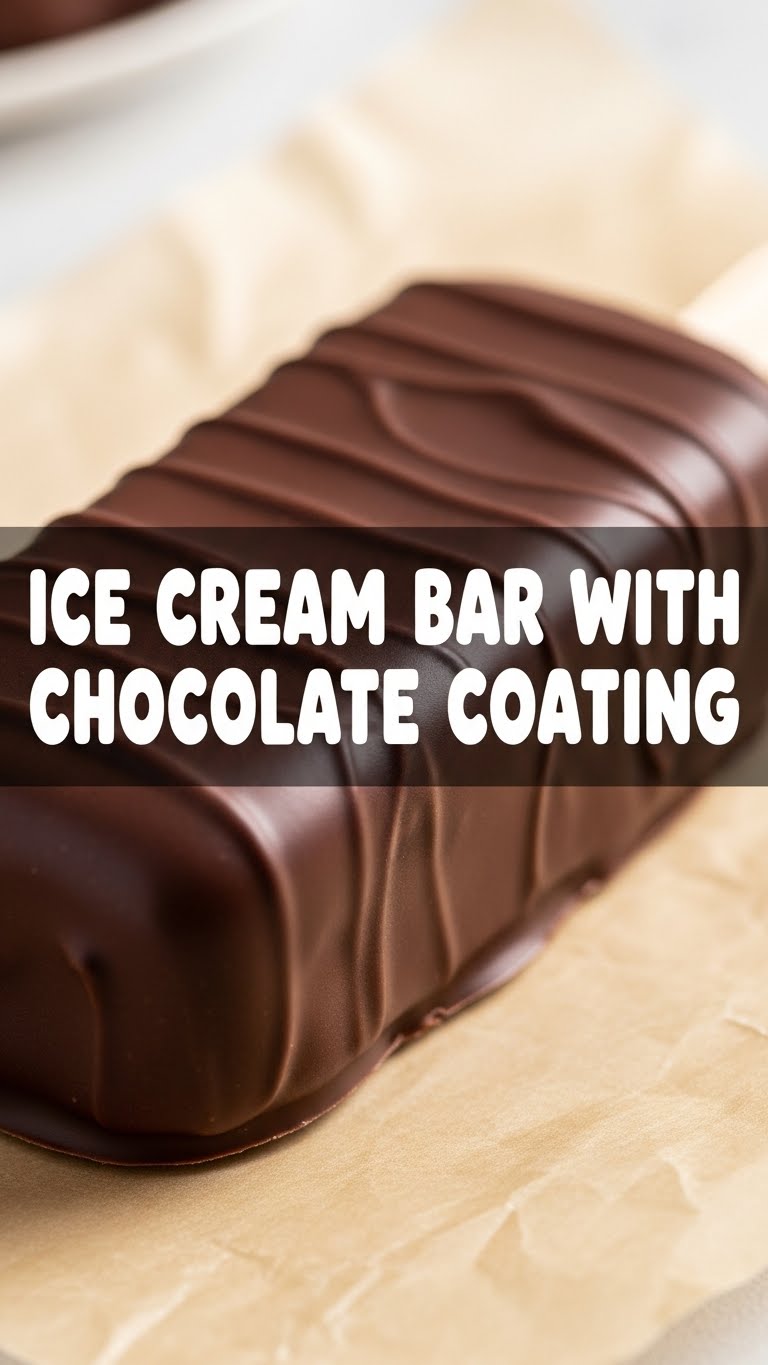
Ever have those days where you just *need* ice cream, but also, like, you want it to be *fancy*? And ideally, not involve a whole production? Yeah, me too. We’re talking gourmet-level indulgence without the gourmet-level effort. Enter the glorious, ridiculously easy homemade ice cream bar with chocolate coating! Forget those flimsy store-bought ones; we’re making the real deal, friends.
Why This Recipe is Awesome
Okay, so why bother making these when you can just buy ’em? Because **homemade is always better, duh!** Plus, you get to customize it. Want extra sprinkles? Go wild. Craving a specific ice cream flavor that no one puts in bars? Now’s your chance! And let’s be real, this recipe is so simple, even my goldfish could probably follow it. No complicated gadgets, no obscure ingredients, just pure, unadulterated dessert magic. It’s practically idiot-proof. Seriously, if I can do it without setting off the smoke detector, *you* definitely can.
Ingredients You’ll Need
Gather ’round, fellow sweet tooths. Here’s your shopping list:
- Your Favorite Ice Cream: 1.5 quarts (about 1.4 liters). **Pro Tip:** Something smooth and not too chunky works best for bars. Vanilla is a classic for a reason, but feel free to go rogue with mint chip or coffee!
- Good Quality Chocolate Chips: 1.5 cups (about 250g) of semi-sweet or dark chocolate chips. Don’t skimp here! The chocolate coating is half the fun, so make it count.
- Coconut Oil: 2-3 tablespoons. This is your secret weapon for that perfectly snappable, shiny chocolate coating. Trust me on this one, it’s magic.
- Optional Toppings: Sprinkles (non-negotiable for some, *ahem*), chopped nuts, flaky sea salt. Because life’s too short for plain chocolate, right?
Step-by-Step Instructions
Let’s get this party started! Follow these ridiculously simple steps to ice cream bar nirvana:
Prep Your Pan: Grab a 9×13 inch (approx. 23×33 cm) baking dish. Line it with parchment paper, leaving a generous overhang on the sides. This makes lifting the frozen ice cream block out super easy. **Seriously, don’t skip this step!** Future you will thank current you.
Soften the Scoop: Take your ice cream out of the freezer and let it sit on the counter for about 10-15 minutes. You want it soft enough to spread, but definitely not a melted puddle. Patience, young padawan.
Spread the Love: Scoop the softened ice cream into your prepared pan. Use an offset spatula or the back of a spoon to spread it into an even layer. Aim for about 1-inch thick. Smooth it out as best you can.
Freeze, Baby, Freeze: Pop the pan back into the freezer for at least 3-4 hours, or until it’s **rock solid**. Overnight is even better if you’re not in a rush and want super firm bars.
Chop ‘Em Up: Once solid, use the parchment paper overhang to lift the entire ice cream block out of the pan. Place it on a cutting board. Use a sharp knife (dip it in hot water for cleaner cuts!) to cut the block into individual bars. Whatever size and shape floats your boat! Return these newly formed bars to the freezer on a baking sheet lined with parchment while you make the coating.
Melt the Magic: In a microwave-safe bowl, combine your chocolate chips and coconut oil. Microwave in 30-second intervals, stirring well after each, until smooth and glossy. Alternatively, use a double boiler on the stovetop. **Remember: gentle heat is key! Don’t overheat!**
Dip & Drip: Working quickly (because those bars are cold!), dip each frozen ice cream bar into the melted chocolate, letting any excess drip off. You can use a fork or a skewer to help with the dipping. If the chocolate starts to thicken, gently reheat it for a few seconds.
Topping Time (Optional): If you’re adding toppings, sprinkle them on immediately after dipping, before the chocolate coating has a chance to set. It hardens fast!
Final Freeze: Place the coated bars back onto your parchment-lined baking sheet and return them to the freezer for another 15-30 minutes, or until the chocolate is completely firm.
Devour: Once solid, store them in an airtight container in the freezer. Try not to eat them all at once! (Good luck with that, though.)
Common Mistakes to Avoid
We’ve all been there, trust me. Learn from my past (chocolate-stained) mistakes!
- **Not lining the pan:** Seriously, don’t be that person trying to pry frozen ice cream from a pan. It’s a sticky, sad, frustrating mess. Just use the parchment, okay?
- **Ice cream too hard or too soft:** If it’s too hard, you’ll struggle to spread it evenly. Too soft (i.e., melted), and it’ll refreeze with weird ice crystals. Aim for that perfect scoop-and-spread consistency.
- **Overheating the chocolate:** Burnt chocolate smells sad and tastes even sadder. Low and slow, my friend. **Gentle heat is key** to a silky, dippable coating.
- **Dipping warm ice cream:** The chocolate will melt the ice cream instantly, and you’ll end up with a puddle, not a bar. Make sure those bars are *super* frozen before their chocolate bath.
- **Impatience:** Good things come to those who wait (for their ice cream to freeze properly). Don’t rush the freezing steps!
Alternatives & Substitutions
The beauty of homemade is making it your own! Here are some ideas:
- **Ice Cream Flavors:** Literally any! Mint chip, strawberry, coffee, cookies ‘n cream, pistachio… your freezer, your rules. You’re the boss apple sauce!
- **Chocolate Type:** Milk chocolate for a sweeter treat, dark chocolate for a richer experience. You could even try white chocolate, though it can be a bit trickier to melt smoothly.
- **Coconut Oil Substitute:** You *could* try other neutral oils like vegetable or canola, but coconut oil gives the best, snappiest coating. **IMO**, it’s truly the best for that satisfying *crack*.
- **Toppings Galore:** Get creative! Crushed Oreos, chopped candy bars, pretzel bits for a salty-sweet crunch, mini M&M’s, toasted coconut flakes. The world is your oyster… or rather, your ice cream bar.
FAQ (Frequently Asked Questions)
Got questions? I’ve got answers (mostly humorous ones).
- My chocolate seized up! What did I do wrong? Uh oh! Usually means it got too hot or a tiny bit of water snuck in. Try adding a teaspoon of vegetable oil or a touch more coconut oil and stir vigorously. Sometimes it’s salvageable, sometimes… well, just eat it with a spoon and try again!
- Can I make these dairy-free? Absolutely! Use your favorite dairy-free ice cream and dairy-free chocolate chips. Easy peasy lemon squeezy.
- How long do these last in the freezer? If they manage to survive that long, usually up to 2-3 weeks in an airtight container. **But seriously, who are we kidding?** They’ll be gone in days.
- My chocolate coating isn’t “snappy” enough. Help! More coconut oil next time! It’s what makes it nice and thin for dipping and gives that satisfying *crack* when you bite into it.
- Do I *have* to use parchment paper? I mean, if you enjoy fighting with frozen desserts stuck to a pan, go for it! But no, really, **use the parchment paper.** It saves you so much grief and makes your life easier.
- Can I drizzle instead of dipping? Sure, if you prefer a lighter coating or a specific look! Just spoon the chocolate over the frozen bars. It won’t be a full coating, but still delicious!
Final Thoughts
See? I told you it was easy! Now you’ve got yourself a batch of gourmet-level ice cream bars, and you barely broke a sweat. Time to kick back, grab a bar (or two, no judgment here), and bask in your culinary glory. Go on, you’ve earned it. And don’t forget to send me a picture of your masterpiece!

