Okay, so you’ve got that glorious, fluffy dough, and the irresistible smell of cinnamon sugar is already making your heart do a happy dance, right? Amazing! But now comes the moment of truth: turning that perfectly proofed blob into beautiful, swirly cinnamon rolls. Don’t sweat it, friend. We’re gonna get you rolling like a pro – no stress, just deliciousness waiting to happen!
Why This Rolling Method is Awesome
Because let’s be real, cinnamon rolls are basically edible hugs. And rolling them perfectly? That’s the secret handshake to getting those picture-perfect spirals that make everyone go “Ooh!” and “Ahh!”. This isn’t just about shaping dough; it’s about maximizing that glorious filling distribution and achieving peak coziness. No one wants a flat, sad roll with all the filling oozing out the bottom. This method ensures every bite is a dream. Plus, it’s super satisfying to watch a flat sheet become a masterpiece. **You totally got this.**
Ingredients You’ll Need (Well, What You Should Have Ready!)
Technically, we’re talking about technique here, but you can’t roll what you don’t have, right? So, make sure you’ve got these ready to roll!
- Your Awesome Dough: (Already made, proofed, and chilling slightly or at room temp, ready to be rolled out into a rectangle. You’re the master baker here, so your favorite recipe goes!)
- Cinnamon Sugar Filling: (That delightful blend of softened butter, brown sugar, and a generous amount of cinnamon. Don’t be shy!)
- A Clean Surface: (Or a giant cutting board. Crucial, unless you enjoy sticky floors and a workout later.)
- Rolling Pin: (Your trusty sidekick. Or a sturdy wine bottle if you’re living dangerously and forgot your actual pin.)
- Bench Scraper, Sharp Knife, or Dental Floss: (Yes, dental floss! More on that genius hack later, but trust me, it’s a game-changer for clean cuts.)
- A tiny bit of extra flour: For dusting, but not too much!
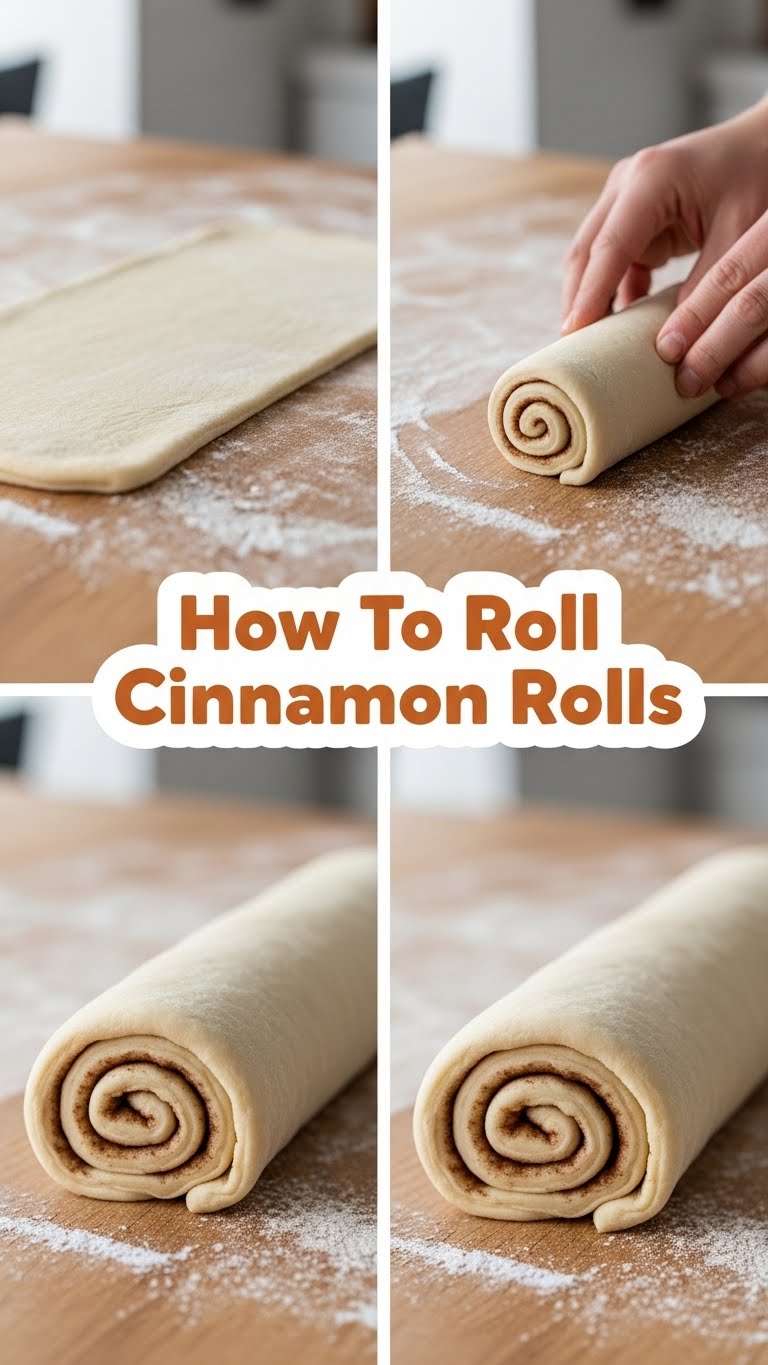
Step-by-Step Instructions for Rolling Glory
- Prep Your Battleground: Lightly flour your clean work surface. Remember, less is more; too much flour will make your rolls tough.
- Roll Out That Dough: Take your lovely dough and gently roll it out into a large rectangle. Aim for roughly 12×18 inches or 1/4 inch thick. Don’t stress about perfect edges; we’ll fix those later.
- Spread the Love (aka the Filling): Evenly spread your softened cinnamon-sugar-butter filling over the entire surface of the dough, leaving about a 1-inch border clear on one of the long edges. This is your “seam” edge.
- The Great Roll-Up Begins: Starting from the long edge *opposite* the clear border, begin to roll the dough tightly and evenly. **The key here is TIGHT.** A loose roll means sad, gappy spirals. Keep the roll as uniform as possible, applying gentle, even pressure as you go.
- Seal the Deal: Once you’ve rolled the entire log, gently pinch that 1-inch clear edge of dough into the roll to seal it. Roll the log over so the seam is facing down.
- Slice and Dice (or Floss!): Now for the fun part! You want rolls that are about 1 to 1.5 inches thick.
- Knife Method: Use a very sharp knife to make clean cuts. Press straight down, don’t saw!
- Dental Floss Method (the pro move!): Slide a piece of unflavored, unwaxed dental floss (about 18 inches long) under the log where you want to cut. Cross the ends over the top and pull them in opposite directions. Voila! Perfect, un-squished rolls every time.
- Arrange and Await: Place your perfectly sliced rolls into a greased baking dish, leaving a little space between them for their final proofing. Cover them loosely, let them rise one last time, and then bake them to golden perfection!
Common Mistakes to Avoid (We’ve All Been There)
Nobody’s perfect, especially when delicious carbs are involved, but here are a few snafus to dodge:
- The “Too Much Flour” Fiasco: Dusting is good; smothering your dough in flour is not. It dries out the dough and makes your rolls tough. **A light dusting is all you need.**
- Uneven Rolling: If your dough isn’t a relatively even rectangle, you’ll end up with wonky rolls – some big, some tiny, all looking confused.
- Not Enough Filling: The horror! Seriously, be generous. This is where the magic happens. A skimpy filling leads to boring rolls.
- Rolling Too Loosely: This is a biggie. If your log isn’t tight, you’ll get rolls that unravel and have big gaps instead of beautiful spirals. Think sushi roll, not a sad blanket.
- Forgetting to Seal the Seam: Rookie mistake! Your gorgeous log will unwind during baking, leaving you with a delicious but messy sheet.
- Cutting with a Dull Knife: This just squishes your beautiful rolls into sad, oval blobs. **Seriously, give the floss a try.**
Alternatives & Substitutions (Get Creative!)
While we’re focusing on the roll, you can totally jazz up what’s going into it or how you cut it:
- Filling Variations: Add some finely chopped toasted pecans or walnuts to your cinnamon sugar. Or a bit of orange zest for a bright kick! A dash of cardamom or even cocoa powder can also be fun.
- Different Cutting Tools: Besides floss, a bench scraper is fantastic for clean, straight cuts. You can also use a very sharp chef’s knife, just remember to press down, not saw.
- Chill the Log: If your dough is super soft and hard to handle, you can pop the rolled log into the fridge for 15-20 minutes before cutting. It makes slicing a breeze, especially with a knife.
FAQ (Frequently Asked Questions – Because You Probably Thought It!)
- “My dough keeps shrinking back when I try to roll it! What gives?”
Your dough is probably a bit tense. Just cover it with a towel and let it rest for 5-10 minutes. The gluten will relax, and then you can roll it out without a fight. Think of it as a mini spa break for your dough!
- “How tight is ‘tightly’ when rolling?”
Think about a sleeping bag, not a loose blanket. You want it snug but not so tight that it tears the dough. Each turn should be compact, pushing out any air. This is crucial for those perfect spirals!
- “Can I use too much flour for dusting?”
Oh, absolutely! Too much flour means dry, tough rolls and can even prevent your seam from sealing properly. A light, almost invisible dusting is ideal. IMO, less is more here.
- “Dental floss? Seriously?”
YES! It’s the ultimate hack. It cuts through the dough and filling cleanly without squishing, giving you beautiful, round rolls every single time. Just make sure it’s unflavored, unless you want minty cinnamon rolls (which, actually, might be an interesting experiment, but probably not for your first time!).
- “What’s the ideal thickness for the dough before rolling?”
About 1/4 inch is perfect. Thin enough to roll easily and get lots of layers, but thick enough to hold up without tearing. Too thin, and your rolls might be flimsy; too thick, and they’ll be dense.
Final Thoughts
And just like that, you’ve transformed a simple sheet of dough into future breakfast bliss! See? No biggie. The art of rolling cinnamon rolls is really just a bit of patience and knowing a few simple tricks. Now go forth, bake those beauties, and bask in the glory of your perfectly rolled, cinnamon-swirled masterpieces. You deserve every single bite (and maybe a second, let’s be honest!). Now go impress someone—or yourself—with your new culinary skills. You’ve earned it!


