
So, You’re Dreaming of Brownies but Scared of the Carb Coma?
Hey there, fellow dessert enthusiast! So you’re craving something fudgy, chocolatey, and utterly decadent, but you’re trying to keep those carb counts in check? Or maybe you just accidentally bought a bag of coconut flour and are wondering what in the world to do with it besides use it as a very expensive dusting agent? Whichever camp you’re in, you’ve landed in the right place! We’re about to whip up some keto brownies so good, you’ll question all your life choices that didn’t involve making them sooner. And the best part? They’re ridiculously easy. Seriously.
Why This Recipe is Awesome (Besides Being Brownies)
Let’s be real, some keto recipes can feel like a science experiment gone wrong. This one? Not so much. It’s practically foolproof. Think minimal ingredients, maximum flavor, and a texture that’ll have you doing a happy dance. Plus, unlike those other “healthy” desserts that taste like sadness disguised as a treat, these are genuinely delicious. You won’t miss the sugar, you won’t miss the flour, and you definitely won’t miss the guilt. It’s legit magic in a baking dish, and you don’t need a PhD in food science to pull it off. Even I manage it, and my oven has a love-hate relationship with me.
Ingredients You’ll Need (Don’t Panic, It’s Not That Scary)
- Coconut Flour: This is our star, our champion, our low-carb fairy godmother. Just a little goes a long way, so measure carefully!
- Unsweetened Cocoa Powder: For that deep, dark chocolatey goodness. Use the good stuff if you can; it makes a difference.
- Sweetener: Your favorite keto-friendly granular sweetener (erythritol, xylitol – if you have dogs, skip the xylitol like your furry friend’s life depends on it, because it does! – or a blend). Adjust to your sweetness preference.
- Butter: Melted and glorious. It’s the glue that holds our chocolate dreams together.
- Eggs: The binder extraordinaire. Make sure they’re at room temperature; they play nicer that way.
- Vanilla Extract: A splash of pure magic. Don’t skimp!
- Baking Powder: Just a touch to give them a little lift.
- Salt: It’s not just for savory dishes, folks! It balances out the sweetness and makes the chocolate pop.
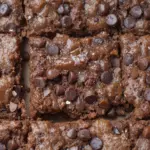
- Optional: Sugar-free Chocolate Chips: Because, let’s be honest, more chocolate is always a good idea.
Step-by-Step Instructions (The Easy Peasy Part)
- Preheat & Prep: Crank your oven up to 350°F (175°C). Line an 8×8 inch baking pan with parchment paper. You want those brownies to slide out like a pro, not cling for dear life.
- Dry Ingredients Unite: In a medium bowl, whisk together the coconut flour, cocoa powder, sweetener, baking powder, and salt. Make sure there are no clumps; we’re not making dust bunnies here.
- Wet Ingredients Get Together: In a separate bowl, whisk together the melted butter, eggs, and vanilla extract until they’re all chummy.
- The Grand Mixing: Pour the wet ingredients into the dry ingredients. Stir until *just* combined. Don’t overmix, or your brownies might get a little tough. Think gentle persuasion, not an interrogation.
- Chocolate Chip Surprise (Optional): If you’re feeling fancy, fold in those sugar-free chocolate chips. They’re like hidden treasures waiting to be discovered.
- Into the Pan: Pour the batter into your prepared baking pan and spread it out evenly. It might seem a bit thick, that’s normal for coconut flour.
- Bake to Perfection: Bake for 20-25 minutes. A toothpick inserted into the center should come out with moist crumbs, not wet batter. Overbaking is the enemy of fudgy goodness!
- Cool Down: This is the hardest part, I know. Let them cool completely in the pan before slicing. Patience, my friend, is a virtue (and essential for good brownies).
Common Mistakes to Avoid (Don’t Be That Person)
- Using Too Much Coconut Flour: This stuff is thirsty! Too much and you’ll end up with dry, crumbly hockey pucks. Measure with your heart, but then measure again with a scale.
- Under-Baking: Resist the urge to pull them out too soon! A slightly underbaked brownie is heaven; a completely raw one is… well, you get it.
- Over-Baking: On the flip side, don’t turn them into charcoal briquettes. Keep an eye on them!
- Skipping the Cooling Step: Seriously, don’t. They’ll fall apart if you try to cut them warm. Let them get cozy in the pan.
Alternatives & Substitutions (When Life Throws You Curveballs)
Can’t find coconut flour? Oh, honey. While this recipe is *designed* for it, you could *try* almond flour, but you’ll likely need to adjust the liquid ingredients. It’s a whole different ballgame, IMO. If you’re out of butter, ghee or coconut oil (the solid kind) will work. For the sweetener, use what you love, but be mindful that different sweeteners have different sweetness levels and can sometimes affect texture. And if you don’t have vanilla extract? A little almond extract can be a fun twist, just use less!
FAQ (Your Burning Questions, Answered Casually)
Q: Can I make these dairy-free?
A: You bet! Just use a dairy-free butter alternative or coconut oil. Easy peasy.
Q: My batter looks really thick. Is that okay?
A: Totally normal for coconut flour! It absorbs a lot of liquid. Just make sure you spread it evenly in the pan.
Q: Can I use regular sugar?
A: Technically, yes, but then they wouldn’t be keto brownies, would they? And you’d miss out on that guilt-free indulgence. Your call, but I’m judging. Gently.
Q: How long do these last?
A: In an airtight container in the fridge, they’re good for about 4-5 days. But let’s be real, they probably won’t last that long.
Q: Can I add nuts?
A: Go for it! Walnuts or pecans would be delicious additions. Just toss them in with the chocolate chips.
Q: Can I freeze these?
A: Absolutely! Wrap them well, and they’ll keep in the freezer for a couple of months. Perfect for those “emergency brownie” situations.
Final Thoughts (Go Forth and Bake!)
There you have it! Your very own batch of ridiculously good, surprisingly simple keto brownies. You’ve conquered the coconut flour, you’ve faced down the oven, and you’re about to reap the delicious rewards. Now go impress someone—or yourself—with your new culinary skills. You’ve earned it! Happy baking!
