So, you’ve hit that sweet spot in the day where only warm, gooey chocolate chip cookies can save you from yourself, right? But also, like, *effort*? Chill, friend. I got you. Forget complicated steps and fancy equipment; we’re about to dive into making the kind of chocolate chip cookies that taste like a hug and come together faster than you can decide what to watch next on Netflix.
Why This Recipe is Awesome
Listen, I’m not saying this recipe will change your life, but it *might* just make your day significantly better. And that’s pretty close, IMO. This isn’t some high-maintenance, divapish cookie recipe. Oh no, this is the reliable, easy-going friend you can always count on.
- It’s so straightforward, you could probably bake these with one eye closed while binging your favorite show. No judgment here.
- It’s practically **idiot-proof**. Even I, the queen of “oops, did I just burn water?”, have mastered this one.
- Seriously, it produces cookies that are crispy on the outside, chewy in the middle, and bursting with chocolatey goodness. Prepare for compliments (or just hoard them all for yourself, your call).
Ingredients You’ll Need
Gather your troops! Here’s what you need to enlist for this delicious mission. Don’t worry, no obscure spices or weird roots here.
- 1 cup (2 sticks) Unsalted Butter, softened. The good stuff. Don’t even *think* about margarine unless you’re feeling exceptionally rebellious (and slightly sad). And yes, **softened butter is key!**
- ¾ cup Granulated Sugar. Adds sweetness and that delightful crisp edge.
- ¾ cup Packed Light Brown Sugar. This is where the magic happens for chewiness and depth of flavor. Don’t skimp on the packing!
- 2 Large Eggs. Binders and moist-makers. Room temp is best, but if you forget, don’t sweat it too much.
- 1 teaspoon Vanilla Extract. A *must*. It’s like the secret handshake of deliciousness. Don’t skip it!
- 2 ¼ cups All-Purpose Flour. The backbone of our cookie empire. Remember to **measure correctly** (spoon into measuring cup, then level off).
- 1 teaspoon Baking Soda. For lift and that perfect spread.
- ½ teaspoon Salt. Balances the sweetness and makes the chocolate pop. Crucial, trust me.
- 1 ½ – 2 cups Chocolate Chips. The star! Semi-sweet is classic, but hey, mix it up with milk, dark, or even white chocolate if you’re feeling wild. More chips, more happiness, right?
Step-by-Step Instructions
Alright, apron on, game face ready! Let’s get baking. These steps are so easy, they practically bake themselves (okay, maybe not *that* easy, but close).
Preheat & Prep: Get that oven fired up to **375°F (190°C)**. Line a baking sheet (or two, if you’re feeling ambitious) with parchment paper. Trust me, less mess and no sticky bottoms.
Cream Butter & Sugars: In a large bowl, using an electric mixer, beat the softened butter with both granulated and brown sugars until light and fluffy. This usually takes 2-3 minutes. Get those arm muscles working!
Add Eggs & Vanilla: Mix in the eggs, one at a time, until just combined. Scrape down the sides of the bowl, then stir in the vanilla extract. Don’t overmix; we’re making cookies, not soufflés.
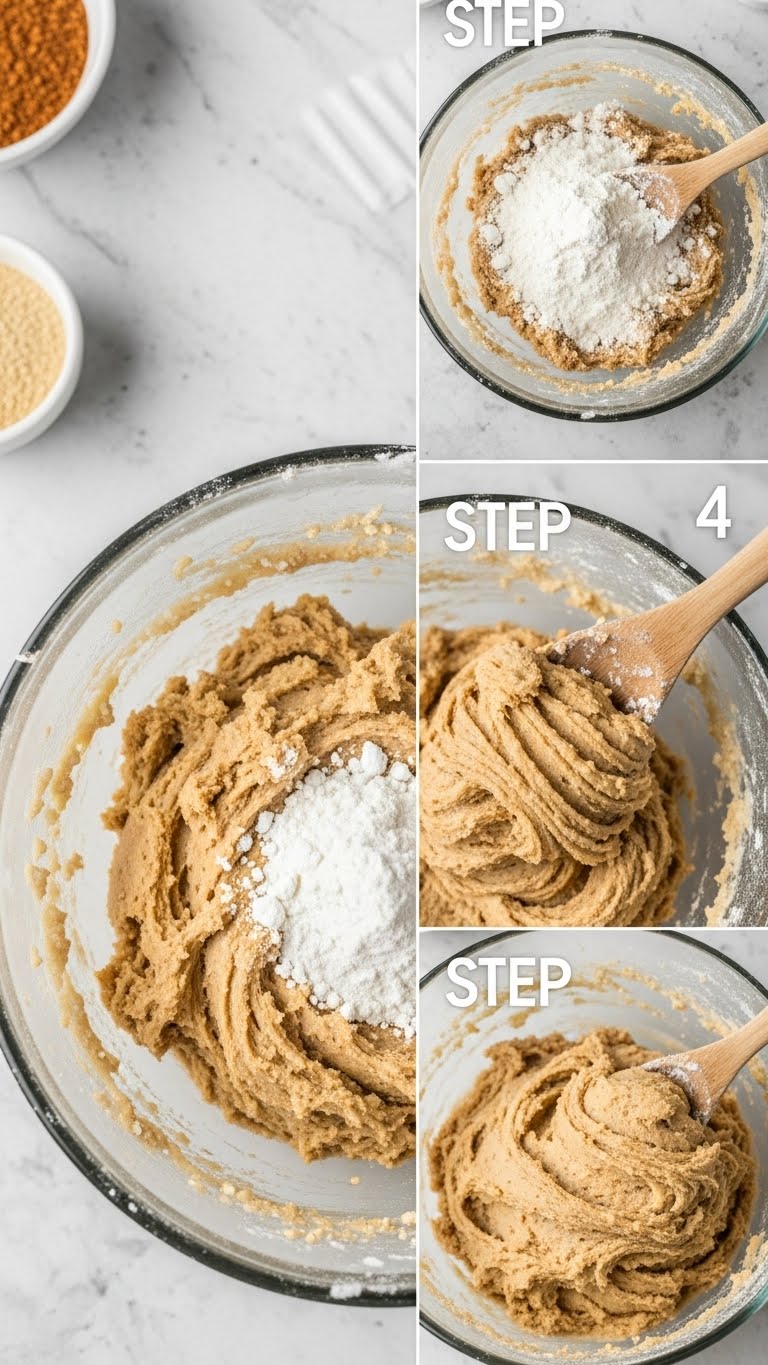
Whisk Dry Ingredients: In a separate, medium-sized bowl, whisk together the flour, baking soda, and salt. This ensures even distribution—no one wants a salty patch or a flat cookie!
Combine Wet & Dry: Gradually add the dry ingredients to the wet, mixing on low speed until *just* combined. As soon as you see no more streaks of dry flour, **stop mixing!** Overmixing develops gluten, which makes tough cookies (and no one likes a tough cookie).
Fold in Chocolate Chips: Stir in your chocolate chips by hand. Go wild! More chips, more happiness, right?
Scoop & Bake: Scoop rounded tablespoons of dough onto your prepared baking sheet. Leave a little space (about 2 inches) between them—they’re gonna spread! Bake for 9-12 minutes, or until the edges are golden brown and the centers still look a *tiny* bit soft and gooey. Don’t overbake!
Cool Down: Let them cool on the baking sheet for 5 minutes before transferring them to a wire rack to cool completely. This helps them set up without falling apart. Patience, young padawan, it’s worth it!
Common Mistakes to Avoid
Let’s save you some heartache (and some wasted ingredients). Here are a few rookie mistakes that even seasoned bakers make sometimes. Don’t be that person!
- Cold Butter is a No-Go: Trying to cream cold butter is like trying to reason with a toddler—futile and frustrating. Always use **room temperature butter**! It creams better and gives your cookies the right texture.
- Overmixing the Dough: We already mentioned it, but it’s worth repeating: once you add the flour, mix *just until* combined. Seriously, overmixing develops the gluten too much, making your cookies tough instead of tender. We want melt-in-your-mouth, not jaw workout.
- Not Using Parchment Paper: Sure, you *can* grease the pan, but parchment paper is your best friend for easy cleanup and perfectly non-stick cookies. Why make life harder?
- Baking on a Hot Sheet: If you’re doing multiple batches, **let your baking sheet cool down** between uses. Placing dough on a hot sheet makes the cookies spread too much, too fast, leading to flat, crispy disappointments.
- Impatience: Pulling them out too early? Undercooked sadness. Waiting too long? Crispy hockey pucks. Look for those **golden edges and slightly soft centers**. It’s a delicate balance, but you’ll get the hang of it!
Alternatives & Substitutions
Feeling creative? This recipe is super flexible. Think of it as a canvas for your cookie artistry!
- Chocolate Chip Choices: Feeling fancy? Swap semi-sweet for milk, dark, or even white chocolate chips! Or go wild with chopped chocolate bars for a more “artisanal” feel. A mix of different chocolates? Yes, please!
- Butter Alternatives: While butter is king, you *can* use vegetable shortening for a slightly softer cookie, or even a good quality plant-based butter alternative. Just make sure it’s one you trust for baking. FYI, the flavor might be a bit different.
- Add-ins: Spice it up with a pinch of cinnamon or a dash of espresso powder for extra depth. Or throw in some chopped nuts (walnuts, pecans) for crunch. Dried cranberries or a sprinkle of flaky sea salt on top? Go for it!
- Flour Power: Want to try whole wheat pastry flour for a slightly healthier twist? You can sub up to half the all-purpose flour. Just know the texture might be a *tad* different, a bit denser perhaps.
FAQ (Frequently Asked Questions)
Because even easy recipes can spark a few “what if’s.”
- Q: My cookies spread too much! What happened?
A: Did you use **cold butter**? Did your butter get *too* soft (like melted)? Is your oven temperature accurate (sometimes they lie!)? Or maybe you didn’t measure your flour correctly. Usually, it’s the butter or the oven being a bit off. A little trick if they’re spreading too much: pop the dough in the fridge for 15-20 minutes before baking.
- Q: Can I chill the dough overnight?
A: **Absolutely, and it’s a pro move!** Chilling the dough deepens the flavor and often results in a chewier cookie. Just cover it tightly and let it hang out in the fridge for up to 2-3 days. You can even scoop it into balls first, then chill.
- Q: What if I don’t have brown sugar?
A: You *can* use all granulated sugar, but your cookies will be less chewy and a bit crispier. It works, but for that classic texture, brown sugar is key. Maybe borrow some from a neighbor?
- Q: Can I use margarine instead of butter?
A: Well, technically yes, but why hurt your soul like that? Butter provides a superior flavor and texture. Margarine can work in a pinch, but the taste won’t be quite the same, and the spread might be different too.
- Q: My cookies are hard as rocks! Help!
A: Two main culprits here: **overbaking** or **overmixing the dough**. Next time, pull them out when the edges are just golden and the center still looks a bit underdone. Remember, they continue to cook on the hot pan for a few minutes. And please, mix the flour *just* until combined!
- Q: How do I store leftover cookies?
A: Leftovers? What are those? Kidding! Store them in an **airtight container** at room temperature for up to 3-5 days. If you want to keep them super fresh, you can even freeze baked cookies (or scoops of raw dough!) for a couple of months.
Final Thoughts
And there you have it, folks! Your very own batch of homemade chocolate chip cookies, ready to conquer cravings and maybe even impress a friend or two (or just yourself, no judgment). This recipe is your new secret weapon, so go forth and bake with confidence! You’ve earned those warm, gooey delights. Now go treat yo’ self!


