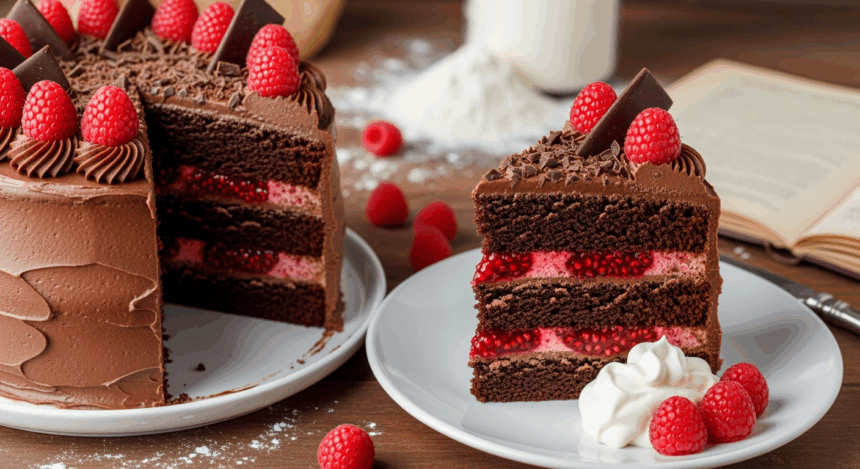
You know what makes a terrible day instantly better? Chocolate cake with raspberry filling. I’m talking about that moment when your fork glides through layers of moist chocolate goodness, hits that vibrant red filling, and you just know life’s about to improve by at least 72%. Ready to create this magic in your own kitchen? Let’s do this!
Why This Recipe is Awesome
Listen, I could pretend this cake is special because it has some fancy French technique or rare Himalayan ingredients. Nope! It’s awesome because it’s the perfect balance of “looks impressive” and “won’t make you cry from frustration.” The chocolate-raspberry combo is basically a flavor power couple – like Beyoncé and Jay-Z of the dessert world. Plus, when you serve this, people will assume you spent hours slaving away. (Your secret’s safe with me.)
Ingredients You’ll Need
For the chocolate cake:
- 2 cups all-purpose flour (the regular stuff, nothing fancy)
- 2 cups granulated sugar (because adulting is hard enough without measuring different sugars)
- ¾ cup unsweetened cocoa powder (the darker, the better – just like my humor)
- 2 teaspoons baking powder
- 1½ teaspoons baking soda
- 1 teaspoon salt
- 2 large eggs (room temperature, not straight from the fridge like some kind of monster)
- 1 cup milk
- ½ cup vegetable oil (olive oil works too if you’re feeling ~Mediterranean~)
- 2 teaspoons vanilla extract (real vanilla, not that imitation nonsense)
- 1 cup hot coffee (or hot water if caffeine makes you bouncy)
For the raspberry filling:
- 2 cups fresh or frozen raspberries
- ½ cup granulated sugar
- 2 tablespoons cornstarch
- 2 tablespoons water
- 1 tablespoon lemon juice (fresh squeezed if you’re showing off)
For the chocolate frosting:
- 1 cup unsalted butter, softened (forget to take it out early? Welcome to the club!)
- 3½ cups powdered sugar (also called confectioners’ sugar for the fancy folks)
- ½ cup cocoa powder
- 3-4 tablespoons heavy cream
- 2 teaspoons vanilla extract
- Pinch of salt (trust me on this one)
Step-by-Step Instructions
Prep Work:
- Preheat your oven to 350°F (175°C). Yes, you actually need to preheat. Not doing this is like showing up to a first date still in your pajamas.
- Grease and flour two 9-inch round cake pans. Or use parchment paper if you’re smart and hate cleanup.
For the Cake:
- In a large bowl, whisk together flour, sugar, cocoa powder, baking powder, baking soda, and salt. This is your dry ingredients party.
- In another bowl, beat the eggs, milk, oil, and vanilla extract until well combined.
- Gradually add the wet ingredients to the dry ingredients, mixing on medium speed. It’ll look like a chocolate swamp at first – keep going.
- Add the hot coffee (or water) and mix until smooth. The batter will be thin. Don’t panic – that’s how it’s supposed to look.
- Pour the batter evenly into your prepared pans and bake for 30-35 minutes, or until a toothpick comes out mostly clean. A few moist crumbs are fine – we’re not making chocolate dust here.
- Let the cakes cool in the pans for 10 minutes, then transfer to wire racks to cool completely. Patience, young padawan.
For the Raspberry Filling:
- In a saucepan, combine raspberries and sugar. Cook over medium heat until the berries break down, about 5 minutes.
- In a small bowl, mix cornstarch and water until smooth. Stir this into the raspberry mixture.
- Add lemon juice and continue cooking until the mixture thickens, about 2-3 minutes. It should coat the back of a spoon.
- Remove from heat and let cool completely. It’ll thicken more as it cools, like my patience when waiting for cake.
For the Frosting:
- Beat the butter until creamy and questioning its life choices (about 2-3 minutes).
- Gradually add powdered sugar and cocoa powder, alternating with heavy cream.
- Mix in vanilla extract and salt. Beat until fluffy and smooth, about 3 minutes.
Assembly (where the magic happens):
- Place one cake layer on your serving plate. If it’s domed, trim the top to make it flat. (Trimmings are chef’s snacks. You’re welcome.)
- Create a “dam” around the edge of the cake with frosting – pipe or spoon a circle of frosting around the outer edge. This prevents raspberry jailbreaks.
- Spoon the raspberry filling inside this dam. Don’t overfill or you’ll have a red tsunami.
- Carefully place the second cake layer on top.
- Frost the top and sides of the cake. Get fancy if you want, or go for rustic if your decorating skills are like mine.
- Garnish with fresh raspberries, chocolate shavings, or whatever makes you feel accomplished.
Common Mistakes to Avoid
We all mess up sometimes. Here’s how to not join the cake fail hall of fame:
- Skipping the dam of frosting around your filling. Unless “raspberry lava flow” is the aesthetic you’re going for.
- Using hot filling on your cake. That’s a one-way ticket to Sog City, population: your sad cake.
- Forgetting to let your butter soften for the frosting. Trying to beat cold butter is like trying to reason with a toddler – technically possible but why torture yourself?
- Rushing the cooling process. Hot cakes + frosting = the Leaning Tower of Disappointment.
- Opening the oven repeatedly while baking. Your cake needs consistent heat, not a helicopter parent.
Alternatives & Substitutions
Because sometimes the pantry situation gets real:
No raspberries? Strawberries, blackberries, or even cherry preserves work beautifully. Honestly, any berry that doesn’t have “poison” in its name is fair game.
Dairy-free? Substitute the milk with almond, soy, or oat milk. For the butter in the frosting, use a plant-based butter substitute. The cake will never know the difference.
Gluten concerns? Swap in a 1:1 gluten-free flour blend. IMO, King Arthur makes one that doesn’t taste like cardboard.
No coffee on hand? Just use hot water. The coffee enhances the chocolate flavor but isn’t mandatory. It’s like the backup dancer of the recipe – nice to have but the show goes on without them.
Lazy option: Use boxed cake mix and doctor it up with an extra egg, substitute milk for water, and add a splash of vanilla. I won’t tell if you don’t.
FAQ (Frequently Asked Questions)
Can I make this cake ahead of time?
Absolutely! The filled and frosted cake will keep in the refrigerator for up to 3 days. Just let it sit at room temperature for about 30 minutes before serving. Unless you enjoy cake that feels like biting into a chocolate ice cube.
Will the filling make my cake soggy?
Not if you create that frosting dam I mentioned. Think of it as building a moat around your cake castle. A delicious, structural necessity.
Do I really need two 9-inch pans?
You could use one pan and cut the cake in half horizontally after baking, but that requires confidence and knife skills I personally don’t possess. If you’re feeling brave, go for it.
Can I use a hand mixer instead of a stand mixer?
Of course! Your arm might get a little workout, but consider it preparation for all the cake you’re about to eat.
My cake cracked/sank/exploded. What happened?
Cracks usually mean your oven is too hot. Sinking means it’s underbaked or you were a little too enthusiastic opening the oven door. Explosions mean you should probably call someone, because that’s not normal for cake.
Can I freeze this cake?
You bet! Wrap individual slices or the whole unfrosted cake in plastic wrap and then aluminum foil. Thaw in the refrigerator overnight when ready to use. Future You will thank Present You for this delicious gift.
Final Thoughts
Congratulations! You’ve just created a chocolate-raspberry masterpiece that would make professional bakers slow-clap in approval. Or at least a cake that’ll make you feel like a kitchen wizard for a day.
Remember, the best thing about homemade cake is that even the “ugly” ones taste amazing. If something goes sideways, just call it rustic, artisanal, or “deconstructed” if you’re feeling particularly fancy.
Now go forth and share your creation – or don’t. I fully support eating cake straight from the fridge at midnight while standing in the dark. That’s peak adulting right there. Enjoy!
