So you’re craving something tasty but too lazy to spend forever in the kitchen, huh? Same. You want something that screams “I tried!” but secretly took like, 20 minutes? My friend, you’ve stumbled upon the Holy Grail of quick desserts: the Lava Cake for Two. Prepare for gooey, chocolatey bliss that’ll make you look like a culinary genius, even if your last meal was cereal straight from the box. No judgment here!
Why This Recipe is Awesome
Okay, let’s be real. Most recipes are either too complicated, too long, or require you to buy obscure ingredients you’ll use once and then forget about in the back of your pantry. Not this one, my friend. This lava cake recipe is so simple, it’s practically idiot-proof. Seriously, even I didn’t mess it up, and my kitchen adventures often end in a smoke alarm concert. It uses basic stuff you probably already have, comes together faster than your favorite show’s intro sequence, and delivers maximum “OMG this is amazing” vibes with minimal effort. Plus, it’s portioned for two, so no awkward leftover cake situation. Unless you’re eating both, which, honestly, valid.
Ingredients You’ll Need
Gather ’round, my fellow lazy gourmands! Here’s your hit list for decadent dessert domination:
- **Butter (Unsalted, please!):** About 1/4 cup (or 4 tablespoons). The good stuff. Don’t skimp; butter is flavor, **FYI**.
- **Dark Chocolate (70% cocoa or similar):** 3.5 ounces (about 100g). Get decent quality, because you’re worth it. This is where the “lava” magic happens. Think chocolate chips, a good bar, whatever floats your boat (but not milk chocolate unless you want it super sweet, just sayin’).
- **Powdered Sugar (Confectioners’ Sugar):** 1/4 cup. Don’t confuse it with granulated sugar unless you want a gritty cake. Rookie mistake!
- **Large Egg:** Just one. The binder, the unifier, the reason your cake doesn’t fall apart.
- **Egg Yolk:** One extra. This little guy amps up the richness and helps achieve that perfect molten center.
- **All-Purpose Flour:** 2 tablespoons. Just a tiny bit to give it some structure.
- **Pinch of Salt:** Seriously, a tiny pinch. It brings out all the chocolatey goodness. Don’t skip it!
- **Optional Fun Stuff (but highly recommended):** Vanilla ice cream, fresh berries, a dusting of extra powdered sugar. Because presentation, darling!
Step-by-Step Instructions
Alright, apron up! (Or don’t, I won’t tell.) Let’s get this molten masterpiece baking!
- **Preheat Power:** First things first, get that oven screaming hot to **400°F (200°C)**. And grab two ramekins (those cute little oven-safe bowls) and butter ’em up generously, then dust with a little cocoa powder or flour. This prevents sticking and ensures easy unmolding. Trust me, it’s worth the extra 30 seconds.
- **Melt & Mix:** In a microwave-safe bowl (or a double boiler if you’re feeling fancy), melt your butter and dark chocolate together. Heat in 30-second intervals, stirring until smooth and glossy. Don’t burn it, or you’ll have bitter lava! Set it aside to cool slightly.
- **Whisk It Real Good:** In another bowl, whisk together the powdered sugar, the whole egg, and the extra egg yolk. Whisk until it’s light and slightly pale. You’re building structure here!
- **Combine Forces:** Gently fold the slightly cooled chocolate mixture into the egg mixture. Do it carefully, you don’t want to deflate all that whisked air.
- **Flour Power:** Sift in the flour and that tiny pinch of salt. Fold until *just* combined. **Avoid overmixing**, or your cake will be tough instead of tender. We’re aiming for gooey, remember?
- **Ramekin Rendezvous:** Divide the batter evenly between your two prepared ramekins. Don’t fill them to the very brim; give it a little space to puff up.
- **Bake It ‘Til You Make It:** Pop those beauties into your preheated oven for **12-14 minutes**. The edges should be set, but the center should still look delightfully jiggly. That jiggle is your lava, people!
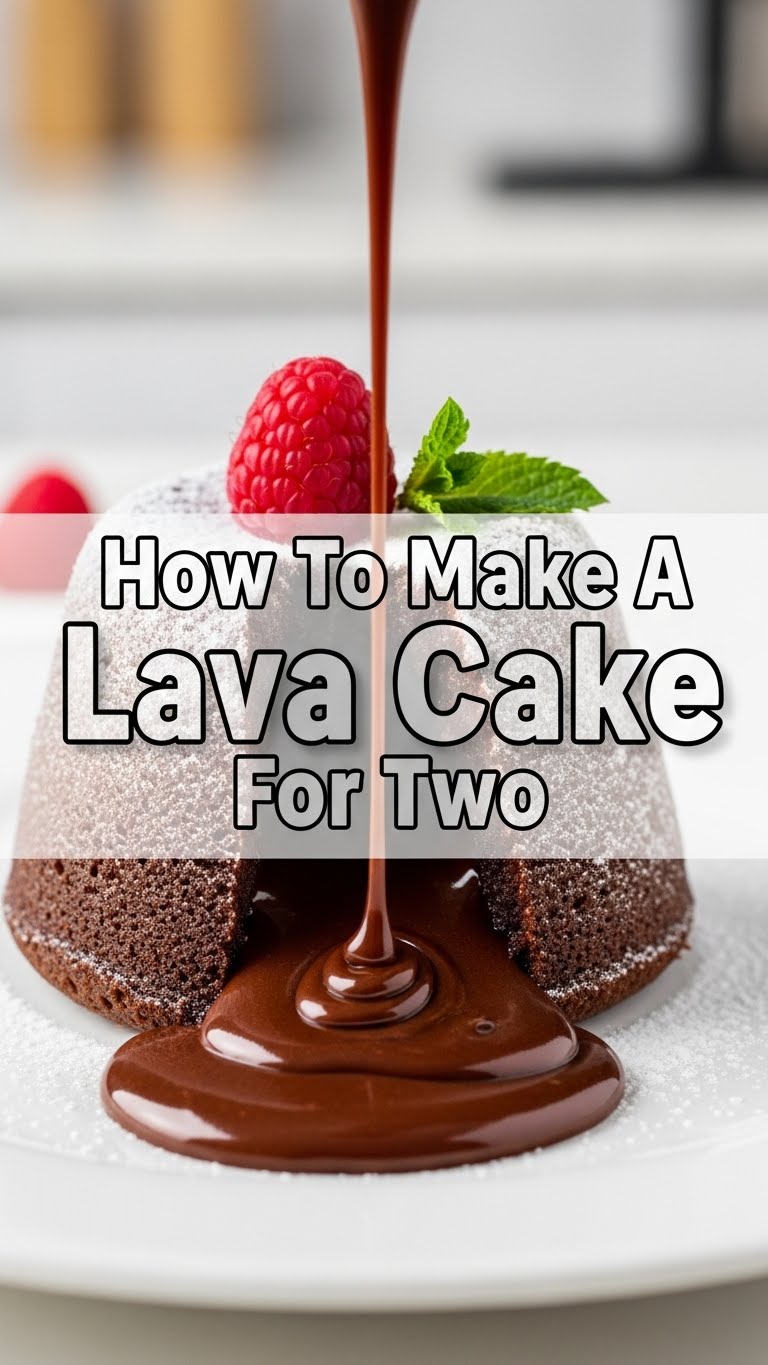
- **The Grand Reveal:** Carefully take them out of the oven. Let them cool for about 1-2 minutes in the ramekins. Then, place a serving plate upside down over each ramekin and *carefully* flip them over. Lift the ramekin, and behold! A perfect little lava cake.
- **Garnish & Devour:** Dust with powdered sugar, add a scoop of vanilla ice cream, or throw some berries on top. Whatever you do, eat it while it’s warm and gooey. This isn’t a “save for later” kind of dessert.
Common Mistakes to Avoid
So you wanna avoid baking disasters? Smart move! Here are some classic blunders to steer clear of:
- **Thinking you don’t need to preheat the oven:** Rookie mistake, seriously. A cold oven means uneven baking and no glorious lava. **Preheat, always!**
- **Overmixing the batter:** You want tender, not tough! Mix just until combined. No need to go crazy with the whisk.
- **Overbaking:** This is the *biggest* sin. Bake it too long, and your lava will solidify into a regular old chocolate cake. Still good, but not what we’re going for! Keep an eye on that jiggle.
- **Using cheap chocolate:** Yeah, I said it. The quality of your chocolate directly impacts the deliciousness of your lava. Don’t sabotage your dessert before it even starts.
- **Not greasing/flouring your ramekins:** Ever tried to get a cake out that’s stuck? It’s not pretty. Save yourself the heartache and do it properly.
Alternatives & Substitutions
Feeling adventurous? Or just missing an ingredient? No worries, we’ve got options!
- **Chocolate Swap:** Can’t find dark chocolate? A good quality semi-sweet chocolate will also work, but your cake will be sweeter. **IMO**, dark chocolate gives it that sophisticated edge. Avoid milk chocolate unless you really love super-sweet desserts, as it might be a bit much.
- **Flour Power:** No all-purpose flour? You can likely get away with a gluten-free all-purpose blend (make sure it has xanthan gum!). Just ensure it’s a 1:1 substitute.
- **Spice It Up:** Add a tiny pinch of cayenne pepper to the chocolate mixture for a subtle, unexpected kick. Or a splash of espresso powder to deepen the chocolate flavor. Trust me on this one, it’s a game-changer!
- **Boozy Bits:** A teaspoon of Kahlua, rum, or Grand Marnier folded into the chocolate mixture can add a lovely adult twist. Who says dessert can’t be sophisticated *and* fun?
FAQ (Frequently Asked Questions)
Got questions? I probably have snarky answers!
- **Can I use margarine instead of butter?** Well, technically yes, but why hurt your soul like that? Butter just tastes better, period. For a truly rich lava cake, butter is your friend.
- **What if I don’t have ramekins?** You can use any oven-safe baking dish that holds about 6-8 ounces, like small ceramic bowls or even muffin tins (just fill halfway for smaller cakes). Just adjust baking time; smaller cakes will bake faster.
- **Can I make these ahead of time?** You can prepare the batter and keep it covered in the fridge for up to 24 hours. Just let it come closer to room temperature before baking, and you might need an extra minute or two in the oven. **But seriously, they’re best fresh!**
- **My lava cake didn’t have a liquid center! What went wrong?** Likely overbaked! Or your oven runs hot. Next time, pull them out a minute or two earlier when the edges are set but the center still has that glorious jiggle.
- **Can I make a bigger batch?** Absolutely! Just scale up the ingredients proportionally. Remember to use appropriate sized baking dishes and adjust baking time accordingly.
- **Why dark chocolate? Can I use milk chocolate?** Dark chocolate provides a richer, less sweet base, allowing the “lava” aspect to shine without being cloying. Milk chocolate would make it much sweeter, and it might not set up quite the same. Stick to dark or semi-sweet for the best results, **IMO**.
Final Thoughts
See? That wasn’t so hard, was it? You just whipped up a fancy-pants dessert that looks like it took hours but was secretly a breeze. You’re basically a kitchen wizard now! Go ahead, pat yourself on the back. You’ve earned it. Now go impress someone—or yourself, because self-love is important—with your new culinary skills. Enjoy your gooey, chocolatey triumph!


