So, you’ve had one of *those* days, huh? Or maybe it’s just Tuesday, and your soul is screaming for chocolate. But, like, actually make it? Ugh. If you’re anything like me, the thought of an overly complicated baking marathon just makes you want to order takeout. Fear not, my friend! I’ve got your back with a chocolate cake recipe that’s so ridiculously easy, it practically bakes itself. (Okay, maybe not *that* easy, but close enough for a Tuesday.)
Why This Recipe is Awesome
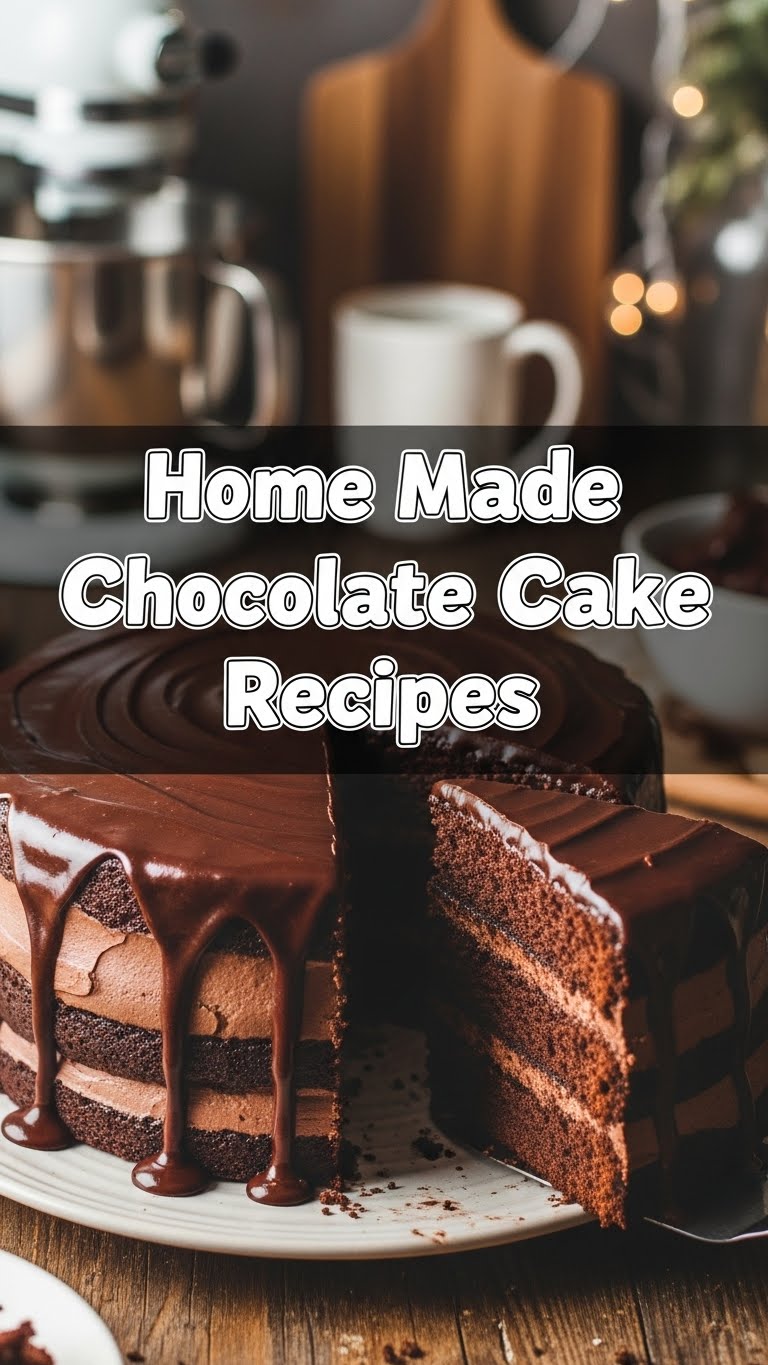
Let’s be real, most chocolate cake recipes promise the moon and deliver a dense brick. Not this one! This bad boy is **fluffy, moist, and ridiculously chocolatey** without requiring you to have a pastry chef degree. Seriously, I’m pretty sure my cat could follow these steps (if he had opposable thumbs and an interest in baking beyond knocking things off counters). It’s **idiot-proof** – even *I* didn’t mess it up, and my track record with delicate desserts is… let’s just say “adventurous.” Plus, the smell alone will make you feel like a baking superstar, even if you just threw everything in a bowl and hoped for the best. Which, FYI, is kinda the vibe here.
Ingredients You’ll Need
Alright, gather your troops! Most of these are probably already lurking in your pantry, which is half the battle won, am I right?
- **All-Purpose Flour:** Just your regular, run-of-the-mill flour. No fancy organic, hand-milled, unicorn-kissed stuff needed.
- **Granulated Sugar:** Sweetness! Get ready for that sugar rush.
- **Unsweetened Cocoa Powder:** The darker, the better for that deep chocolatey hug. Don’t cheap out here unless you want sad chocolate cake.
- **Baking Soda & Baking Powder:** The dynamic duo of lift! Don’t confuse them; they’re like Batman and Robin, both essential but for different things.
- **Salt:** Just a pinch to make everything else taste even better. It’s like the unsung hero of flavor.
- **Large Eggs:** Two of ’em. Room temp, if you’re feeling fancy (it helps with emulsification, but honestly, I rarely remember).
- **Milk:** Any kind works – whole, 2%, almond… whatever you have chilling in the fridge.
- **Vegetable Oil:** Or canola, or sunflower. Something neutral. This is our secret weapon for moistness.
- **Vanilla Extract:** Don’t skip this! It makes the chocolate taste even *more* chocolatey. Magical.
- **Boiling Water:** Yes, boiling! It’s going to bloom that cocoa powder and make your cake intensely rich. Trust me on this.
Step-by-Step Instructions
Deep breaths, you got this! Let’s make some magic happen.
- **Preheat Your Oven & Prep Your Pans:** Crank that oven to **350°F (175°C)**. Grease and flour two 8 or 9-inch round cake pans. Or line a 9×13 inch pan with parchment paper. If you skip this, your cake will stage a rebellion and stick. Don’t say I didn’t warn you.
- **Whisk the Dry Stuff:** In a large bowl, whisk together your flour, sugar, cocoa powder, baking soda, baking powder, and salt. Make sure there are no lumpy bits. We’re going for smooth sailing here.
- **Add the Wet Stuff (Except Boiling Water):** Dump in the eggs, milk, oil, and vanilla extract into your dry mixture. Beat with an electric mixer on medium speed for about 2 minutes. Scrape down the sides of the bowl to make sure everything gets acquainted.
- **Introduce the Hot Friend:** Now, for the secret ingredient: carefully pour the boiling water into your batter. It’s going to look super thin, maybe even a little scary. Don’t panic! This is normal. Stir until just combined. The batter will be quite runny, and that’s exactly what we want.
- **Bake It Up:** Divide the batter evenly between your prepared pans. Pop them in the preheated oven for **30-35 minutes** for round cakes, or 35-40 minutes for a 9×13. How do you know it’s done? A toothpick inserted into the center should come out clean.
- **Cool Down:** Let the cakes cool in their pans for about 10-15 minutes before carefully inverting them onto a wire rack to cool completely. Patience is a virtue, especially when it comes to not having your cake crumble.
- **Frost & Devour:** Once completely cool (seriously, wait!), slather on your favorite chocolate frosting. Or cream cheese frosting. Or just eat it plain, because it’s *that* good. Now, go impress someone—or yourself!
Common Mistakes to Avoid
Listen, we’ve all been there. Baking can be a minefield of “oops” moments. Here are a few traps to sidestep:
- **Thinking you don’t need to preheat the oven:** Rookie mistake! Your cake won’t rise properly, and you’ll end up with a sad, dense disc. **Always preheat!**
- **Opening the oven door constantly:** Resist the urge! Every time you peek, you let out heat, which can make your cake sink in the middle. Be strong!
- **Overmixing the batter:** Once you add the flour, mix *just* until combined. Overmixing develops the gluten too much, leading to a tough, dry cake. Nobody wants a rubbery cake, right?
- **Not letting the cake cool completely before frosting:** This is how you get frosting soup. Unless you’re going for a “deconstructed messy deliciousness” look, just wait. I know, it’s hard.
- **Skipping the salt:** It might seem minor, but salt actually enhances the chocolate flavor. Don’t be a hero, add the salt.
Alternatives & Substitutions
Life happens, and sometimes you don’t have exactly what the recipe calls for. No stress! We can totally wing it.
- **No Buttermilk? No Problem!** If you’re out of milk and only have buttermilk, go for it! Or, if you only have regular milk but want that buttermilk tang, add 1 tablespoon of white vinegar or lemon juice to your regular milk and let it sit for 5 minutes. Voila! Instant “buttermilk.”
- **Oil vs. Butter:** This recipe uses oil for ultimate moistness, but if you’re a butter purist, you can absolutely substitute melted butter for the oil. Just know it might alter the texture slightly (usually a bit denser, but still delicious).
- **Gluten-Free Flour:** Wanna make it GF? Use a 1:1 gluten-free baking blend. I haven’t personally tested it with this specific recipe, but generally, GF flours play nice with chocolate cakes.
- **Espresso Powder:** For an even deeper chocolate flavor, add 1-2 teaspoons of instant espresso powder to your dry ingredients. It won’t make your cake taste like coffee, it just boosts the chocolate. It’s a game-changer, IMO.
- **No Vanilla Extract?** Okay, this one is tough. You *can* skip it, but your cake won’t have that extra oomph. It’s like a good outfit without accessories – still good, but could be better.
FAQ (Frequently Asked Questions)
Got questions? I’ve got answers (mostly helpful, sometimes sarcastic).
- **Can I make this into cupcakes?** Absolutely! Line a muffin tin with liners, fill about two-thirds full, and bake for 18-22 minutes. Keep an eye on them, nobody likes a burnt cupcake.
- **My cake sank in the middle! What happened?** Usually, this is due to opening the oven door too early, underbaking, or too much leavening (baking soda/powder). Next time, resist the urge to peek!
- **Can I use dark chocolate cocoa powder?** Heck yes! The darker, the richer, the happier your taste buds will be. Go wild!
- **How long does this cake last?** If stored in an airtight container at room temperature, it should be good for 3-4 days. In the fridge? Maybe up to a week. But honestly, it rarely lasts that long in my house.
- **Can I freeze this cake?** You betcha! Wrap cooled, unfrosted cake layers tightly in plastic wrap, then foil. They’ll keep in the freezer for up to 2 months. Thaw at room temperature before frosting. Future you will thank past you.
- **Why boiling water? Does it really make a difference?** Oh, you bet it does! The boiling water “blooms” the cocoa powder, intensifying its flavor and making the cake incredibly moist. It’s a simple trick with huge payoff.
Final Thoughts
And there you have it! Your very own, incredibly delicious, ridiculously easy homemade chocolate cake. See? I told you it wasn’t a big deal. Now go impress someone—or yourself—with your new culinary skills. Seriously, take a moment to enjoy that rich, chocolatey goodness. You’ve earned it, my friend. Happy baking (and eating)!


