Prepare yourselves, fellow dessert enthusiasts, because we’re about to embark on a delectable journey that will tickle your taste buds and earn you legendary status among your friends and family. Forget everything you thought you knew about indulgence, because today, we’re diving deep into the magical realm of the Hershey Chocolate Cake With Cream Cheese Filling – a true masterpiece of flavor and texture that’s surprisingly fun to create!
This isn’t just any chocolate cake; it’s *the* Hershey’s chocolate cake, renowned for its incredible moistness and rich cocoa flavor. And when paired with a tangy, velvety cream cheese filling? Oh, sweet heavens, that’s where the real party begins! Get ready to whisk, bake, and frost your way to pure bliss. Let’s get baking!
The Magic Behind the Batter: What Makes Hershey’s Chocolate Cake So Special?
Before we even dream of that luscious filling, let’s talk about the star player: the chocolate cake itself. The classic Hershey’s chocolate cake recipe is beloved for a reason. It’s incredibly forgiving, delivers consistent results, and boasts a deep, satisfying chocolate flavor without being overly sweet. But what’s its secret sauce?
- Cocoa Powder Power: Unlike recipes relying solely on melted chocolate, Hershey’s uses cocoa powder, often bloomed with hot water or coffee. This intensifies the chocolate flavor, making it richer and more profound.
- A Liquid Love Affair: Many versions call for hot water or freshly brewed hot coffee. The hot liquid helps to dissolve and “bloom” the cocoa particles, releasing their full flavor potential. Coffee, even in small amounts, doesn’t make the cake taste like coffee, but it significantly deepens the chocolate notes. It’s like a secret flavor amplifier!
- Oil vs. Butter: Often, this cake uses vegetable oil instead of butter. While butter adds flavor, oil contributes to a supremely moist crumb, keeping the cake tender for days. It’s a texture game-changer!
The result? A consistently tender, wonderfully moist chocolate cake that serves as the perfect canvas for our next delicious component: the cream cheese filling.
Crafting the Dreamy Cream Cheese Filling: A Tangy Cloud of Joy
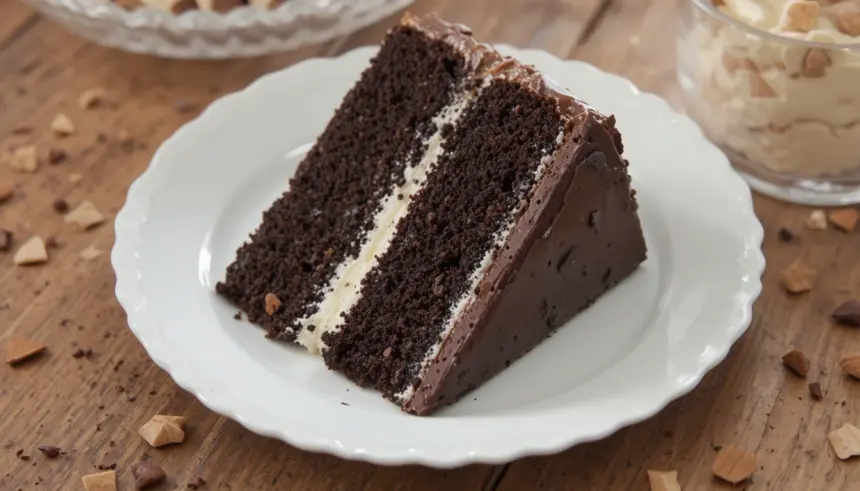
Now, let’s talk about the soulmate to our chocolate wonder: the cream cheese filling. This isn’t just any frosting; it’s a creamy, tangy counterpoint that cuts through the richness of the chocolate cake, creating a perfect flavor harmony. Imagine biting into that deep chocolate, only to be met by a refreshing, slightly tart, and utterly smooth cloud of cream cheese. Pure bliss!
The beauty of a cream cheese filling lies in its simplicity and its ability to transform an already great cake into an extraordinary one. Here’s what makes it so irresistible:
- The Tang Factor: High-quality cream cheese provides that essential tanginess that prevents the dessert from being overwhelmingly sweet. It’s the yin to the chocolate’s yang.
- Silky Smooth Texture: When made correctly, this filling is incredibly smooth and spreadable, creating a beautiful aesthetic and an even more delightful mouthfeel.
- Versatility: While perfect with chocolate, it’s also amazing with red velvet, carrot cake, or even a simple vanilla cupcake.
But beware, aspiring bakers! The key to a stable, lump-free cream cheese filling often lies in the temperature of your ingredients and careful mixing. We’ll dive into those details shortly!
Your Step-by-Step Journey to Hershey Chocolate Cake With Cream Cheese Filling Perfection
Ready to get your hands deliciously dirty? Here’s how you’ll bring this magnificent Hershey Chocolate Cake With Cream Cheese Filling to life. Follow these steps, and you’ll be a dessert legend in no time!
Gathering Your Delicious Arsenal (Ingredients)
Before you begin, ensure all your ingredients are at room temperature (especially the eggs, milk, butter, and cream cheese for the filling). This ensures a smooth, well-emulsified batter and filling.
| For the Hershey Chocolate Cake | For the Cream Cheese Filling |
|---|---|
| 2 cups granulated sugar | 16 oz (two 8-oz blocks) full-fat cream cheese, softened |
| 1¾ cups all-purpose flour | ½ cup (1 stick) unsalted butter, softened |
| ¾ cup unsweetened Hershey’s cocoa powder | 4-5 cups powdered sugar (confectioners’ sugar), sifted |
| 1½ teaspoons baking soda | 1-2 teaspoons pure vanilla extract |
| 1½ teaspoons baking powder | Pinch of salt (optional, but recommended to balance sweetness) |
| 1 teaspoon salt | |
| 2 large eggs | |
| 1 cup milk | |
| ½ cup vegetable oil | |
| 2 teaspoons pure vanilla extract | |
| 1 cup boiling water (or hot coffee for extra depth) |
Conquering the Cake Layers
- Preheat & Prep: Preheat your oven to 350°F (175°C). Grease and flour two 9-inch round baking pans, or line with parchment paper.
- Dry Mix Magic: In a large bowl, whisk together sugar, flour, cocoa, baking soda, baking powder, and salt. Make sure there are no lumps!
- Wet Mix Wonder: Add eggs, milk, oil, and vanilla extract to the dry ingredients. Beat with an electric mixer on medium speed for 2 minutes, scraping the bowl once or twice.
- The Hot Secret: Carefully stir in the boiling water (or hot coffee) until just combined. The batter will be thin, but don’t worry, that’s normal!
- Bake to Perfection: Divide the batter evenly between the prepared pans. Bake for 30-35 minutes, or until a wooden skewer inserted into the center comes out clean.
- Cool Down: Let the cakes cool in the pans for 10 minutes before inverting them onto wire racks to cool completely. Patience is a virtue here! A completely cool cake prevents melting filling.
Whisking Up the Cream Cheese Filling Fun
- Cream the Stars: In a large bowl with an electric mixer, beat the softened cream cheese and softened butter together on medium speed until light, fluffy, and completely smooth (about 2-3 minutes). No lumps allowed!
- Sweeten the Deal: Gradually add the sifted powdered sugar, 1 cup at a time, mixing on low speed until combined, then increasing to medium until smooth after each addition.
- Flavor Boost: Stir in the vanilla extract and an optional pinch of salt. Mix until everything is beautifully incorporated and creamy. Avoid overmixing, as this can make the filling too thin.
The Grand Assembly: Stacking and Spreading
- Level Up: If your cake layers have domes, use a serrated knife to gently level them for a flat surface.
- First Layer Down: Place one cooled cake layer on your serving plate or cake stand.
- Fill ‘Er Up: Spread about 1 to 1½ cups of the cream cheese filling evenly over the top of the first layer.
- Second Layer On: Carefully place the second cake layer on top.
- The Grand Finale: Use the remaining filling to frost the top and sides of the entire Hershey Chocolate Cake With Cream Cheese Filling. Get creative with your swoops and swirls!
- Chill Out: For best results, chill the cake for at least 30 minutes before slicing. This helps the filling set and makes for cleaner cuts.
Expert Tips & Tricks for a Showstopping Hershey Chocolate Cake With Cream Cheese Filling
Want to elevate your baking game even further? Here are some insider secrets to ensure your Hershey Chocolate Cake With Cream Cheese Filling is not just good, but legendary!
- Don’t Overmix (Cake Batter): Once you add the dry ingredients to the wet, mix only until just combined. Overmixing develops gluten, leading to a tough, dry cake.
- Don’t Overmix (Cream Cheese Filling): Beat only until smooth and combined. Overmixing can incorporate too much air, making the filling unstable and potentially runny.
- Room Temperature is Key (Filling): Seriously, for the smoothest, lump-free cream cheese filling, your cream cheese and butter MUST be perfectly softened at room temperature. If they’re cold, you’ll get lumps.
- Sift Your Powdered Sugar: Sifting the powdered sugar for the filling prevents lumps and ensures a silky-smooth texture. Trust us on this one!
- Coffee for Deeper Chocolate: If you’re a true chocolate lover, swap the boiling water for hot brewed coffee in the cake batter. It won’t taste like coffee, but it will significantly enhance the chocolate flavor.
- Chill for Clean Slices: A chilled cake is a happy cake, especially when it comes to clean slices. The filling sets beautifully in the fridge.
- Storage Savvy: Due to the cream cheese, this cake should always be stored in an airtight container in the refrigerator. Bring it to room temperature for 30 minutes before serving for the best flavor and texture.
Troubleshooting Common Cake Crises
Even experts have off days! Here’s how to tackle a few common issues:
- Cake is Dry:
- Did you overbake it? Use a timer and check for doneness at the earliest recommended time.
- Was your oven temperature accurate? An oven thermometer can be a lifesaver.
- Filling is Runny:
- Were your cream cheese and butter too warm? They should be soft, not melted.
- Did you overmix it? This can incorporate too much air, making it less stable.
- Did you add enough powdered sugar? It provides structure.
- Cake Crumbled When Frosting:
- Was the cake completely cool? Warm cake will crumble and melt the frosting.
- Try a “crumb coat” – apply a very thin layer of frosting to seal in the crumbs, chill, then apply the final layer.
Frequently Asked Questions (FAQ) About Hershey Chocolate Cake With Cream Cheese Filling
Got questions? We’ve got answers! Here are some common queries about making this fantastic cake:
- Q: Can I make the Hershey Chocolate Cake layers ahead of time?
A: Absolutely! Baked and cooled cake layers can be wrapped tightly in plastic wrap and stored at room temperature for up to 2 days, or frozen for up to 2-3 weeks. Thaw completely before frosting.
- Q: How long does Hershey Chocolate Cake With Cream Cheese Filling last?
A: Stored in an airtight container in the refrigerator, it will last for 4-5 days. It tastes best at room temperature, so let it sit out for about 30 minutes before serving.
- Q: Can I use low-fat cream cheese for the filling?
A: While technically possible, we highly recommend using full-fat cream cheese for the best flavor, texture, and stability. Low-fat versions often have more water content, which can make the filling runny and less rich.
- Q: What if I don’t have boiling water for the cake?
A: You can use hot tap water, but boiling water (or hot coffee) truly helps bloom the cocoa powder for maximum flavor. You can quickly heat water in a microwave or kettle.
- Q: Can I add chocolate chips to the cake batter?
A: You bet! Fold in about ½ to 1 cup of mini chocolate chips (or regular) into the batter just before pouring into the pans for an extra chocolatey burst. It’s a delightful addition to the Hershey Chocolate Cake With Cream Cheese Filling experience!
- Q: My cream cheese filling is too soft/runny. What can I do?
A: Try adding a bit more sifted powdered sugar, one tablespoon at a time, mixing well after each addition until it reaches your desired consistency. You can also chill the filling in the refrigerator for 15-30 minutes to firm it up before frosting.
The Grand Finale: Your Delicious Journey Awaits!
There you have it, intrepid bakers! You’re now fully equipped with the knowledge, tips, and expert guidance to conquer the magnificent Hershey Chocolate Cake With Cream Cheese Filling. This isn’t just a dessert; it’s an experience, a celebration of rich chocolate and tangy creaminess that never fails to impress.
So, gather your ingredients, put on your favorite apron, and let the baking adventure begin! We guarantee that the moment you take that first bite, you’ll know every whisk, every stir, and every sprinkle was absolutely worth it. Go forth and create your chocolate cake masterpiece!
Ready to bake? Share your creations with us! We can’t wait to see your sensational Hershey Chocolate Cake With Cream Cheese Filling!
