So, you’re craving that glorious sweet and sour goodness but also, like, *not* craving a food coma or a lecture from your doctor about your life choices, huh? Same, friend, same. We want all the flavor without all the “OMG, what have I done?” guilt. Good news: I’ve got your back with a healthy sweet and sour chicken recipe that’s so good, you might actually high-five yourself.
Why This Recipe is Awesome
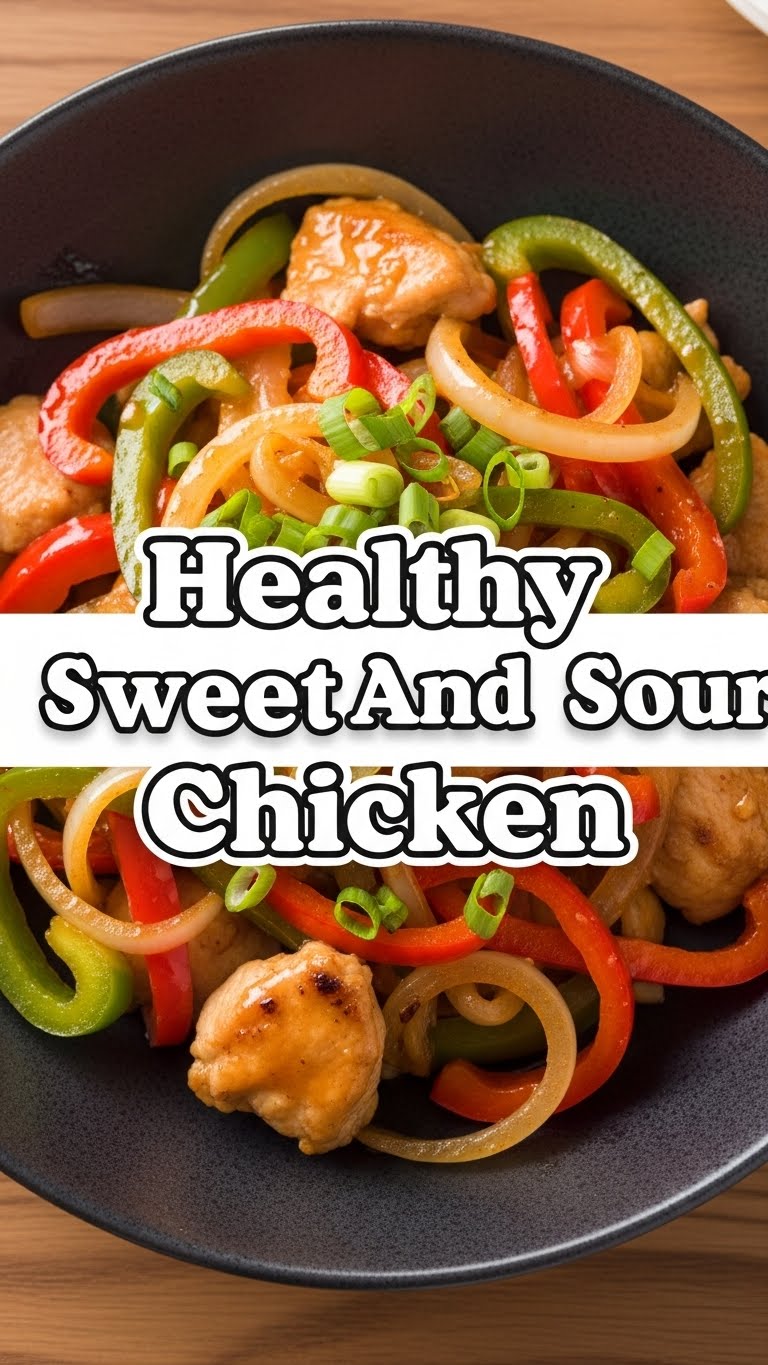
Okay, let’s be real. Most sweet and sour chicken recipes are basically chicken nuggets swimming in a sugar bath. Delicious, yes. Good for your soul (and arteries)? Eh, not so much. This version? It’s a glow-up! We’re baking (or air-frying!) the chicken instead of deep-frying it, packing in tons of fresh veggies, and whipping up a sauce that’s sweet, tangy, and totally crave-worthy without going overboard on the sugar. It’s practically a health food disguised as a takeout treat. Plus, it’s surprisingly quick, which means less time in the kitchen and more time binging your favorite show (with a satisfied belly, no less).
Ingredients You’ll Need
Get ready to assemble your culinary dream team:
- For the Chicken:
- 1.5 lbs boneless, skinless chicken breasts or thighs, cut into 1-inch pieces (your protein canvas!)
- 1 tbsp cornstarch or arrowroot powder (for that crispy coating without the grease)
- Salt and pepper to taste
- 1 tbsp olive oil or avocado oil
- For the Veggies:
- 1 red bell pepper, chopped (for a pop of color and crunch)
- 1 green bell pepper, chopped (because two peppers are better than one, IMO)
- 1 medium onion, chopped (the unsung hero of flavor)
- 1 cup pineapple chunks (fresh or canned, drained – the sweet-tart superstar)
- Optional: 1 cup broccoli florets or snap peas (more veggies = more winning!)
- For the Healthy-ish Sweet & Sour Sauce:
- 1/2 cup low-sodium chicken broth
- 1/4 cup apple cider vinegar (the tang master)
- 2 tbsp soy sauce or tamari (go low-sodium if you can!)
- 2 tbsp honey or maple syrup (our natural sweetener, keeping it real)
- 1 tbsp ketchup (just a touch for classic flavor)
- 1 tbsp cornstarch or arrowroot powder (to thicken things up)
- 1 clove garlic, minced (because everything is better with garlic)
- 1 tsp grated fresh ginger (the zing that makes all the difference!)
- For Serving:
- Cooked brown rice or quinoa (for maximum healthy vibes)
- Sesame seeds and chopped green onions (for garnish, making it look fancy!)
Step-by-Step Instructions
- Preheat & Prep the Chicken: Preheat your oven to 400°F (200°C) or your air fryer to 375°F (190°C). In a bowl, toss the chicken pieces with cornstarch, salt, and pepper until lightly coated. Then, drizzle with olive oil and toss again.
- Cook the Chicken: Spread the chicken in a single layer on a baking sheet lined with parchment paper (for oven) or in your air fryer basket. Bake for 15-20 minutes, flipping halfway, or air fry for 10-15 minutes, shaking the basket occasionally, until golden and cooked through. Set aside.
- Sauté the Veggies: While the chicken cooks, heat a large skillet or wok over medium-high heat. Add a tiny splash of oil (if needed) and toss in the bell peppers and onion. Sauté for 3-5 minutes until they start to soften but still have a little crunch. Add the optional broccoli or snap peas and cook for another 2 minutes.
- Whip Up the Sauce: In a small bowl, whisk together the chicken broth, apple cider vinegar, soy sauce, honey/maple syrup, ketchup, cornstarch, minced garlic, and grated ginger until smooth. No lumps allowed!
- Combine & Thicken: Pour the sauce mixture into the skillet with the veggies. Bring to a gentle simmer, stirring constantly, until the sauce thickens to your liking – usually 2-3 minutes. It should coat the back of a spoon.
- Bring It All Together: Add the cooked chicken pieces and pineapple chunks to the skillet. Toss everything gently to coat the chicken and veggies evenly with that glorious sauce. Heat through for another minute or two.
- Serve It Up: Dish out generous portions over your favorite brown rice or quinoa. Garnish with sesame seeds and green onions for that extra flair. Revel in your culinary genius!
Common Mistakes to Avoid
- Overcrowding the Pan: Whether it’s the chicken in the oven/air fryer or the veggies in the skillet, don’t cram ’em in. They’ll steam instead of getting that lovely char or crispness. Give them space!
- Skimping on the Ginger and Garlic: These aren’t just suggestions; they’re the soul of the sauce. Don’t be shy. Fresh is always best here.
- Forgetting to Taste the Sauce: Before you add the chicken, give the sauce a little taste. Does it need more tang? A touch more sweetness? Adjust it to YOUR preference! You’re the chef, after all.
- Overcooking the Chicken: Dry chicken is a sad chicken. Keep an eye on it; once it’s cooked through, pull it. Remember, it’ll warm up again in the sauce.
Alternatives & Substitutions
Feeling adventurous? Or just out of a specific ingredient? No worries, we’ve got options!
- Protein Swap: Not a chicken fan today? This recipe works wonderfully with shrimp (cook for less time, obviously!), firm tofu (press it first!), or even pork tenderloin. Just adjust cooking times accordingly.
- Veggies Galore: Feel free to raid your fridge! Carrots, mushrooms, water chestnuts, baby corn – whatever makes your veggie heart sing can totally join the party.
- Sweetener Switch: If you’re out of honey or maple syrup, a little brown sugar or even a touch of stevia (if you’re into that) can work, but start small and taste as you go.
- Spicy Kick: Want to turn up the heat? Add a pinch of red pepper flakes to the sauce or a dash of sriracha when serving. Your tastebuds, your rules!
FAQ (Frequently Asked Questions)
Got questions? I probably have answers (or at least funny guesses).
- Can I make this ahead of time? Absolutely! Cook the chicken and make the sauce separately. Reheat the chicken, then warm the sauce and veggies, tossing everything together right before serving. The chicken will thank you for not sitting in sauce all day getting soggy.
- Is it really “healthy”? Like, for real? Compared to typical takeout? YES! We’re using lean protein, minimal oil, tons of fresh veggies, and natural sweeteners. It’s a huge step up. Does it mean you can eat the whole batch yourself? Probably not, but I’m not here to judge.
- What if I don’t have apple cider vinegar? Rice vinegar is your next best bet! White vinegar works in a pinch, but might be a bit sharper.
- My sauce isn’t thickening! What did I do wrong? Did you add enough cornstarch? Is it simmering long enough? Sometimes a tiny whisk of an extra half teaspoon of cornstarch mixed with a tablespoon of cold water, then stirred into the simmering sauce, is all it takes to fix it.
- Can I use frozen chicken? Yep, just make sure it’s fully thawed and patted dry before you toss it with cornstarch. Otherwise, it might get a bit watery.
- Why bother with all these steps when I can just order takeout? Because, my friend, you get to control the ingredients, the flavor, and the *health* factor! Plus, the satisfaction of making something this delicious from scratch? Priceless.
Final Thoughts
See? Who said healthy eating had to be boring or complicated? This Healthy Sweet And Sour Chicken is a testament to the fact that you can have your cake (or, well, your chicken) and eat it too, without any of the post-meal regret. It’s vibrant, flavorful, and seriously satisfying. So go ahead, whip up a batch, impress yourself (and maybe some actual friends, if you feel like sharing). You’ve earned those culinary bragging rights!


