So, you’re looking for a snack that feels like a hug but doesn’t require you to sell your soul to a sugar demon? And ideally, one that doesn’t involve an entire afternoon spent in the kitchen? My friend, you’ve landed in the right spot! We’re making **Healthy Granola Bars**, and trust me, they’re so good, you’ll wonder why you ever bought those cardboard-flavored ones from the store. Consider this your official invitation to join the “I-made-it-myself-and-it’s-actually-delicious” club.
Why This Recipe is Awesome
Let’s be real, life is busy. Who has time for complicated recipes that involve rare ingredients and a sous chef? Not me, and probably not you either! This recipe for healthy granola bars is basically **idiot-proof**. I’ve made it, and I’ve been known to set off the smoke detector making toast. So, if I can do it, you can definitely do it.
- It’s super quick, like, faster-than-delivery-pizza quick.
- **Customizable AF!** You like nuts? Add ’em. Hate raisins? Ditch ’em! This recipe is your canvas.
- No-bake option? Almost! A quick toast in the oven, and you’re golden.
- Actually good for you! Packed with wholesome ingredients that make your nutritionist proud (or at least not cringe).
- Your house will smell amazing. Seriously, better than any fancy candle.
Ingredients You’ll Need
Gather your troops! These are the heroes of our healthy snack adventure. Don’t worry, nothing too exotic here.
- 2 cups rolled oats: The OG base. Not instant oats, unless you want mush. We’re going for texture, baby!
- 1/2 cup nut butter: Almond, peanut, cashew – whatever floats your boat (or is currently in your pantry). Adds glorious stickiness and flavor.
- 1/2 cup sticky sweetener: Maple syrup or honey. Agave works too, if you’re feeling fancy. This is our glue and our sweet kiss.
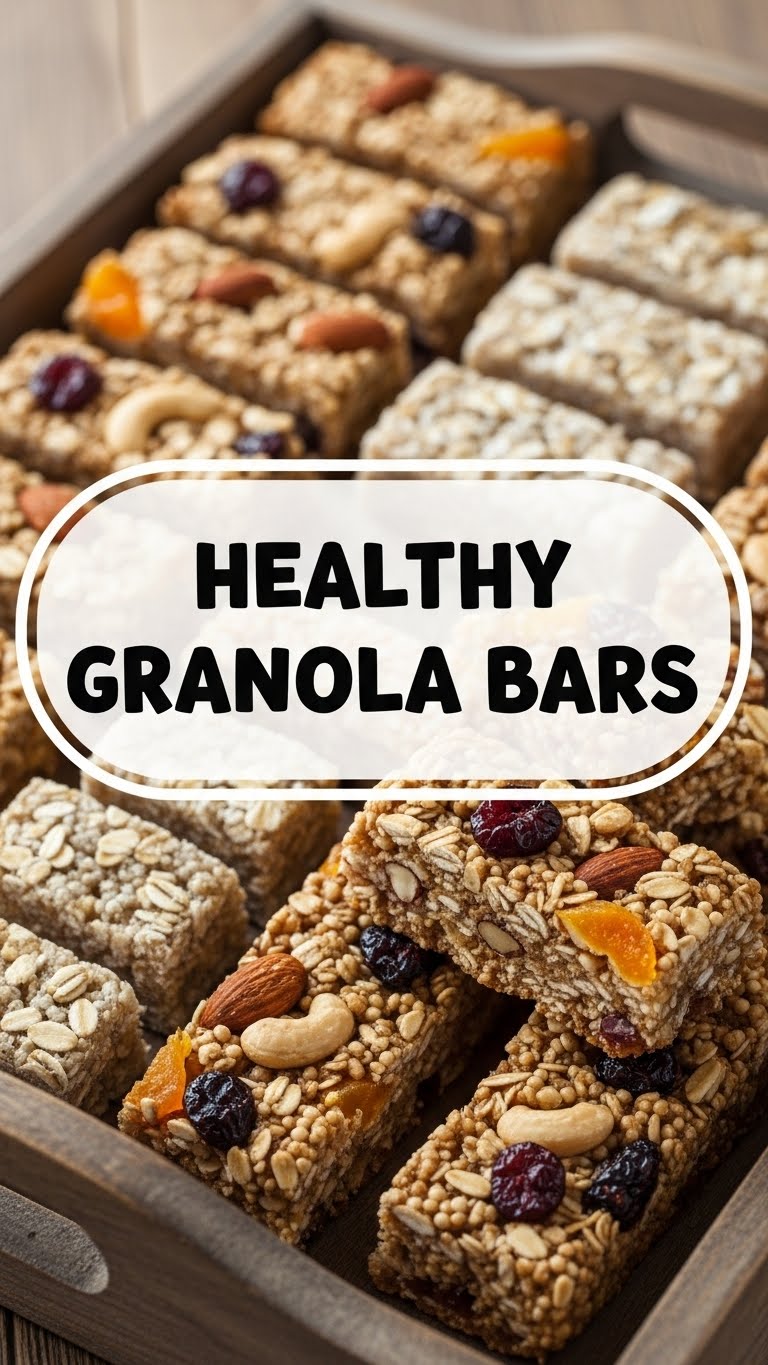
- 1/4 cup mix-ins: Think chocolate chips (dark, obviously, for health!), dried fruit (cranberries, apricots, whatever you can find hiding in your cupboards), chopped nuts, or seeds. This is where the party happens!
- 1/4 cup protein powder (optional): Vanilla or unflavored. Gives it that extra oomph and makes you feel like a fitness guru.
- 1 tsp vanilla extract: Because everything’s better with vanilla, IMO.
- Pinch of salt: Balances out all that sweetness. Don’t skip it, it’s a flavor enhancer!
Step-by-Step Instructions
Alright, apron on (or don’t, I won’t tell). Let’s get this party started!
- **Preheat Power:** Get your oven preheating to 300°F (150°C). While it’s warming up, line an 8×8 inch baking dish with parchment paper, leaving an overhang on the sides. This makes removal a breeze, trust me.
- **Oats on the Scene:** Spread your rolled oats on a baking sheet. Pop them into the preheated oven for about 10-15 minutes, or until lightly golden and smelling toasty. This step is crucial for flavor and texture – **don’t skip it!**
- **Melt & Mingle:** While the oats are toasting, in a large microwave-safe bowl (or a saucepan on low heat), combine your nut butter, sticky sweetener, vanilla extract, and pinch of salt. Microwave for 30-60 seconds, or heat gently on the stove, until everything is warm and easy to stir together. It should be a lovely, smooth concoction.
- **Combine Forces:** Once your oats are toasted, add them to the wet mixture in the bowl. Stir well until the oats are fully coated. Now, fold in your chosen mix-ins and the optional protein powder. Make sure everything is evenly distributed – every bar deserves some love!
- **Press & Chill:** Pour the mixture into your prepared baking dish. Using the back of a spoon or your (clean!) hands, **press the mixture down VERY firmly**. We’re talking serious compaction here. The firmer you press, the less likely your bars are to crumble later.
- **Patience is a Virtue:** Pop the dish into the fridge for at least 2 hours, or even better, overnight. This chilling time is essential for the bars to set properly. No peeking!
- **Slice & Conquer:** Once fully chilled and firm, lift the entire block out of the dish using the parchment paper overhang. Place it on a cutting board and slice into your desired bar size. Enjoy your homemade, healthy goodness!
Common Mistakes to Avoid
We all make mistakes, but let’s try to avoid these rookie errors, shall we? Learn from my past granola bar disasters!
- **Forgetting to toast the oats:** Yes, it adds a step. But skipping it means bland, raw-tasting bars. And who wants that?
- **Not pressing firmly enough:** This is probably the biggest culprit for crumbly bars. You need to channel your inner bodybuilder and really squish it down. Think of it as stress relief.
- **Cutting them too soon:** Impatience is your enemy here. If they’re not fully chilled, they’ll fall apart faster than my New Year’s resolutions.
- **Using instant oats:** These absorb too much liquid and will give you a sad, gummy texture. Stick to old-fashioned rolled oats for best results.
- **Overdoing the wet ingredients:** While tempting, too much nut butter or sweetener can make your bars too soft and sticky, making them hard to hold. Stick to the ratios!
Alternatives & Substitutions
Feeling creative? Or just missing an ingredient? No worries, we’ve got options! This recipe is incredibly forgiving.
- **Nut Butter Swap:** Out of peanut butter? Almond butter, cashew butter, sunflower seed butter (for nut-free folks) all work beautifully. Just make sure it’s a smooth, drippy kind, not too thick or crunchy.
- **Sweetener Switch-up:** Honey or maple syrup are interchangeable. You can also use brown rice syrup for an even chewier texture, though it’s a bit thicker.
- **Mix-in Madness:** The world is your oyster!
- **Nuts & Seeds:** Chia seeds, flax seeds, pumpkin seeds, sunflower seeds, chopped almonds, walnuts, pecans. Add a mix for extra nutrients and crunch.
- **Dried Fruit:** Raisins, dried cranberries, chopped apricots, dates, cherries. Just watch out for super sticky dates, they might need a chop.
- **Chocolate:** Dark chocolate chips, white chocolate chunks, cacao nibs. Because a little chocolate never hurt anyone.
- **Spices:** A pinch of cinnamon or nutmeg can add a lovely warm flavor.
- **Make it Vegan:** Simply use maple syrup (not honey) and ensure your chocolate chips are dairy-free. Easy peasy!
FAQ (Frequently Asked Questions)
Got questions? I’ve got (casual) answers!
- Can I make these gluten-free?
- Absolutely! Just make sure your rolled oats are certified gluten-free. Oats are naturally GF, but cross-contamination can occur during processing.
- How long do these last?
- Stored in an airtight container in the fridge, they’ll happily hang around for about a week. If they last that long, that is!
- Can I bake them instead of chilling?
- You could, but they tend to be softer and more cookie-like rather than firm bars. If you want a truly no-bake version, ensure your oats are quick oats (though I prefer toasted rolled oats for texture). For firm, chewy bars, chilling is king!
- My bars are too crumbly, help!
- Did you press them down firmly enough? That’s usually the main culprit. Also, ensure you used enough sticky sweetener and nut butter, and that they were properly chilled.
- What if I don’t have parchment paper?
- You can grease the dish very well, but trust me, parchment paper makes life SO much easier for getting the block out cleanly. It’s worth the extra step!
Final Thoughts
And there you have it, folks! Your very own batch of healthy, homemade granola bars. You’ve officially conquered the snack game. Now go forth, enjoy your delicious creations, and maybe even share one… or five. You’ve earned this, you culinary wizard, you! Don’t be shy about experimenting with your favorite mix-ins next time, BTW. Happy snacking!


