So you’re craving something tasty, something that feels like a treat, but also, you know, doesn’t secretly judge you for eating it? And let’s be real, you’re probably too lazy to spend forever in the kitchen, huh? Same, friend, *same*. We’ve all been there, staring into the abyss of the fridge, hoping a healthy, delicious snack will magically appear. Well, guess what? Today, we’re making that magic happen, but with minimal effort and maximum deliciousness. Say hello to your new best friend: Healthy Cereal Bars!
Why This Recipe is Awesome
Because let’s be honest, life’s too short for bland, crumbly “health” bars that taste like cardboard. This recipe? It’s the MVP of snack time. First off, it’s pretty much **idiot-proof**. Seriously, if I can make these without setting off the smoke alarm (which is my usual culinary superpower), you’re golden. They’re no-bake, meaning your oven can chill while you do the heavy lifting (aka, stirring). They’re packed with good-for-you ingredients that actually keep you full, unlike those tiny, unsatisfying things you grab at the store. Plus, they’re super customizable, so you can basically create your own flavor symphony. Think of it as a delicious, wholesome, energy-boosting hug for your taste buds.
Ingredients You’ll Need
Gather ’round, my fellow lazy gourmands! Here’s your shopping list for snack salvation. Don’t worry, most of these are probably chilling in your pantry already.
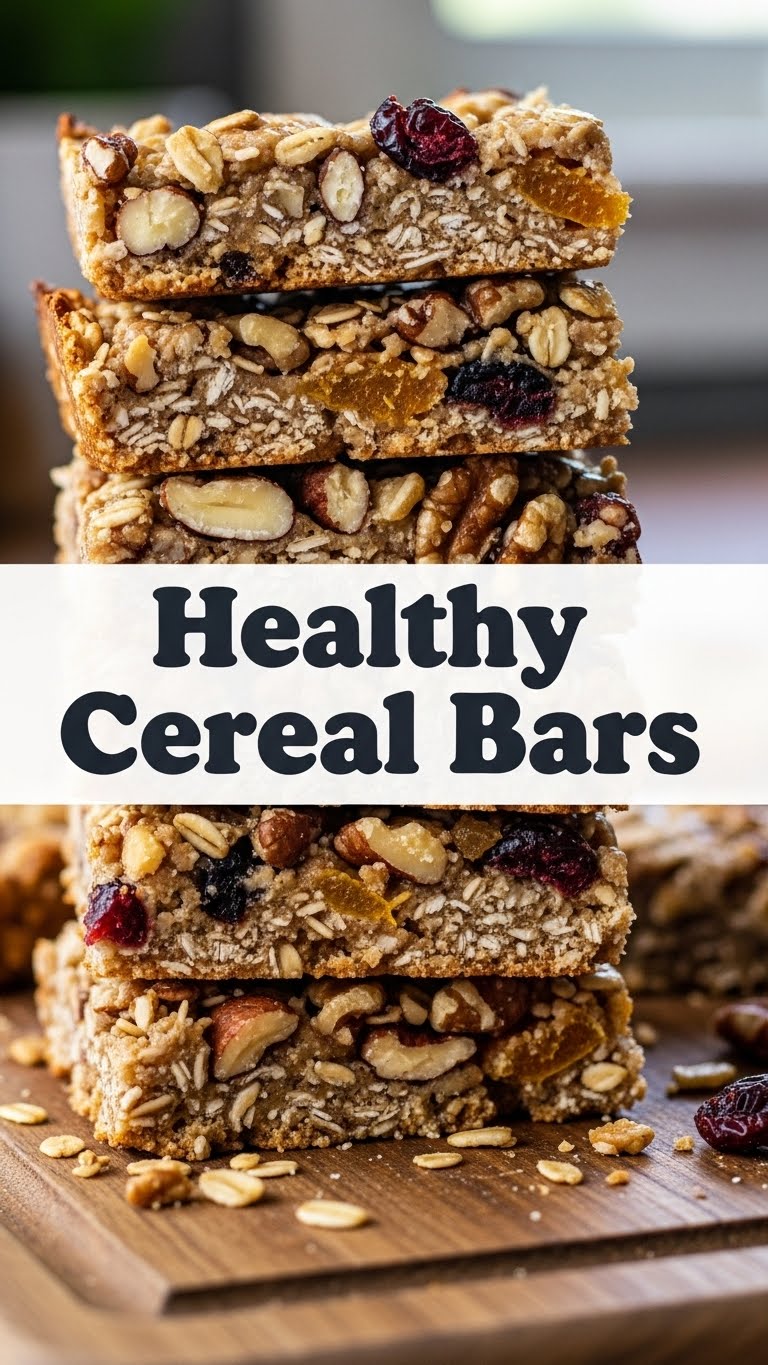
- 2 cups Rolled Oats: The OG base. Not instant, please! We need some texture here, not mush.
- 1/2 cup Creamy Nut Butter: Peanut, almond, cashew – whatever floats your boat. This is the superglue of our operation. Make sure it’s the natural kind, no added sugar if possible.
- 1/2 cup Honey or Maple Syrup: Your choice of liquid gold! Adds sweetness and helps bind everything together.
- 1/4 cup Coconut Oil: Melted, please. Adds a lovely richness and helps them set up perfectly.
- 1 tsp Vanilla Extract: Because everything’s better with a splash of vanilla, right?
- 1/4 tsp Salt: Don’t skip this! It really enhances all the other flavors. Trust me.
- Optional Mix-ins (1/2 cup total):
- Mini Chocolate Chips (because you deserve joy)
- Chopped Nuts (almonds, walnuts, pecans for extra crunch)
- Dried Fruit (cranberries, raisins, chopped apricots for chewiness)
- Chia Seeds or Ground Flaxseed (for that extra omega-3 boost, you health guru, you!)
Step-by-Step Instructions
Alright, let’s get this party started! No complicated steps, just pure, unadulterated snack-making bliss.
- First things first: Line an 8×8 inch square baking pan with parchment paper, leaving an overhang on the sides. This makes lifting them out later a breeze. You’ll thank me.
- In a medium microwave-safe bowl (or a saucepan over low heat), combine the nut butter, honey (or maple syrup), and coconut oil. Heat gently until everything is melted and smooth. Give it a good whisk!
- Stir in the vanilla extract and salt into your melted mixture. In a separate large bowl, combine the rolled oats and any of your chosen mix-ins. This is where you get to be creative!
- Pour the warm wet mixture over the dry oats and mix-ins. Stir, stir, stir until everything is evenly coated. Make sure every oat feels the love.
- Transfer the mixture to your prepared pan. Now, this is the crucial part: **Press it down firmly and evenly.** Use the back of a spoon, a spatula, or even your hands (lightly greased if it’s too sticky). The harder you press, the less crumbly your bars will be.
- Pop the pan into the fridge for at least 1-2 hours, or until the bars are completely firm. Patience is a virtue, especially when deliciousness is involved.
- Once firm, use the parchment paper overhang to lift the entire slab out of the pan. Place it on a cutting board and slice into 10-12 bars. Now, go impress someone—or yourself—with your new culinary skills. You’ve earned it!
Common Mistakes to Avoid
Listen, we all make mistakes. It’s part of the fun! But with these tips, you can avoid the most common pitfalls of cereal bar creation.
- Not Pressing Firmly Enough: This is probably the number one culprit for crumbly bars. Seriously, put some muscle into it! Imagine you’re trying to flatten out all your life’s problems.
- Not Chilling Long Enough: Trying to cut warm, soft bars is like trying to build a sandcastle with dry sand – it’s just going to fall apart. **Give them time to firm up!**
- Too Much Liquid (or too little): Follow the recipe ratios. Too much nut butter/sweetener and they might be too soft; too little and they’ll be dry and crumbly. It’s a delicate balance, like finding the perfect Netflix show.
- Using Instant Oats: Just… don’t. Instant oats will give you a gloopy, mushy texture. We want a satisfying chew, not baby food.
- Cutting Too Soon: Similar to not chilling enough. Don’t be impatient! A quick cut leads to a sad, fractured bar.
Alternatives & Substitutions
This recipe is practically a blank canvas for your snack-making artistry! Feel free to play around.
- Nut Butter Swaps: Not a peanut butter fan? Almond, cashew, or even sunflower seed butter (for nut-free options!) work beautifully. Just make sure they’re creamy, not chunky.
- Sweetener Options: Agave nectar or brown rice syrup can be used instead of honey/maple syrup. Just be aware of slight flavor and texture changes. For a less sweet bar, you can slightly reduce the amount.
- Gluten-Free: The recipe is already naturally GF if you use certified gluten-free oats. Easy peasy!
- Vegan Vibes: Use maple syrup instead of honey, and opt for vegan chocolate chips. Boom, fully plant-based deliciousness!
- Mix-in Mania: The world is your oyster! Try shredded coconut, pumpkin seeds, hemp seeds, dried cranberries, white chocolate chips, a sprinkle of cinnamon, or even a dash of orange zest. Get wild!
FAQ (Frequently Asked Questions)
Got questions? I’ve got (casual and hopefully amusing) answers!
- How long do these magical bars last?
In an airtight container in the fridge, they’ll happily hang out for about a week. If they even last that long, that is. Mine usually disappear by day three, *ahem*.
- Can I bake these instead of chilling?
Nah, these are specifically designed for the no-bake life! Baking might dry them out or make them a bit too hard. Let your fridge do the work.
- Are they *really* healthy? They taste too good!
Okay, “healthy” is a spectrum, right? But compared to many store-bought bars loaded with weird ingredients and refined sugar, these are a total winner. Whole grains, healthy fats, natural sweeteners – you’re doing great, sweetie!
- My bars are falling apart! What did I do wrong?
Most likely culprit: not enough pressing or not enough chill time. Seriously, get in there and press ’em down like you’re trying to win an arm wrestling match with the pan. And then, **chill** (literally!).
- Can I omit the coconut oil?
You *can*, but it might affect the texture and how well they set. The coconut oil adds a lovely binding quality and a subtle richness. If you skip it, your bars might be a bit softer or more prone to crumbling. Proceed with caution!
Final Thoughts
And there you have it, folks! Your new go-to recipe for when you want something satisfying, nutritious, and ridiculously easy. These healthy cereal bars are perfect for a quick breakfast on the go, a post-workout refuel, or just a little pick-me-up when the 3 PM slump hits. So, ditch the boring snacks, grab your oats, and get ready to impress yourself with your newfound culinary prowess. You’ve totally got this! Now go forth and snack wisely (and deliciously)!


