So, you’ve scrolled through Instagram for hours, drooling over those impossibly gorgeous, vibrant bowls that look like edible art, right? And then you glance at your sad, brown-ish dinner and think, “How do they *do* that?!” Well, friend, put down that pity-party spoon because today we’re cracking the code on the **Healthy Bowl Aesthetic**. It’s not just about eating well; it’s about making your food look so good, you almost don’t want to eat it. (Almost. Let’s not be crazy.)
Why This Recipe is Awesome
Honestly? Because it’s a cheat code for looking like a culinary genius without, you know, actually being one. This isn’t really a “recipe” in the traditional sense, more like a *framework* for assembling something ridiculously good-looking and ridiculously good-for-you. It’s totally customizable, so you can literally use whatever odds and ends are lurking in your fridge (we’ve all got ’em). Plus, it’s **idiot-proof**. Seriously, if I can make my bowl look like it belongs in a magazine, so can you. No fancy cooking skills required, just a bit of artistic flair and a willingness to embrace the “pile it high and make it pretty” philosophy.
Ingredients You’ll Need
Think of these as your building blocks for a masterpiece. Don’t worry, we’re not getting overly prescriptive here – mix and match based on what makes your taste buds sing (and your eyes happy!).
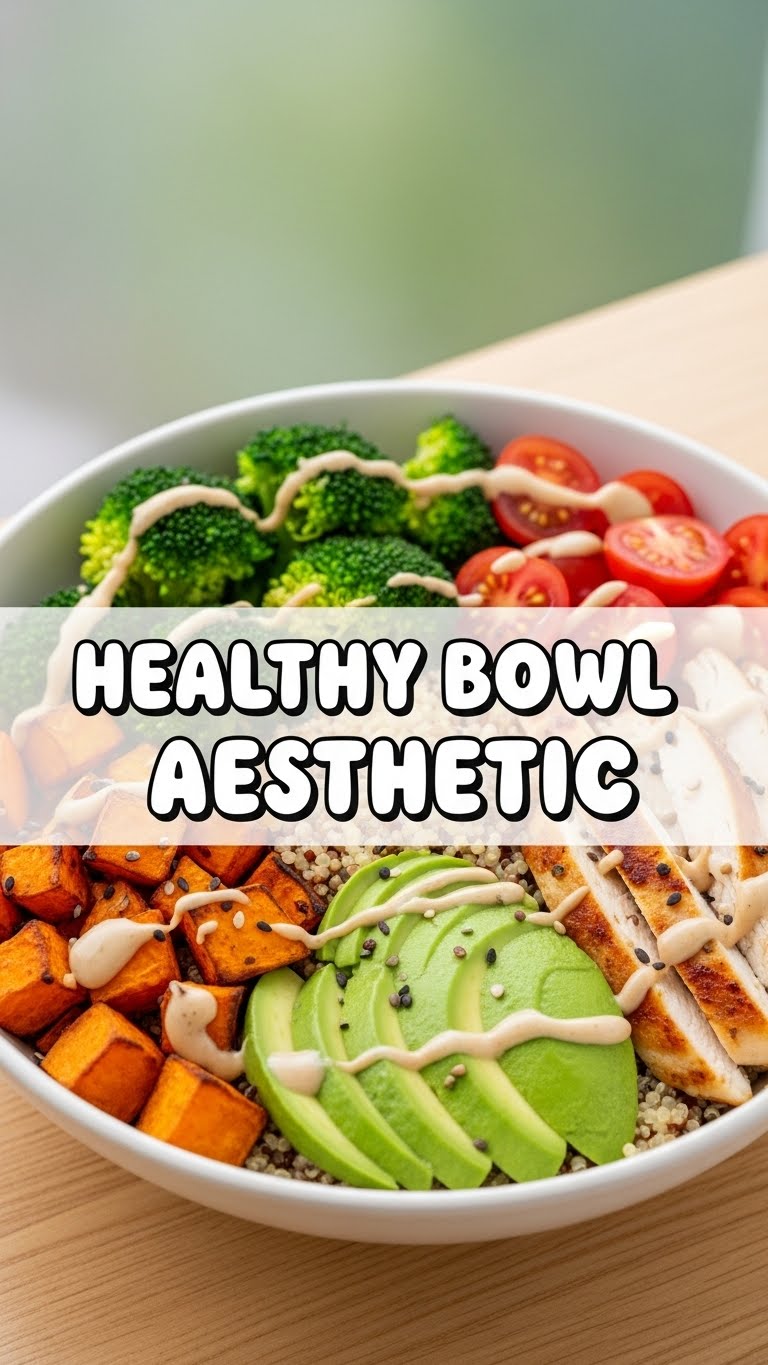
- **Your Base (The Foundation):**
- Cooked Grains: Quinoa, farro, brown rice, couscous. Or if you’re feeling leafy, a generous bed of spinach, mixed greens, or kale. Think sturdy, not wilt-y.
- **Your Protein (The Muscle):**
- Baked or grilled chicken/fish (salmon is a winner for color!), hard-boiled eggs, roasted chickpeas, lentils, tofu, tempeh. Whatever keeps you full and happy!
- **Your Veggies (The Color Palette):**
- Roasted sweet potatoes, bell peppers (all the colors!), broccoli, asparagus.
- Fresh stuff: Sliced cucumber, cherry tomatoes, shredded carrots, radish slices. **Vibrancy is key here!**
- **Your Healthy Fats (The Creaminess & Crunch):**
- Avocado (sliced or diced – a non-negotiable for aesthetic points, IMO!), a sprinkle of nuts (almonds, walnuts) or seeds (pumpkin, sunflower, chia).
- **Your Dressing (The Flavor Bomb):**
- A light vinaigrette, tahini dressing, a squeeze of lemon juice with olive oil. Something that ties it all together without drowning your art.
- **Your Garnish (The Sparkle):**
- Fresh herbs (cilantro, parsley, dill), a sprinkle of sesame seeds, chili flakes. These are literally the “chef’s kiss.”
Step-by-Step Instructions
This is where the magic happens. We’re assembling, not just dumping. Think of yourself as a food stylist.
- **Prep Your Components:** First things first, get all your ingredients cooked, chopped, and ready. This is the secret to a stress-free assembly. No one wants to chop while hangry.
- **Lay Down the Base:** Grab a wide, shallow bowl – it’s your canvas! Start with your greens or grains, spreading them out evenly. Don’t be shy; build a good foundation.
- **Arrange Your Protein:** Place your protein artfully on one side of your base. Slice chicken or fish nicely, or make a neat pile of chickpeas. We’re going for organized yumminess.
- **Add Your Veggies:** This is where you get to play with color and texture! Arrange different veggies in separate sections around your protein. Think “mini piles” rather than one big messy heap. **Bright colors next to contrasting ones make it pop!**
- **Incorporate Healthy Fats:** Tuck in your avocado slices or sprinkle your nuts/seeds over a section. Avocado slices fanned out? Pure genius.
- **Drizzle with Dressing:** This is important! Drizzle your dressing *over* your bowl, not just dump it in the middle. A beautiful swirl or line makes it look intentional and delicious.
- **Finish with Garnish:** Sprinkle those fresh herbs, sesame seeds, or chili flakes right at the end. These little touches elevate your bowl from “dinner” to “dining experience.” Take a picture! You earned it.
Common Mistakes to Avoid
Look, we all make ’em. But let’s learn from the past, shall we?
- **The Over-Dressed Disaster:** Drowning your beautiful bowl in dressing is a rookie mistake. It makes everything soggy and sad. **Start light, you can always add more.**
- **The Brown-On-Brown Blues:** If all your ingredients are the same beige or brown color, your bowl won’t look appealing. Think about contrasting colors! Add something red, green, or orange.
- **The “Everything Just Dumped In” Effect:** While convenience is king, simply tossing everything into the bowl doesn’t create that aesthetic vibe. Take an extra 30 seconds to arrange things. It makes a HUGE difference.
- **Forgetting Textures:** A good bowl has a mix of textures: crunchy, soft, chewy. Don’t just have one kind of texture, or it’ll be boring.
Alternatives & Substitutions
This is where you get to be the boss. Don’t have something? Swap it out!
- **Grain Game:** No quinoa? Brown rice works! Sweet potatoes roasted are also an awesome base. Want low-carb? Pile on the greens!
- **Protein Power-Up:** Not a fan of chicken? Try grilled halloumi, edamame, or even a can of tuna (drained, obviously, let’s keep it classy).
- **Veggie Vibes:** Use whatever’s in season! Asparagus can be swapped for green beans, bell peppers for carrots. Fresh herbs make almost anything better, IMO.
- **Sauce Swaps:** Bored of vinaigrette? A peanut sauce, a zesty lime dressing, or even just some good old balsamic glaze can change the whole vibe. Get creative!
FAQ (Frequently Asked Questions)
- **Can I use frozen veggies?** Totally! Just make sure they’re cooked properly and pat them dry so they don’t add extra water to your bowl. Nobody likes a watery bowl.
- **How long do these bowls last in the fridge?** If you keep the dressing separate, most components will last 3-4 days. It’s a meal prep superstar!
- **What if I don’t like avocado? Is my bowl doomed?** Heavens no! While it’s a star for aesthetics, you can totally skip it. Try toasted nuts for crunch, or a dollop of hummus for creaminess.
- **Do I *have* to use a wide, shallow bowl?** For maximum aesthetic points, yes. It gives you more surface area to arrange things beautifully. A deep bowl just encourages piling.
- **My veggies look a bit sad after cooking. Any tips?** **Don’t overcook them!** Keep a little crunch, and if you’re roasting, try not to overcrowd the pan. A little char is good, mushy is not.
- **What makes a bowl truly “aesthetic”?** Contrast! Contrast in colors, textures, and even shapes. And then, a little intentional arrangement instead of just plopping things down. It’s like styling an outfit!
Final Thoughts
So there you have it, folks! The secret sauce (pun intended) to creating healthy bowls that look so good, you’ll actually *want* to eat them. It’s less about strict rules and more about playing with colors, textures, and a dash of plating magic. Now go forth and create your edible masterpiece! And hey, if it doesn’t look perfect the first time, who cares? It’ll still taste amazing, and that’s the main goal, right? **Now go impress someone—or yourself—with your new culinary skills. You’ve earned it!**

